Loading...
Loading...
Loading...
Loading...
Loading...
Loading...
Loading...
Loading...
Loading...
Loading...
Loading...
Loading...
Loading...
Loading...
Loading...
Loading...
Loading...
Loading...
Loading...
Loading...
Loading...
Loading...
Welcome to the Somnia docs. Here, you will find guides and explanations of all the metaverse apps built on Somnia. We also have all the guides, examples and links to references for creators.
Create your first avatar and go through our getting started guides.
More Soon!
Coming soon!
Go to the playground from the Somnia betanet page or go to https://playground.somnia.network/
Click the world you created using the create your first world guide. Then click the jump-in button.
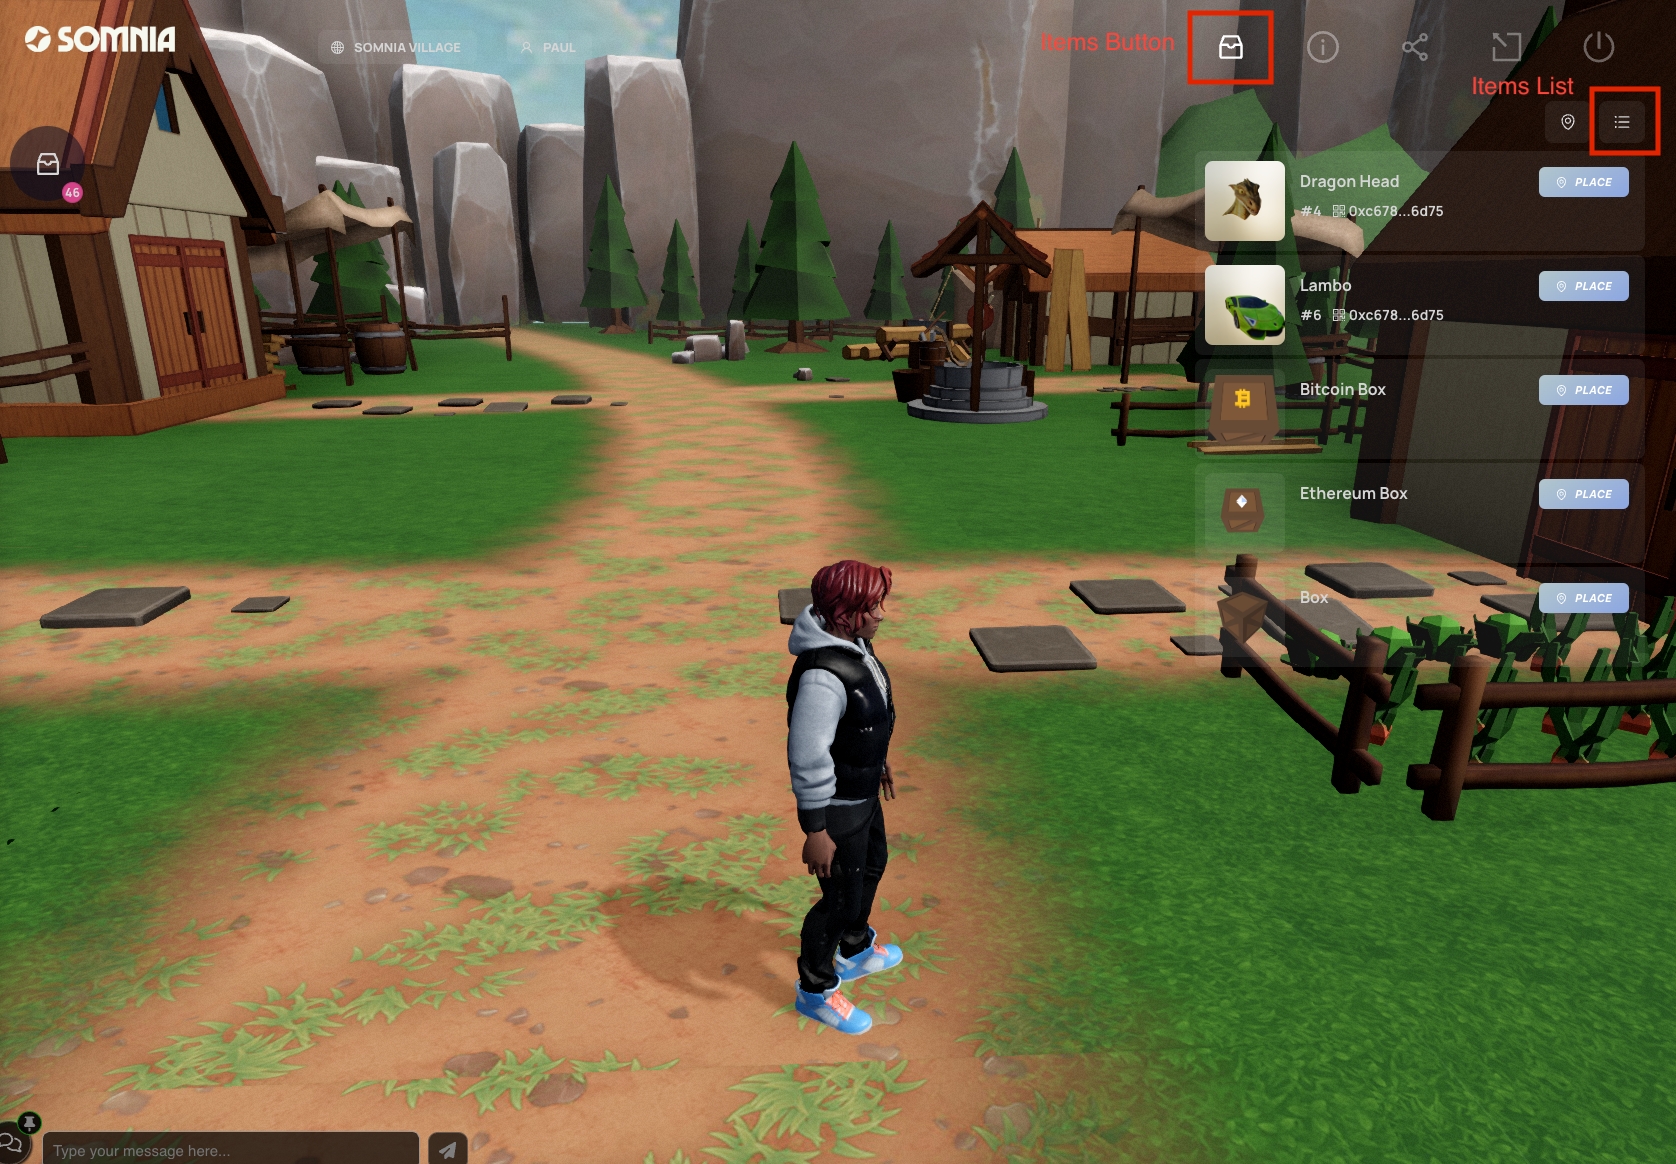
Select the items menu in the top right and then the item list button.
Here, you can select an item from the list you want to place. Then click the place button.
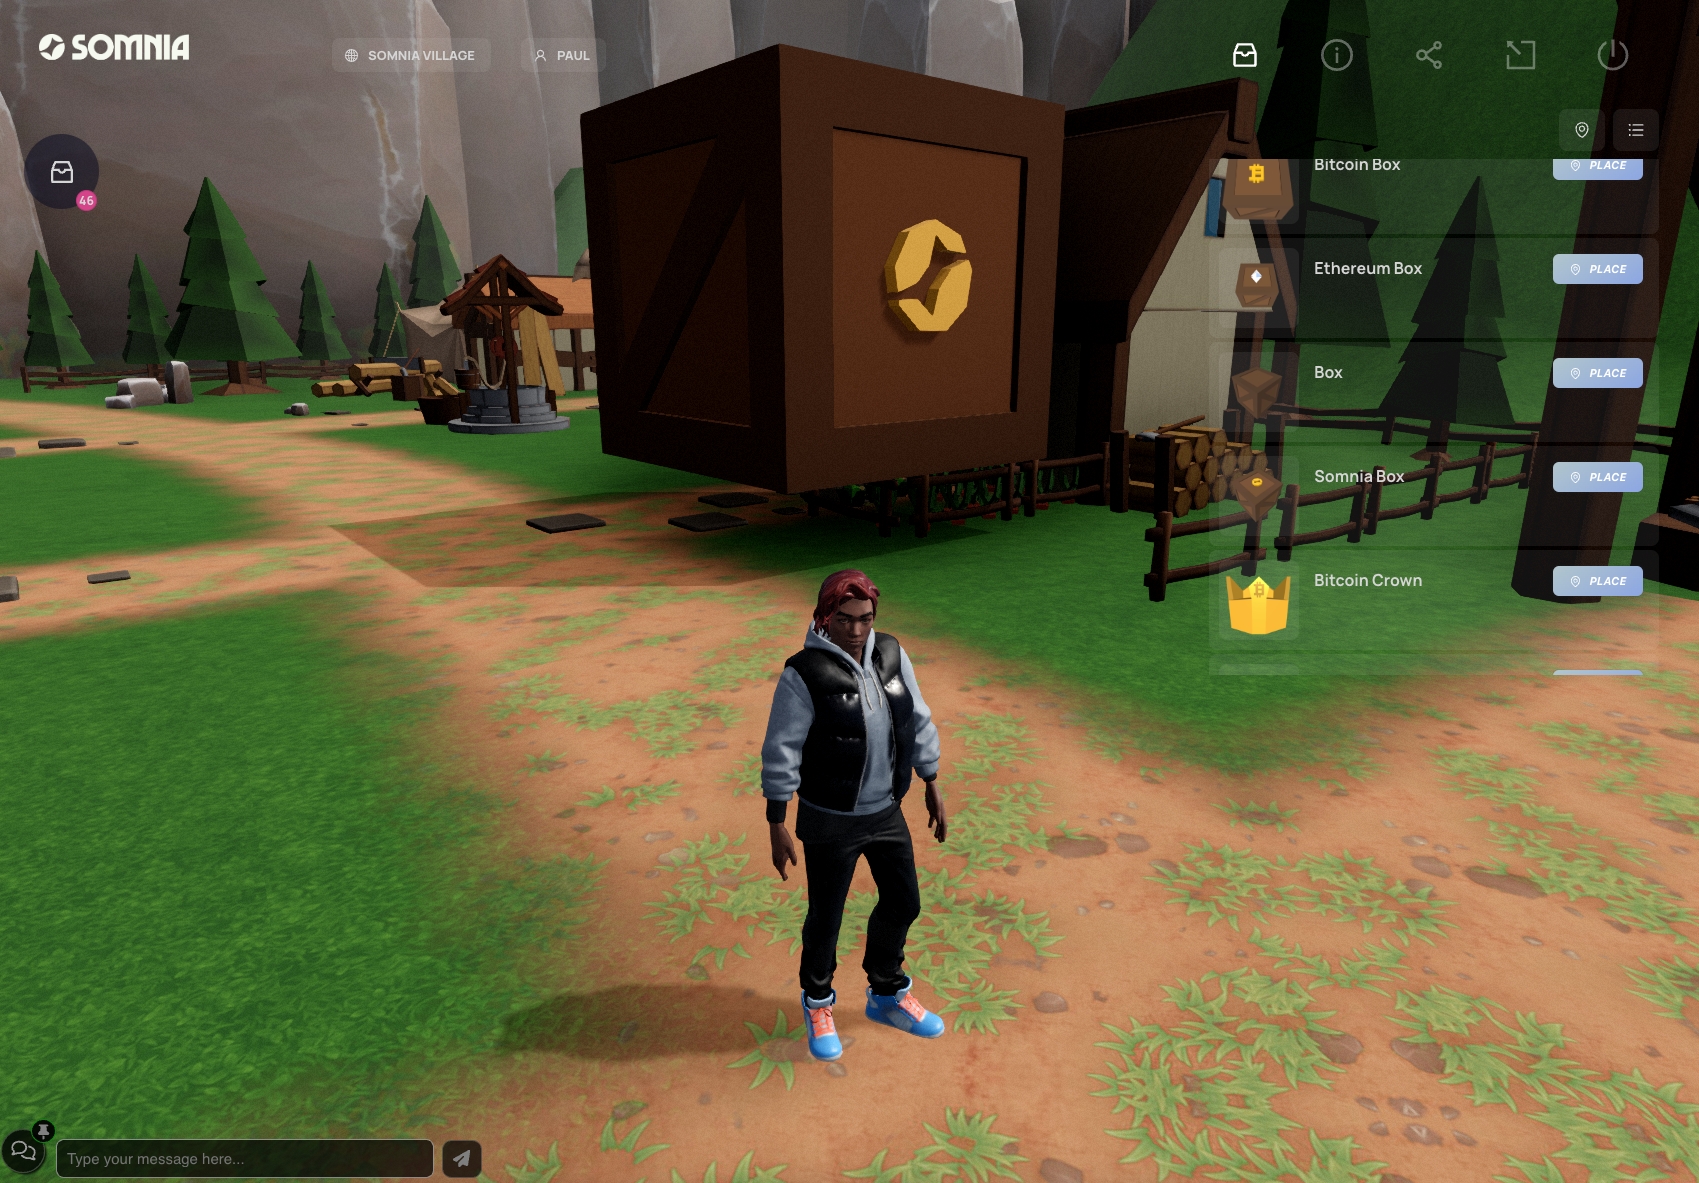
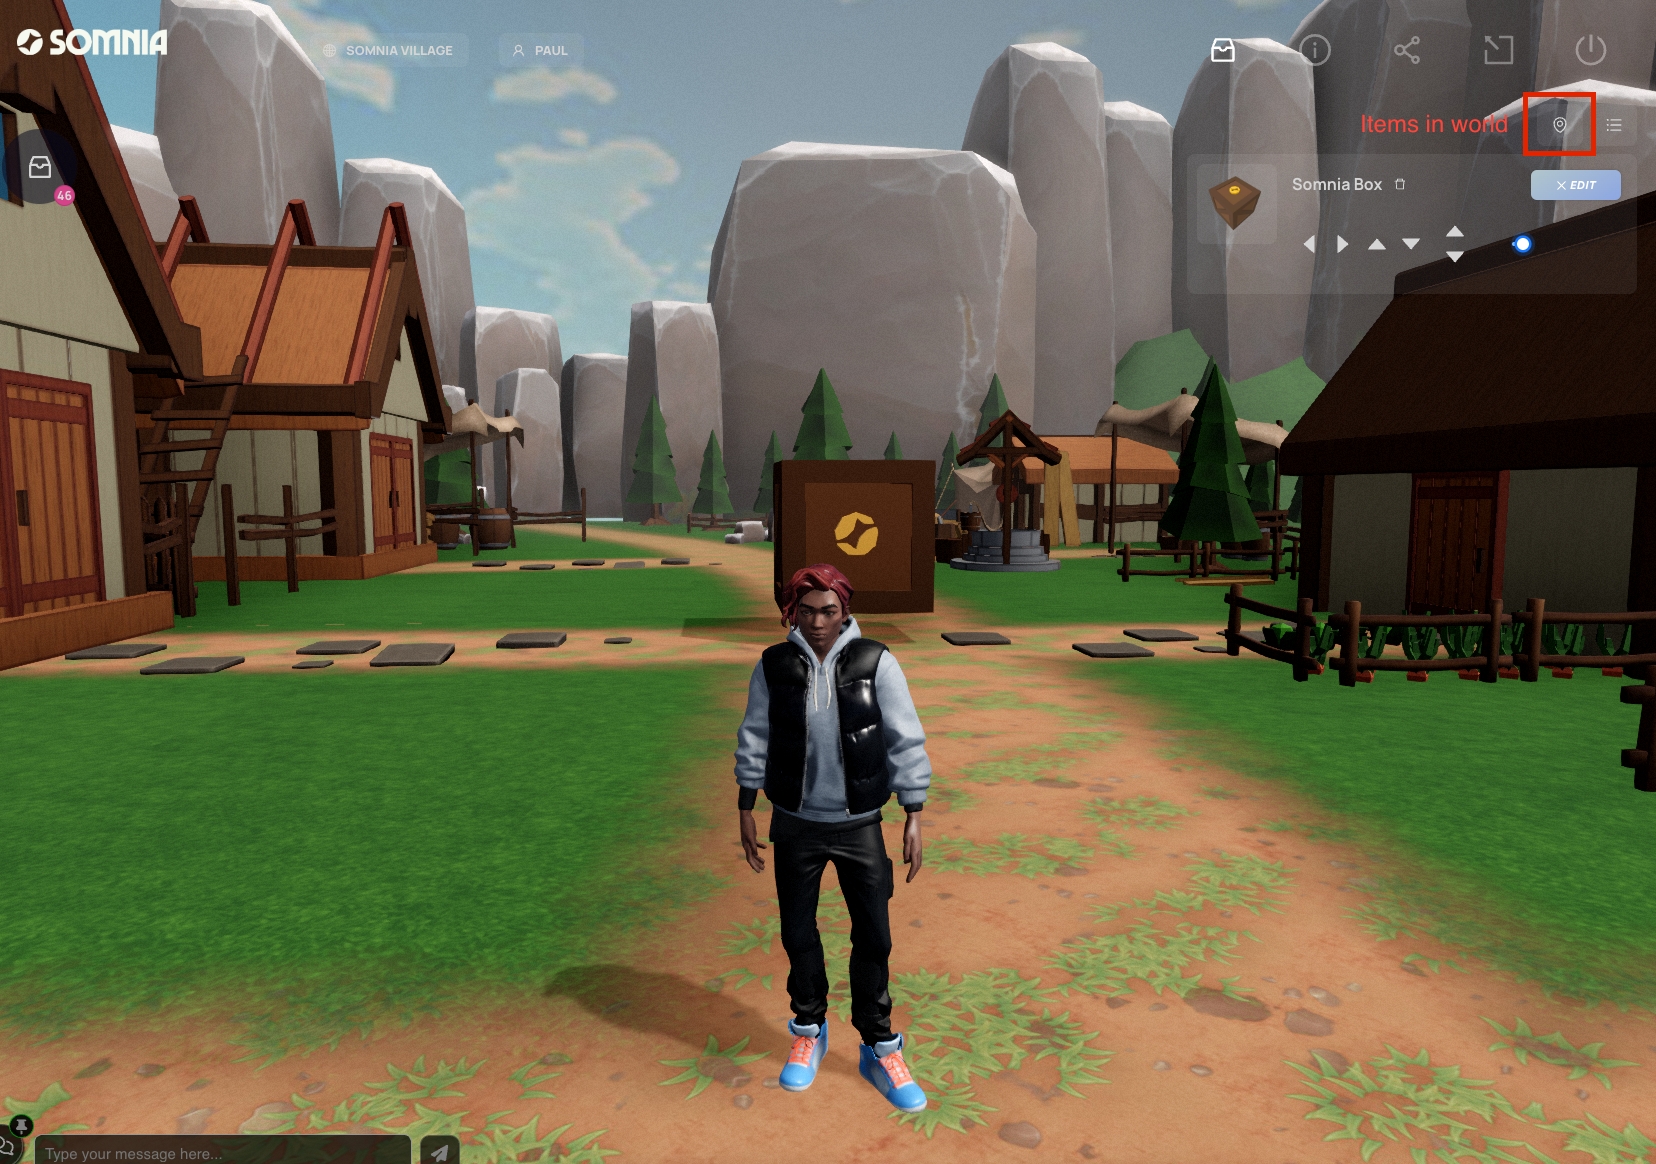
Here we have placed the Somnia box into the playground! You can edits it's size and position by going to the items in world list, selecting edit on the item which will allow you to move and resize it.
You can place many items and customize your playground however you want! These items will persist between sessions, so when you log in, they will still be there. Learn how you can make your own custom objects with the Create First Object guide.
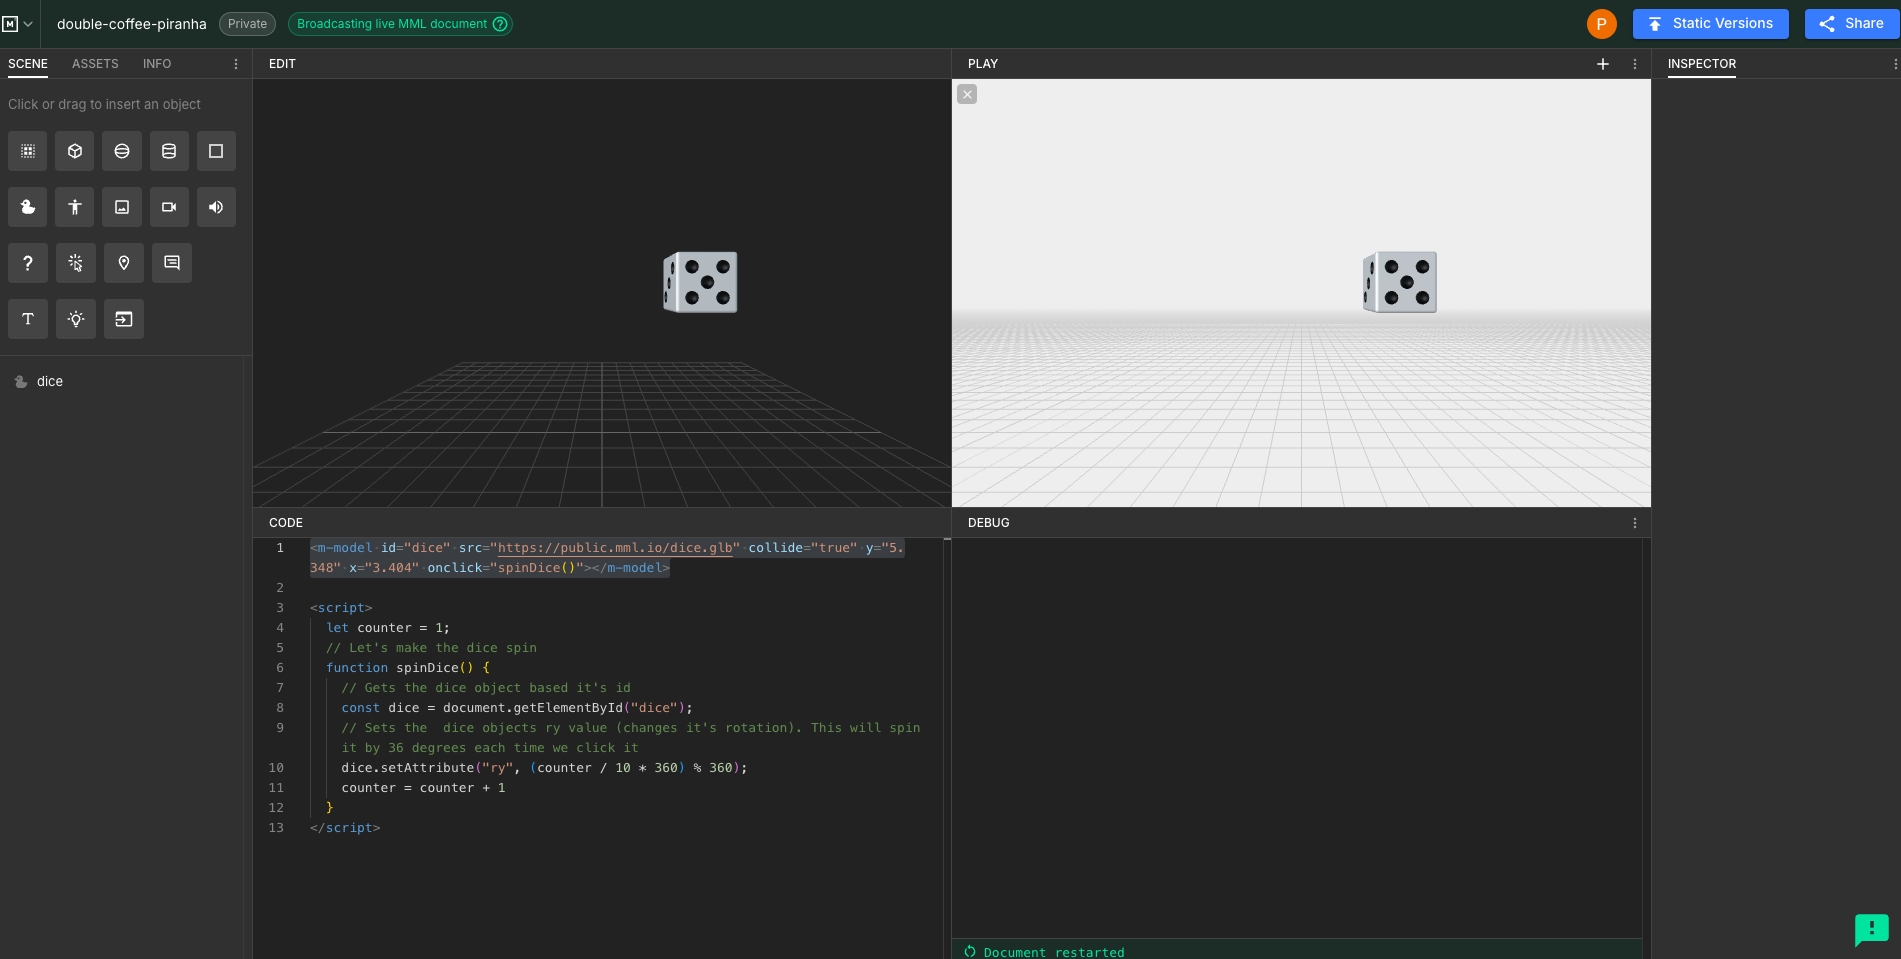
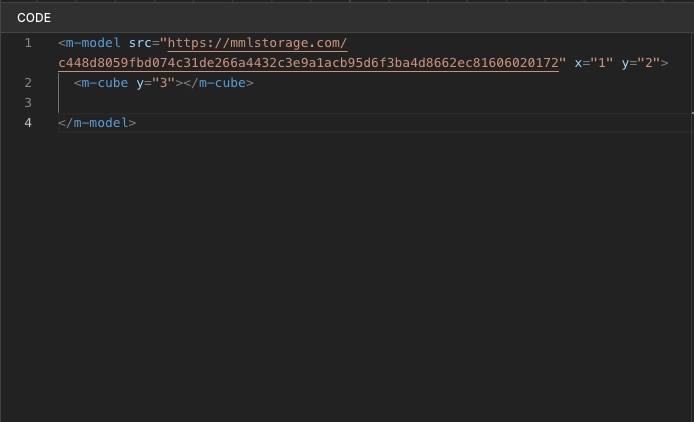
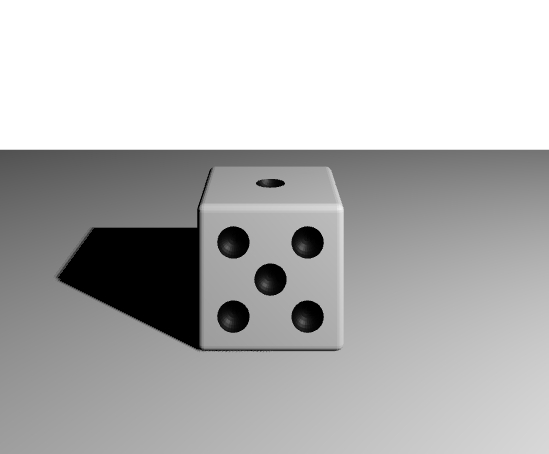
We will create a simple dice that spins when we click it.
We are first going to create a 3d dice model.
First create a new project. Head over to and click the create project button:
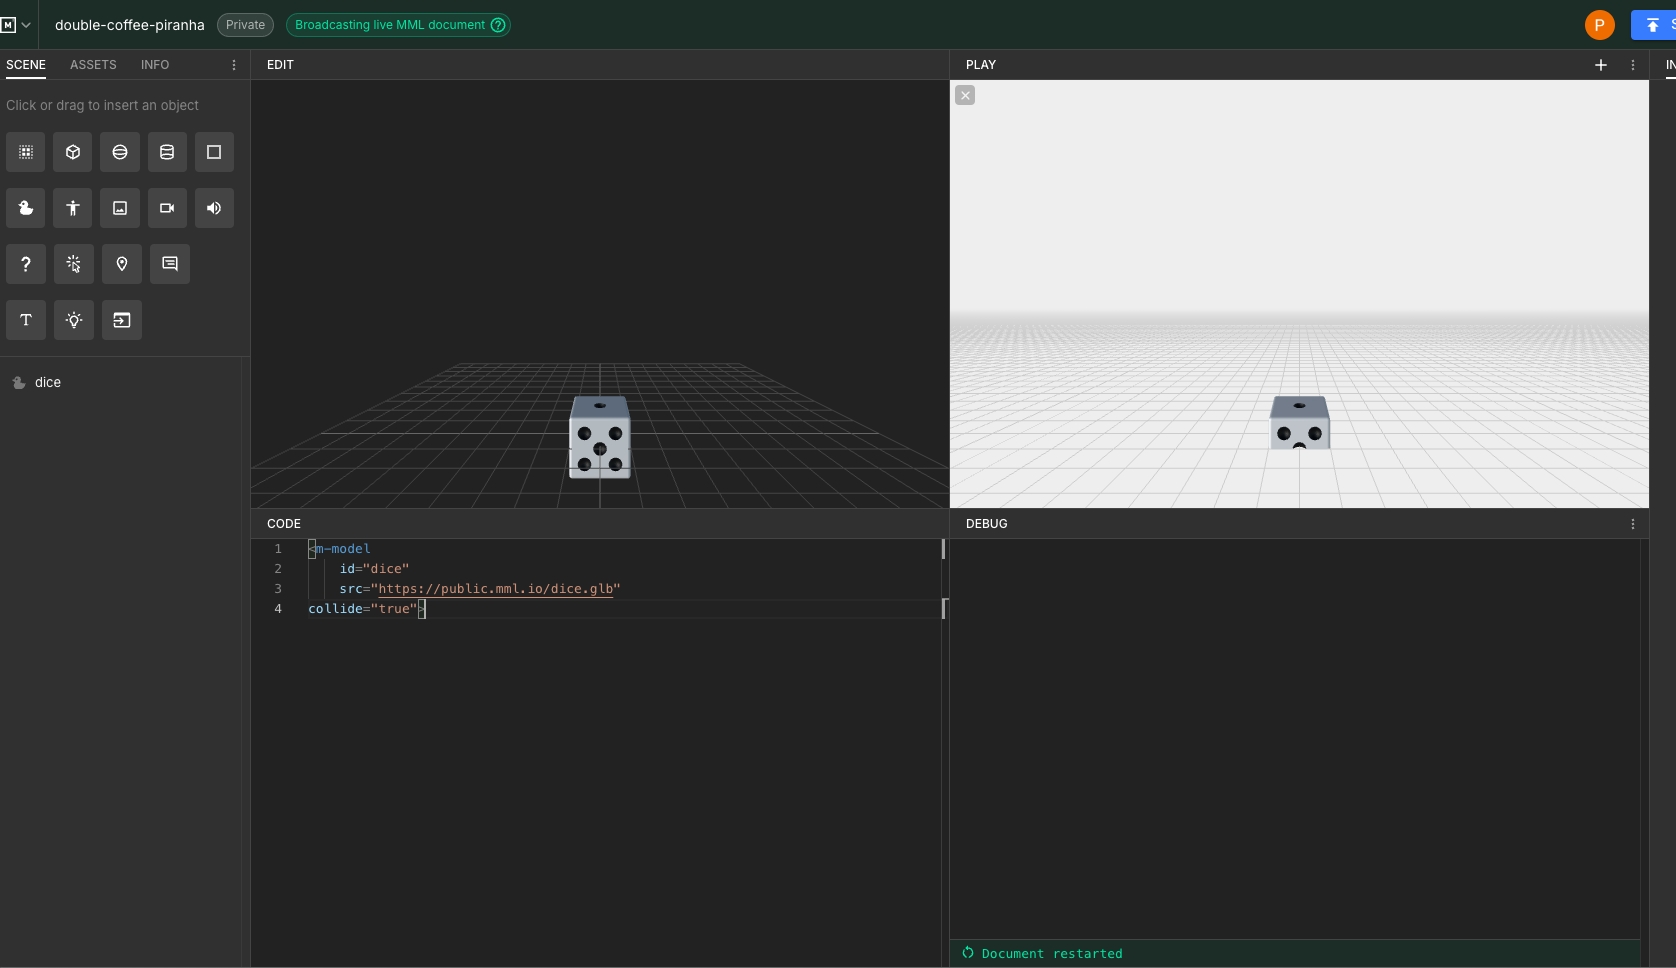
If you want to learn about the different parts of the mml editor you can go to this guide. If you just want to create the object click the code editor window and add the following code:
This code is one of the simplest primitives in MML. It creates a 3d model of an object. The <m-model> tag tells the interpreter this is a model. The id is used to give the object and id, which we can later reference in code to manipulate the object. The src parts point to where the 3d model of the object is. This would be on some storage solution. The collide tag means that if other objects or avatars touch this object, it will have collisions. You can find all the tags associated with an m-model here
Your editor should now look like this:
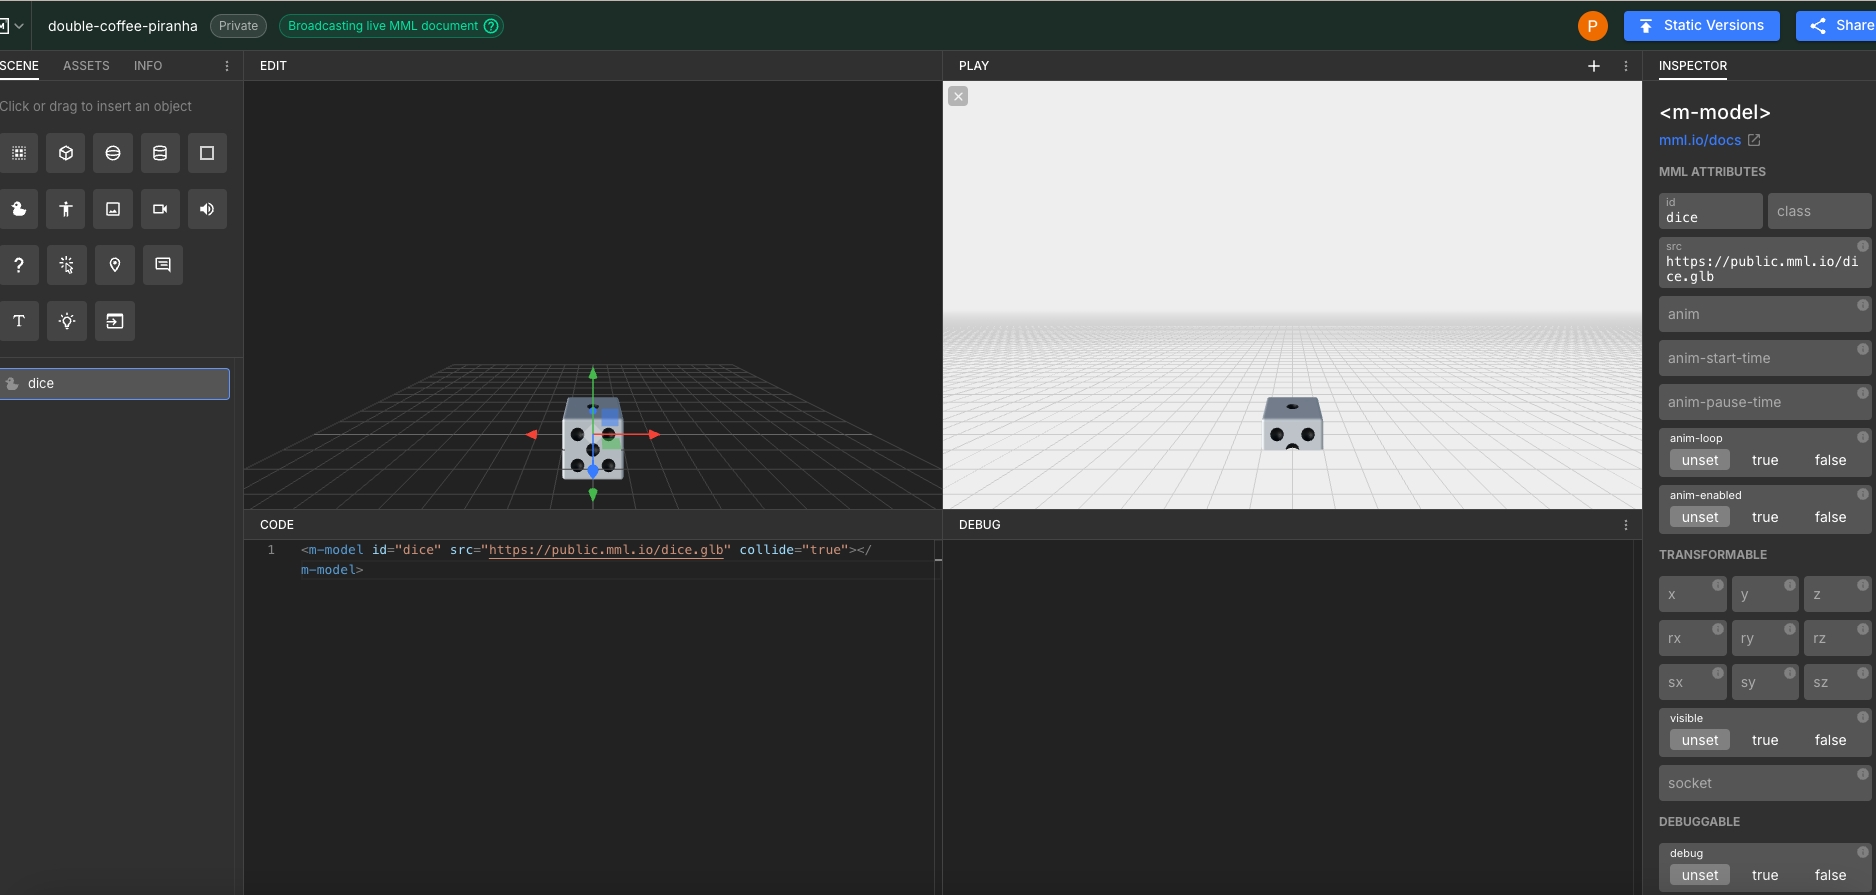
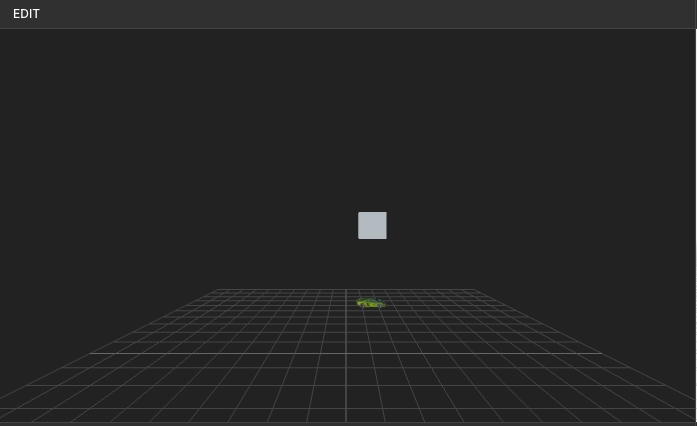
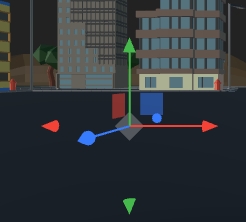
You can now do some simple things in the editor. Let's try moving the dice around. To do this click on the dice in the edit window. This should look like this:
You can now move the dice around the scene by left-clicking and dragging the arrows. The green arrow will move up and down, the red arrows left and right, and the blue arrow forward and backward. Let's move the dice so it's above the ground.
You will see the dice move in real-time in the play editor and also the code updating the x, y and z values:
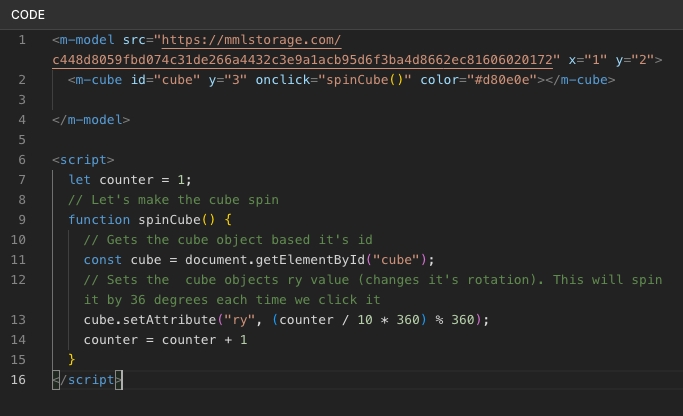
Ok we are now going to add some code to make the dice spin when we click it. First add the following javascript. We have annotated it with comments to explain how it works:
We now need to add the onclick event to the dice. this will call the code we wrote above when we click the dice:
It should look like the window below if you have everything in the right place:
Now if you click the dice in the play window you will see it Spin! Congratz you just made your first dynamic mml object. Now try uploading it using the item builder and using it in the playground!
The avatar creator allows you to create a custom avatar to be used across the Somnia network. This avatar is created using MML making it interoperable across experiences.
The avatar builder will be extended in the future with more customisation options. We will also enable creators to make their own assets to customise the avatar.
You can build your first avatar using this .
<m-model
    id="dice"
    src="https://public.mml.io/dice.glb"
collide="true">
</m-model><m-model id="dice"
src="https://public.mml.io/dice.glb"
collide="true" y="5.348" x="3.404">
</m-model><script>
let counter = 1;
// Let's make the dice spin
function spinDice() {
// Gets the dice object based it's id
const dice = document.getElementById("dice");
// Sets the dice objects ry value (changes it's rotation). This will spin it by 36 degrees each time we click it
dice.setAttribute("ry", (counter / 10 * 360) % 360);
counter = counter + 1
}
</script><m-model id="dice"
src="https://public.mml.io/dice.glb"
collide="true" y="5.348" x="3.404"
onclick="spinDice()"></m-model><m-group y="4">
<m-cylinder color="lightgrey" radius="4" height="0.1" rx="90"></m-cylinder>
<m-group id="hour" rz="0" z="0.1">
<m-cube sx="0.14" sy="1.2" sz="0.08" z="0.04" color="#000000" y="0.2"></m-cube>
</m-group>
<m-group id="minute" rz="0" z="0.11">
<m-cube sx="0.1" sy="2.4" sz="0.08" z="0.04" color="#000000" y="0.3"></m-cube>
</m-group>
<m-group id="second" rz="0" z="0.12">
<m-cube sx="0.08" sy="3.2" sz="0.08" z="0.04" color="#ff0000" y="0.8"></m-cube>
</m-group>
</m-group>
<script>
function setTime() {
const d = new Date();
document.getElementById("hour").setAttribute("rz", (d.getHours() / 12) * -360);
document.getElementById("minute").setAttribute("rz", (d.getMinutes() / 60) * -360);
document.getElementById("second").setAttribute("rz", (d.getSeconds() / 60) * -360);
}
setTime();
setInterval(setTime, 1000); // update every second
</script>Add ignacio video and walkthrough when ready
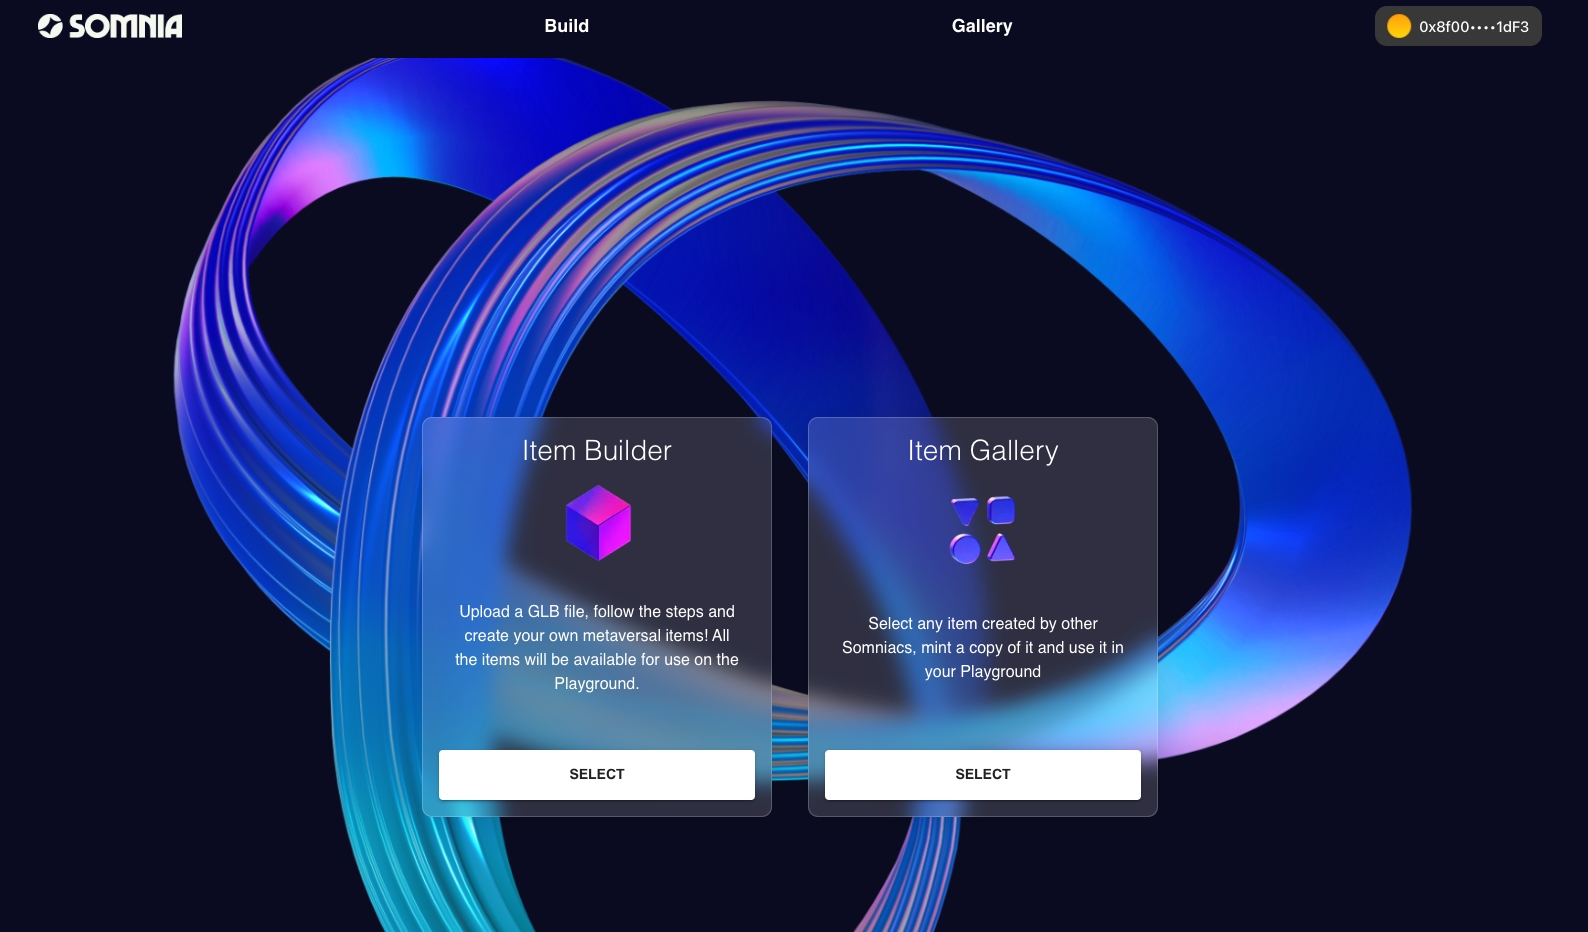
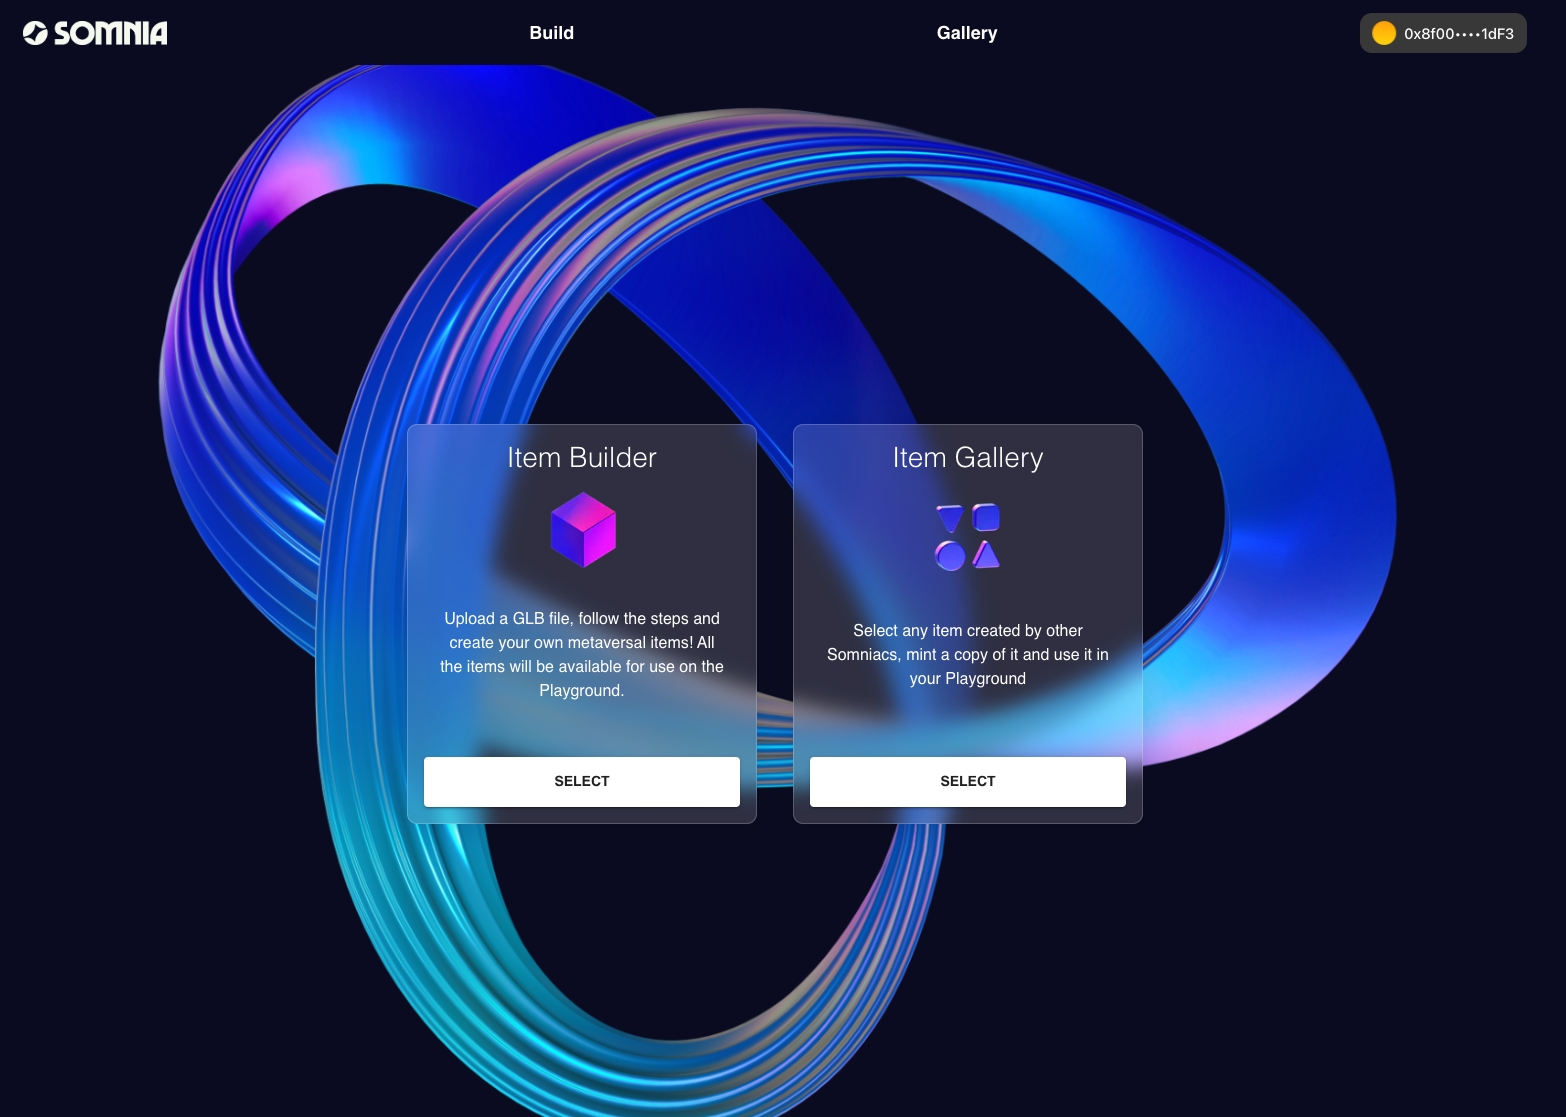
If you want to create and customize items quickly and efficiently, our Item Builder tool is designed just for you. This guide will walk you through the entire process, from starting a new item to saving and using it in the Playground.
Accessing the Item Builder
First, you need to access the Betanet page on the Somnia website and then select the “Dream Builder” option in the drop-down menu for “Dapp”
Scroll down, and you will see “Item Builder” on the left-hand side of the screen. Click the box that says “Select.”
Next, navigate to the Item Builder box on the right-hand side of the screen. Once there, you’ll see the option to Select. Click on this button to start the process of building your new item.
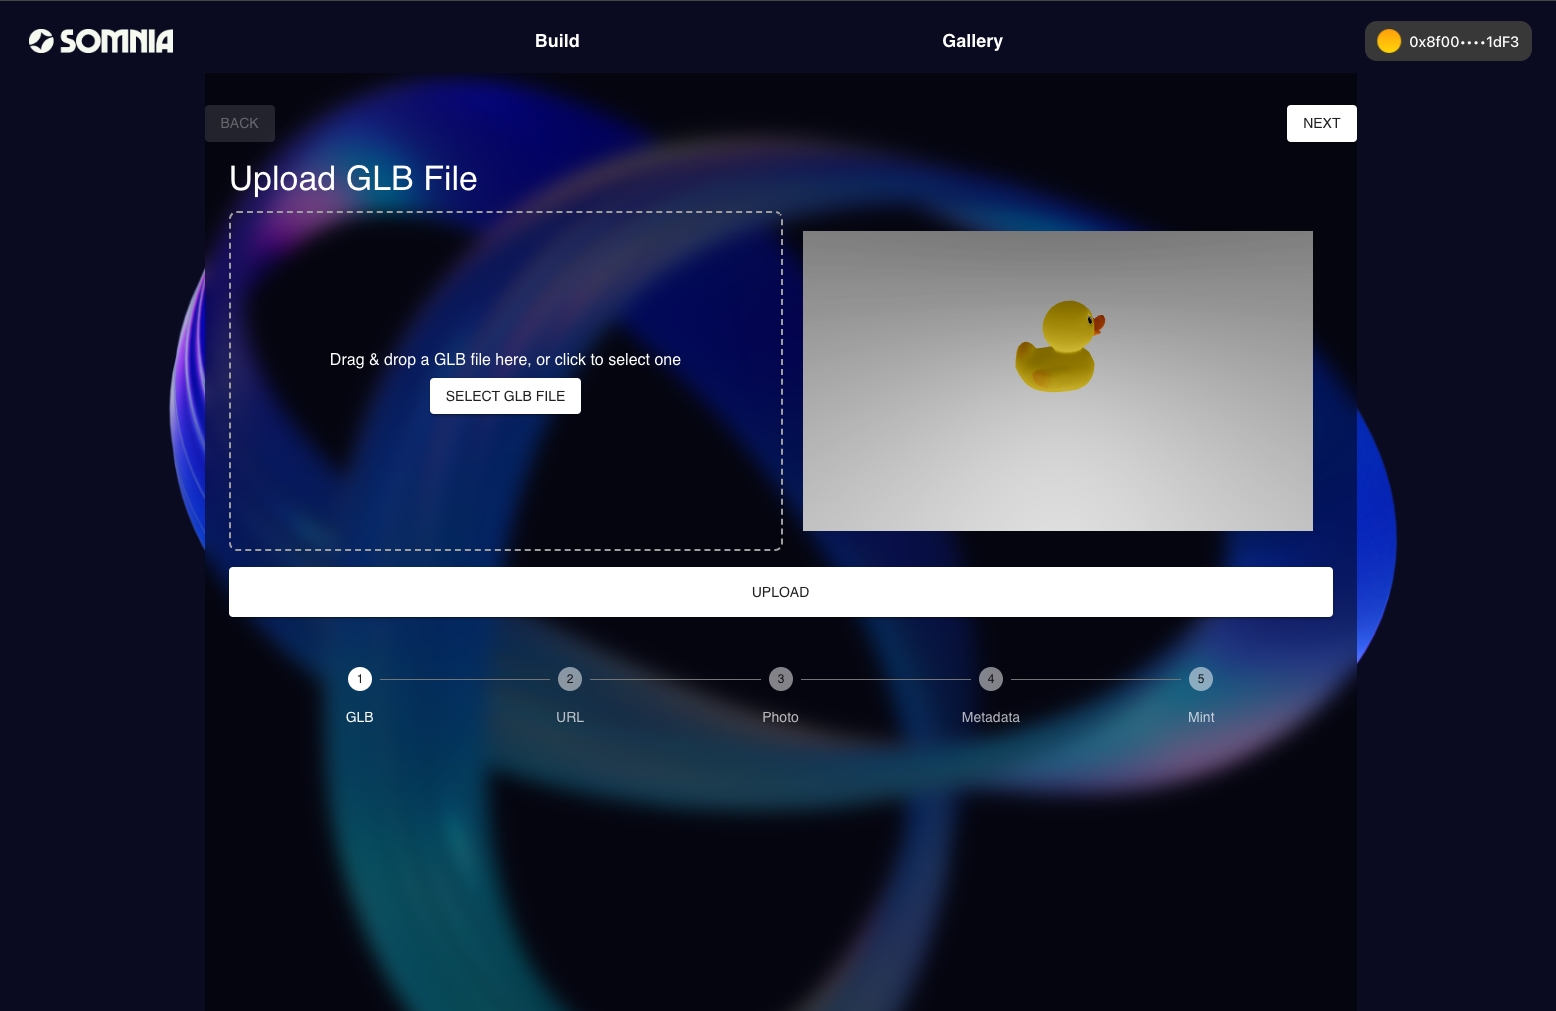
Uploading GLB File
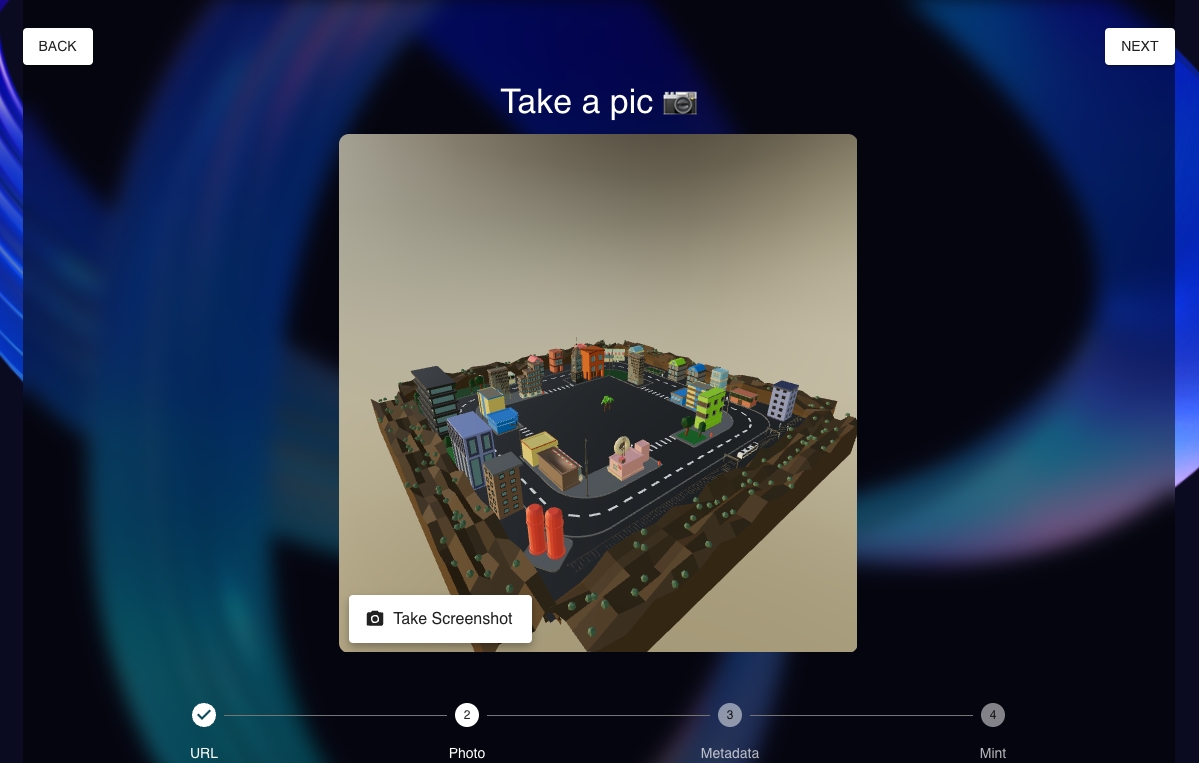
The first screen you’ll encounter allows you to upload the GLB file for your item. Just click the button that says “Select GLB File”, then find the file on your device.
When you click “Upload,” you will be brought to another screen. Here, you will be shown the URL for the new MML file and a preview of the image. If it looks good, click the upload button again.
Now you need to screenshot the item for the NFT gallery. You can rotate the image around to get it into the best position, then click the button that says “Take Screenshot.”
Now it’s time to give a name and description for your item.
Item Name: Choose a clear and descriptive name for your item.
Description: Provide a brief description that explains what your item is and its purpose.
When you are ready, click the “Save Metadata” button.
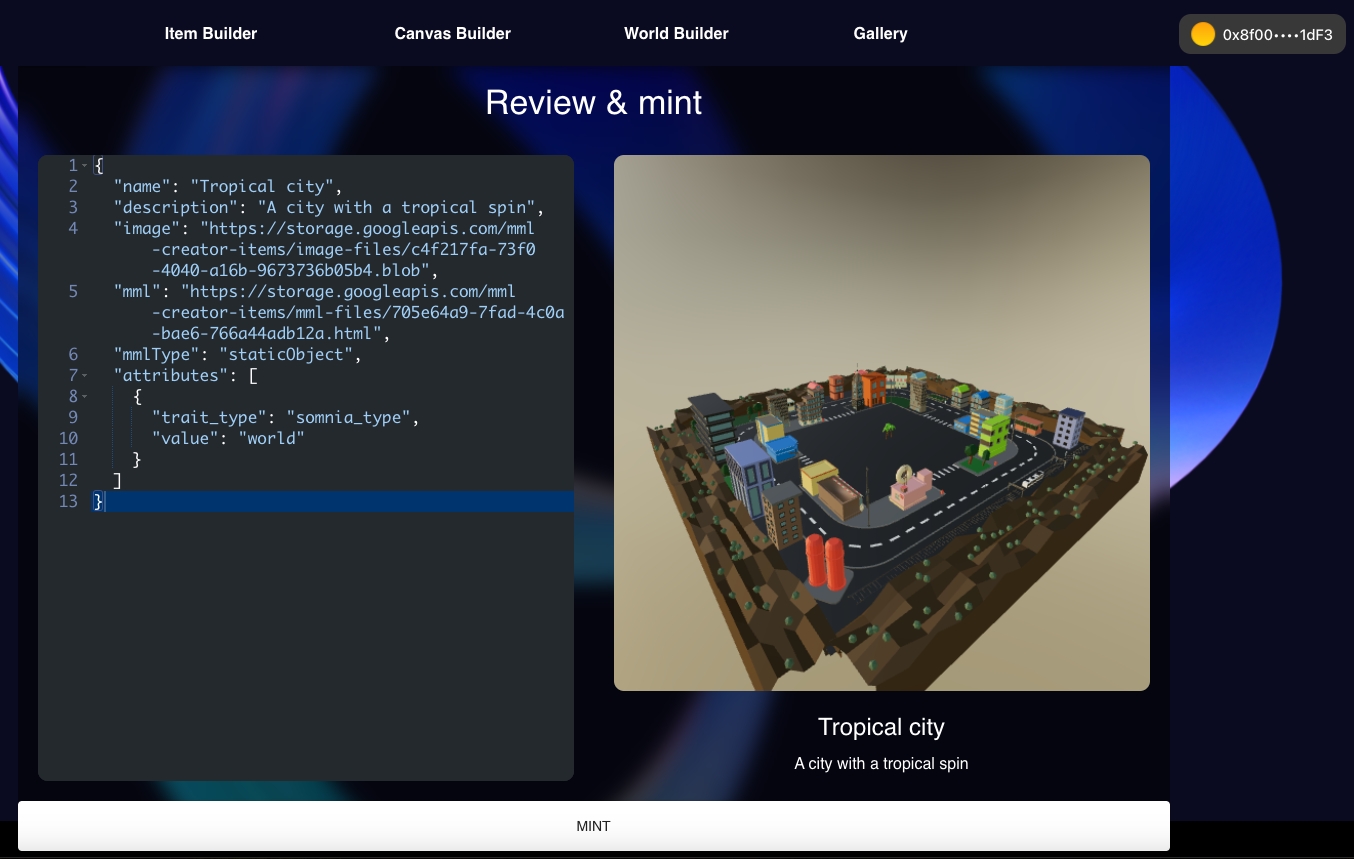
On the next page, you will have one more opportunity to review your item before minting. You’ll also get a preview of the MML URL. If everything looks good, click the “Mint” button at the bottom of the screen.
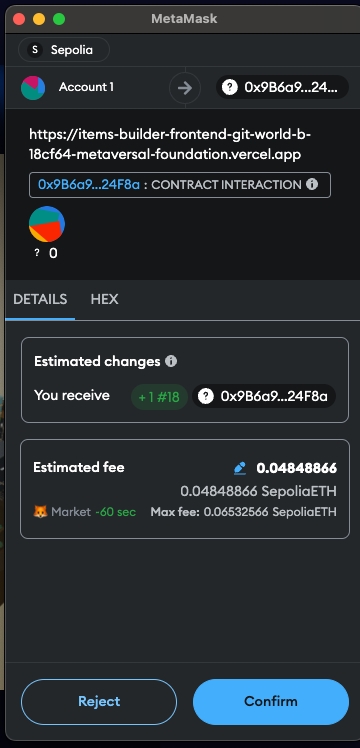
Once you click the “Mint” button, you must confirm the transaction in your Web3 wallet. When the transaction is complete, you can see your item in the “Gallery” page.
Now you and all of your friends can generate this item in any Playground space! See this guide for how to place items.
First, go to https://playground.somnia.network/. Here, you can start your journey to create your own slice of the metaverse.
You need to do is connect your wallet. There are two different ways to do this on the Playground interface. You can see those options in the screenshot below.
You will then need to make a few confirmations in your wallet.
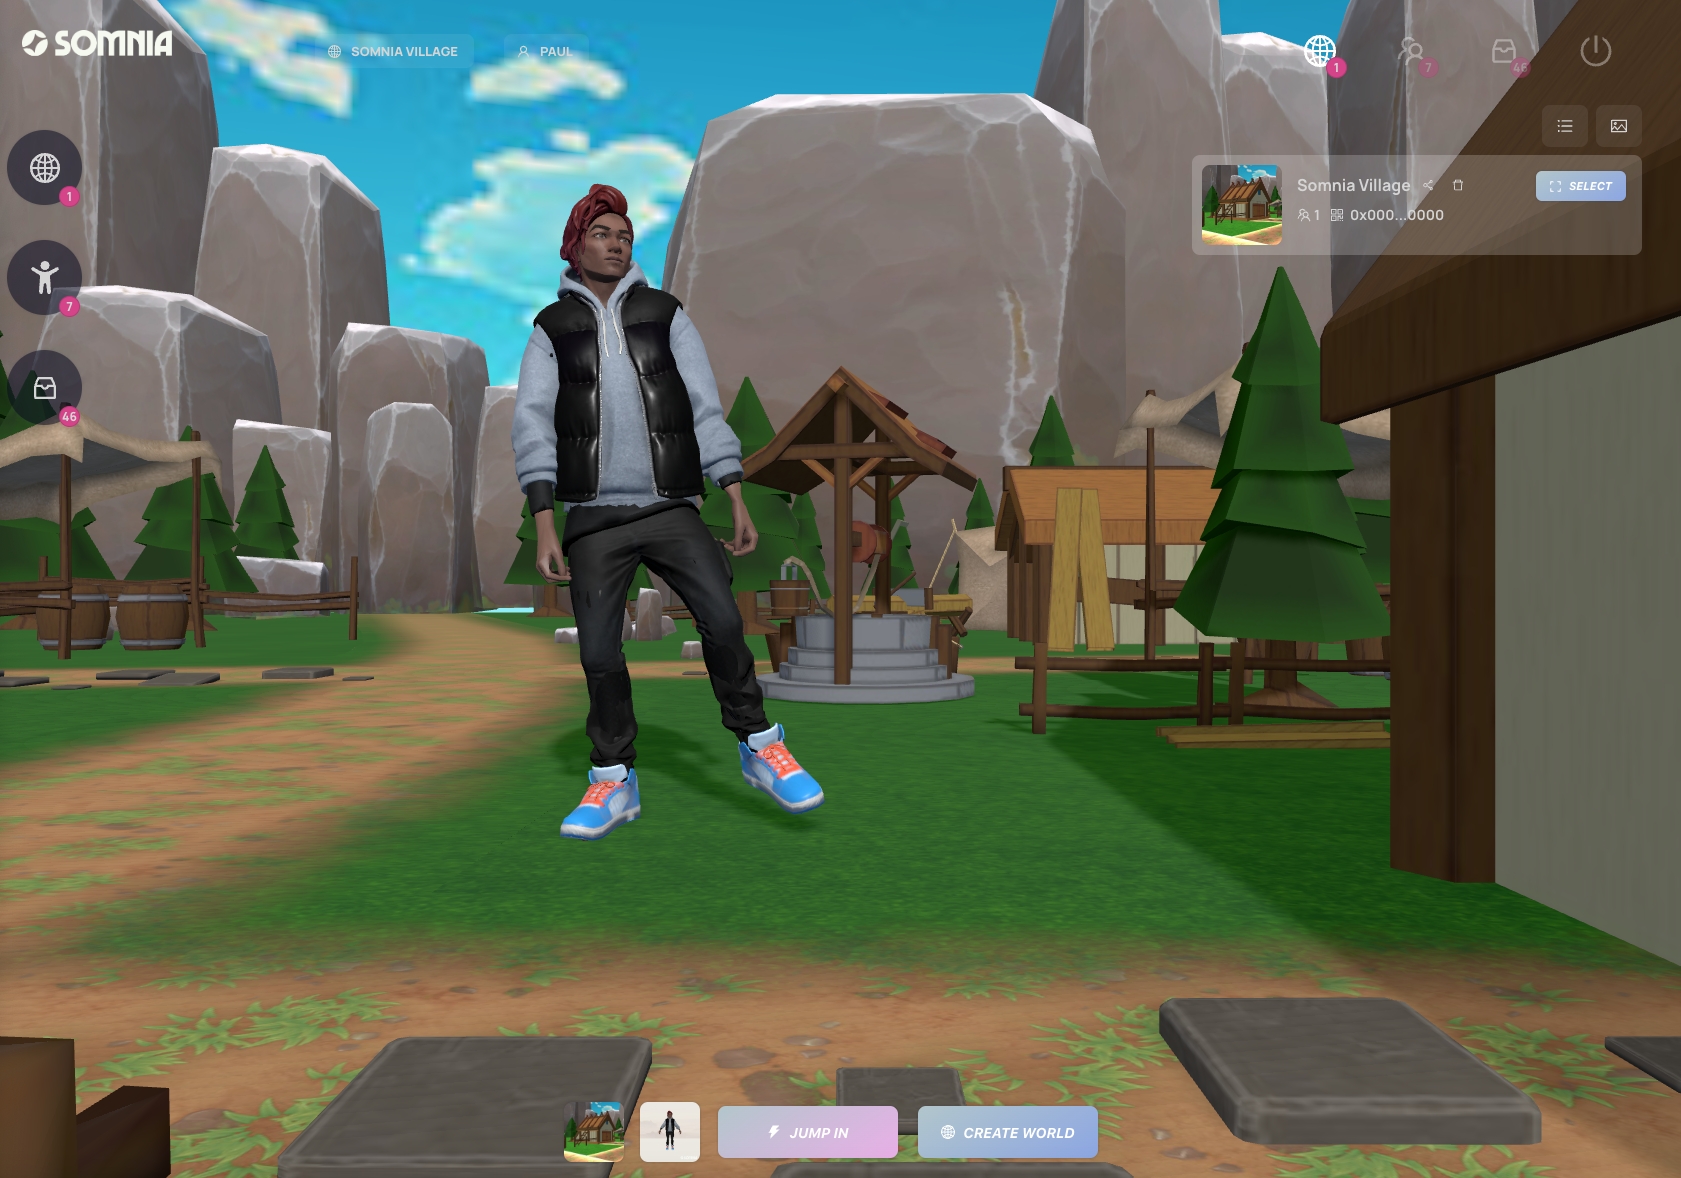
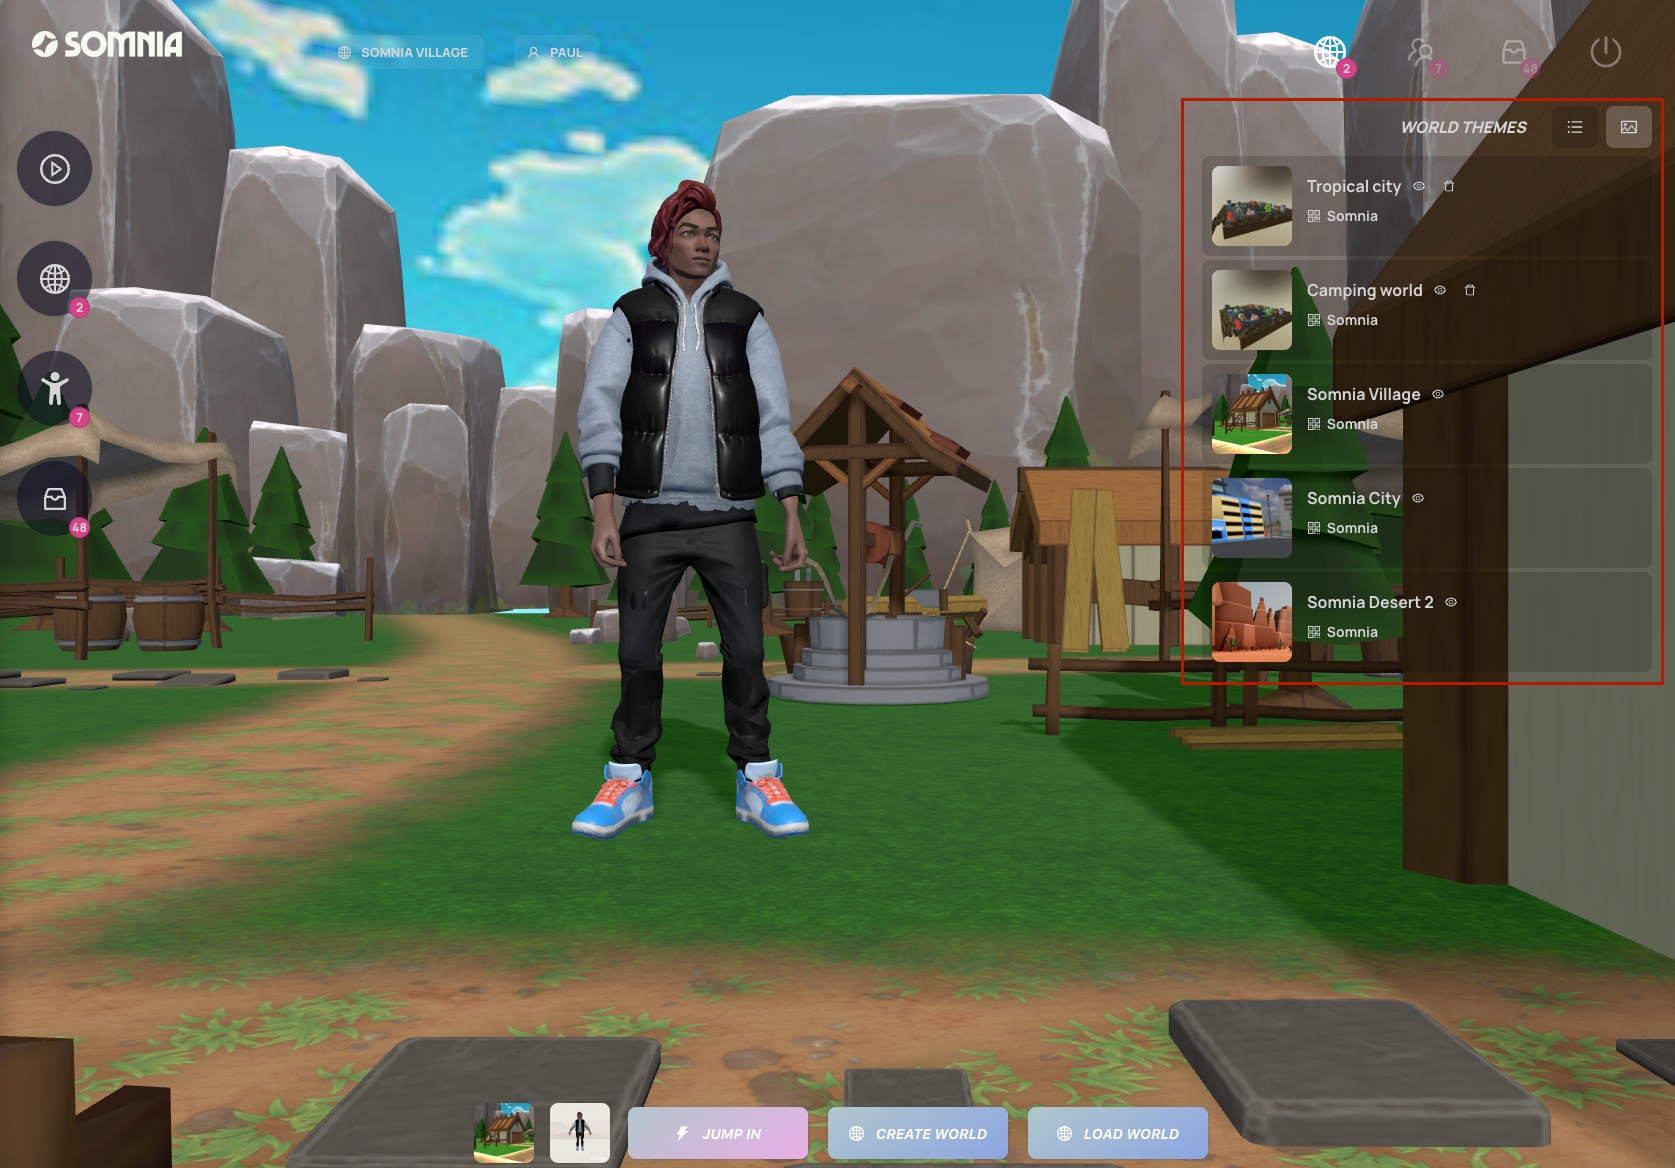
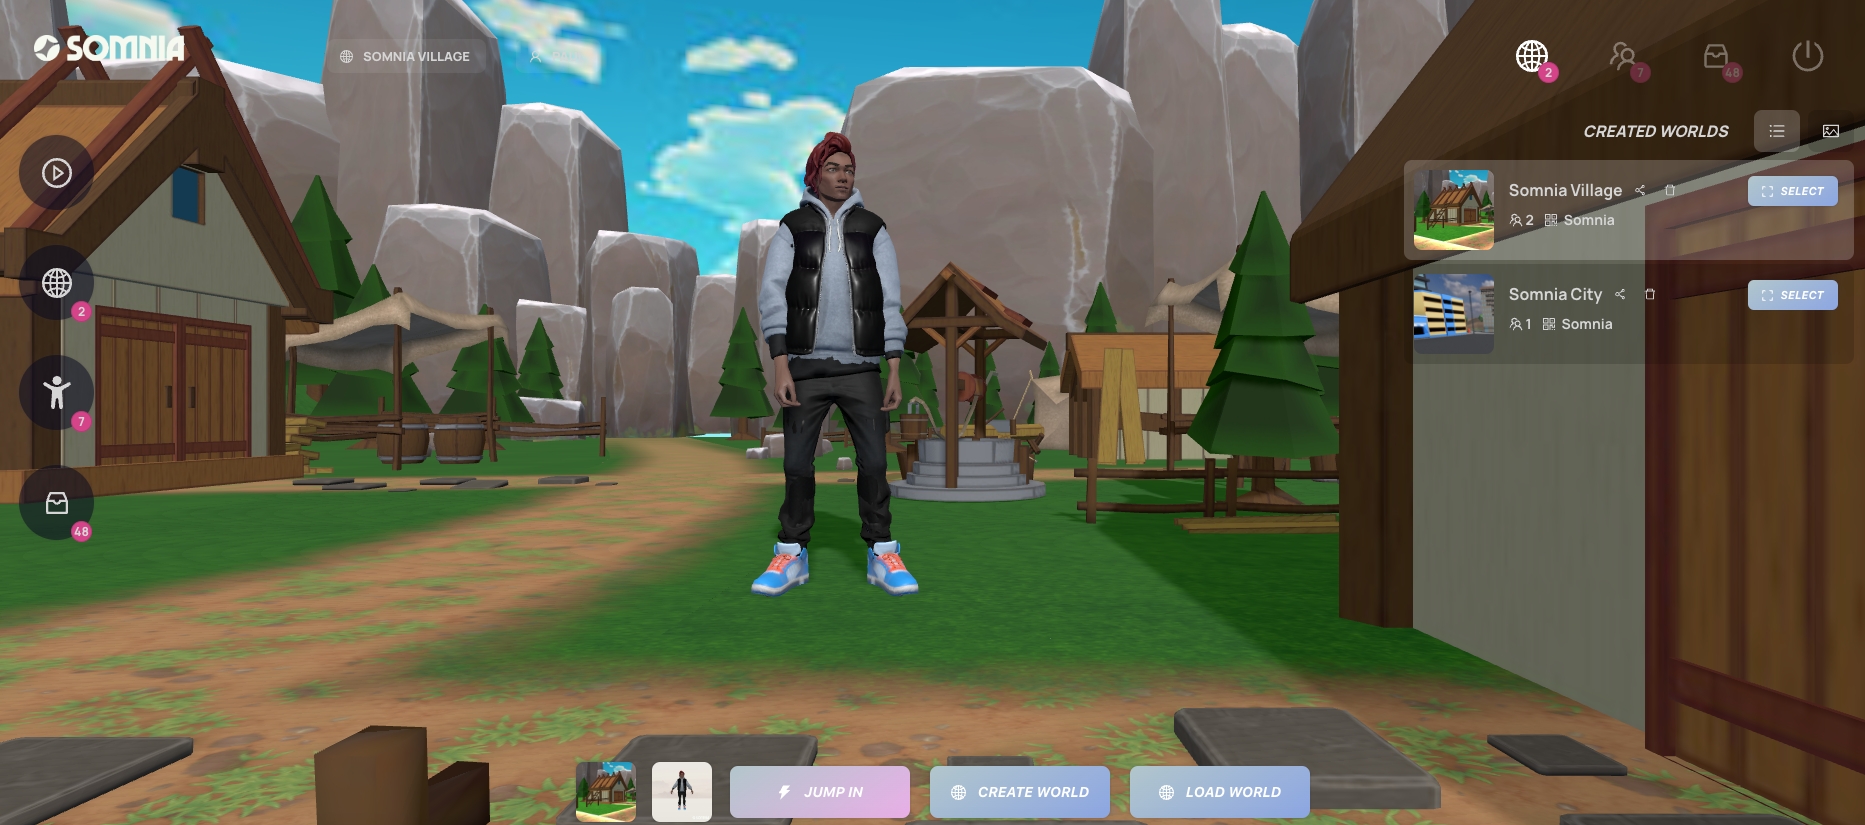
The globe icon at the top of the screen allows you to navigate to the different worlds available.
When you click any of the “select” buttons in the menu on the right side of your screen, the dashboard will transform into a preview of the world you have chosen. Note: sometimes, the select button will say “Jump in,” but it has the same effect.
When you have chosen the world that you want, click the “Jump In” button at the bottom of the screen to explore the world with your avatar. You should see a short loading screen. Then, you will be able to navigate the world you selected!
Now, let’s talk about avatars. The icon showing two human figures allows you to access your avatars.
You can also access the worlds and avatars on the left side of your screen
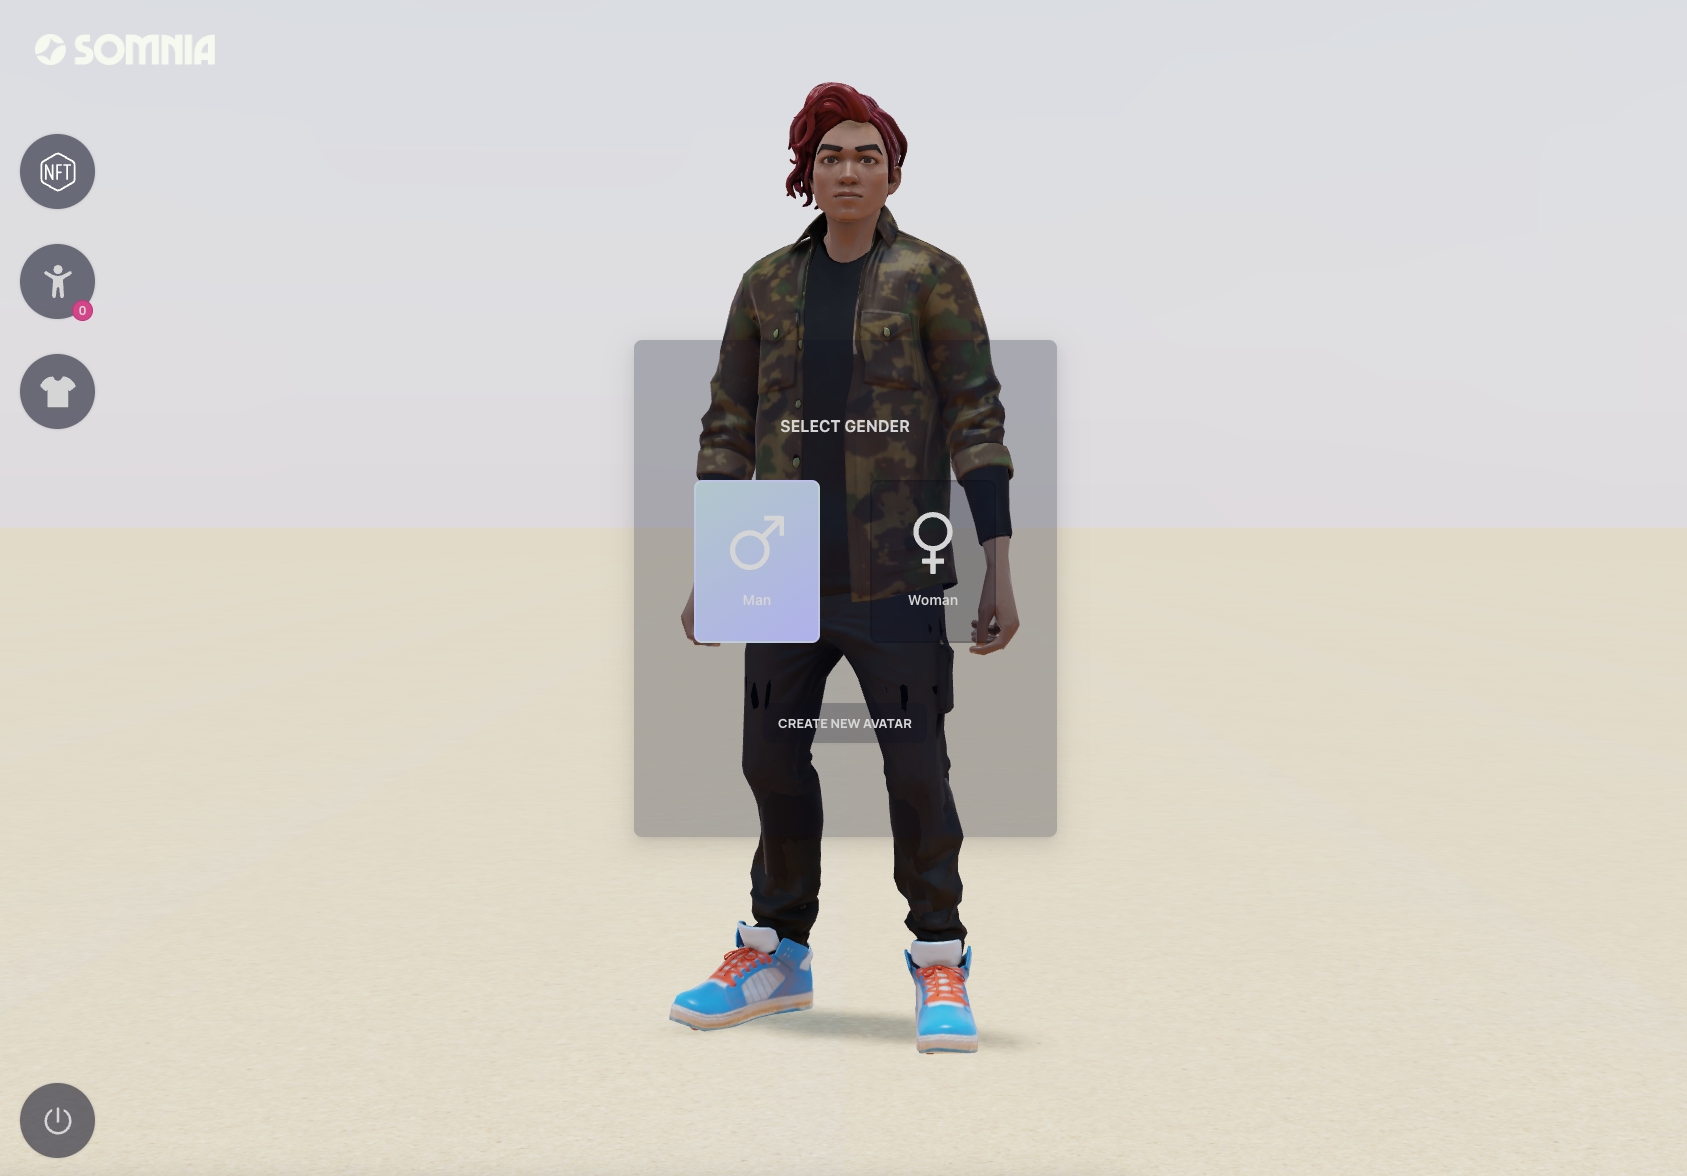
You will start out with a default avatar, but if you want something more personalized, you can visit the Somnia to mint a personalized avatar for free! When you go to the Metaverse Browser, select the avatar icon on the left side of the screen, and start personalizing your avatar. You can also go directly to Somnia’s .
Also, make sure to connect with the same wallet that you plan to use for the Playground, so you will be able to use your avatar there.
Personalize your avatar by giving it a name, you can give the avatar your name, or create an alter ego! Click on “Avatar Name,” enter the name you want, and then click “save.”
When you save the name of your avatar you should see this loading screen before reappearing back in your Playground. This screen will also appear jumping into a new world.
Now let’s discuss movement
The “i” with a circle around it is the information button that shows you how to move. You can navigate your angle of vision using the mouse, and then use the following keys to move:
W – Forward
A – Left
S – Backward
D – Right
Space – Jump
Shift – Run
You can also create your own world! Just click the create world button at the bottom of your screen.
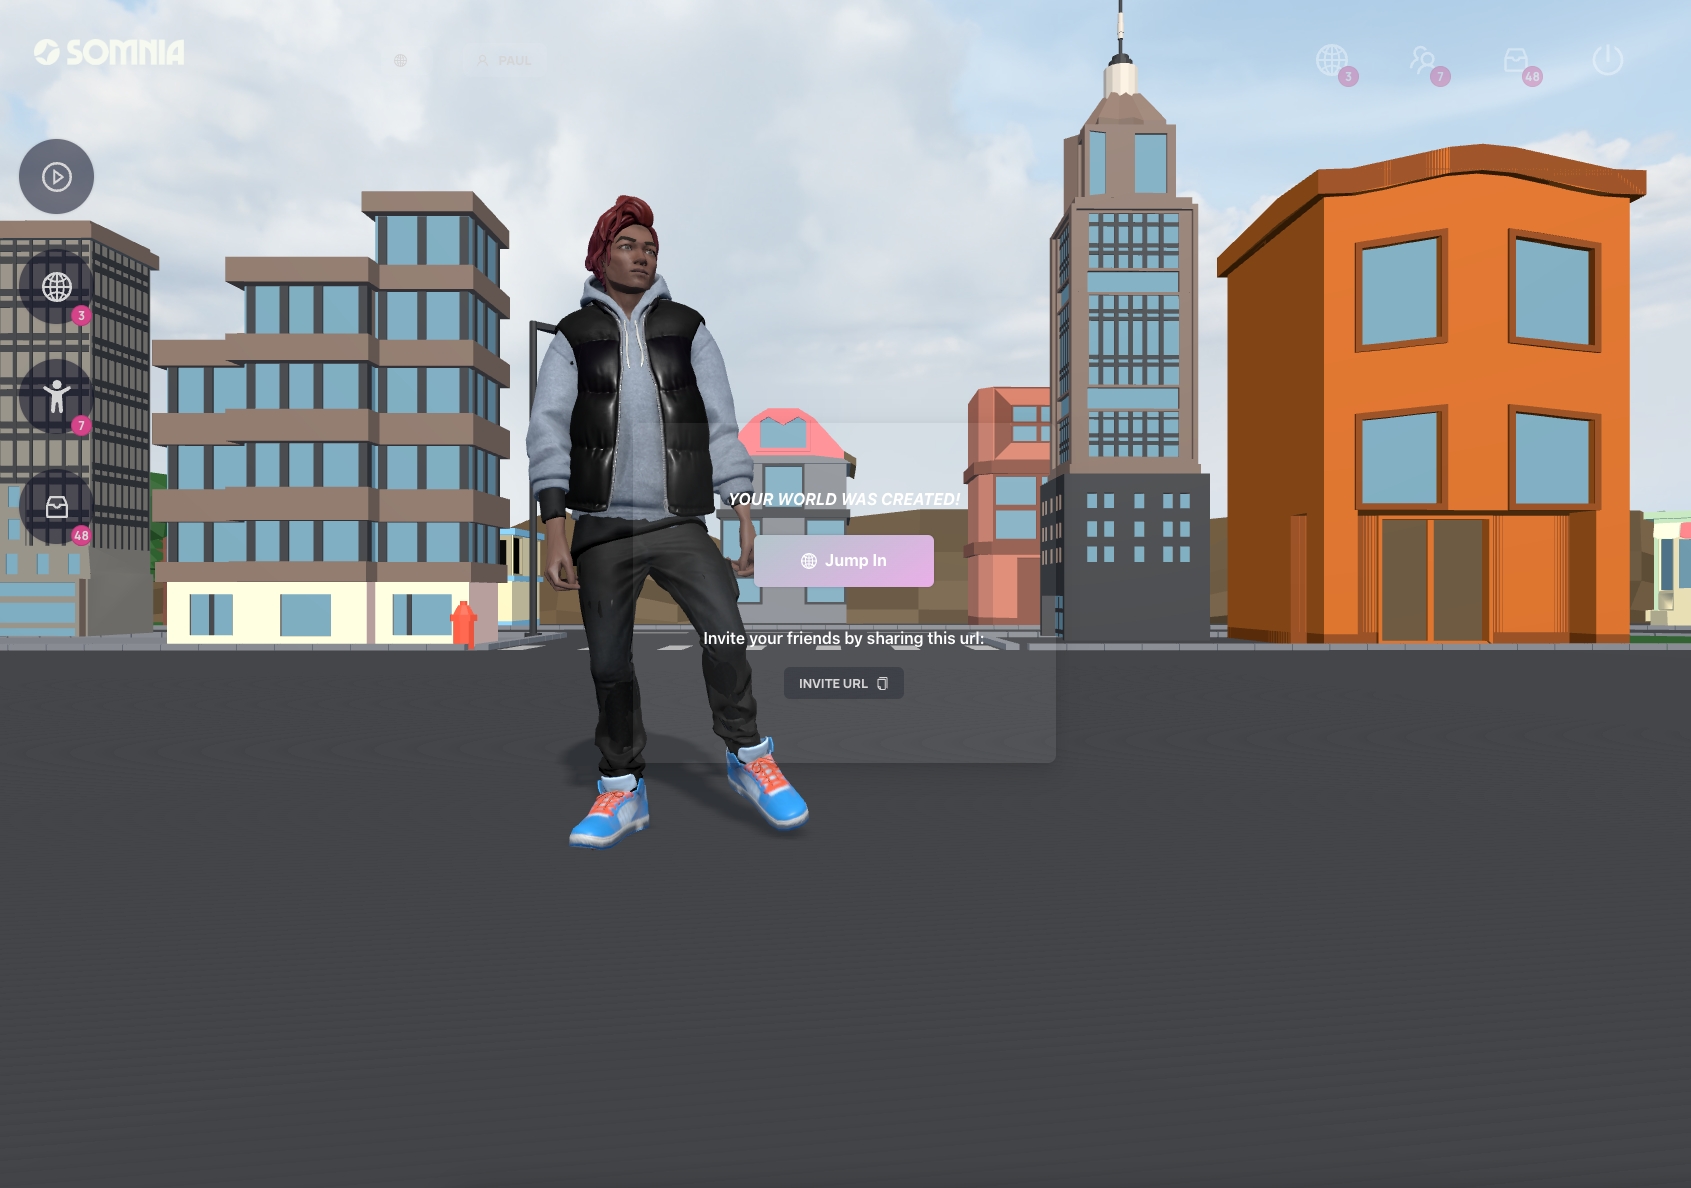
Next, a screen will pop up asking you to name your world. Choose a name, and then click “Create World.”
After your world is created, you will get another pop up with a button for visiting the world, and then another button to copy the world’s URL so you can invite your friends.
You can share any world that you visit with your friends and invite them to join you, even for worlds that you didn’t create. Click on the “share” icon as shown below to choose what world you want to share:
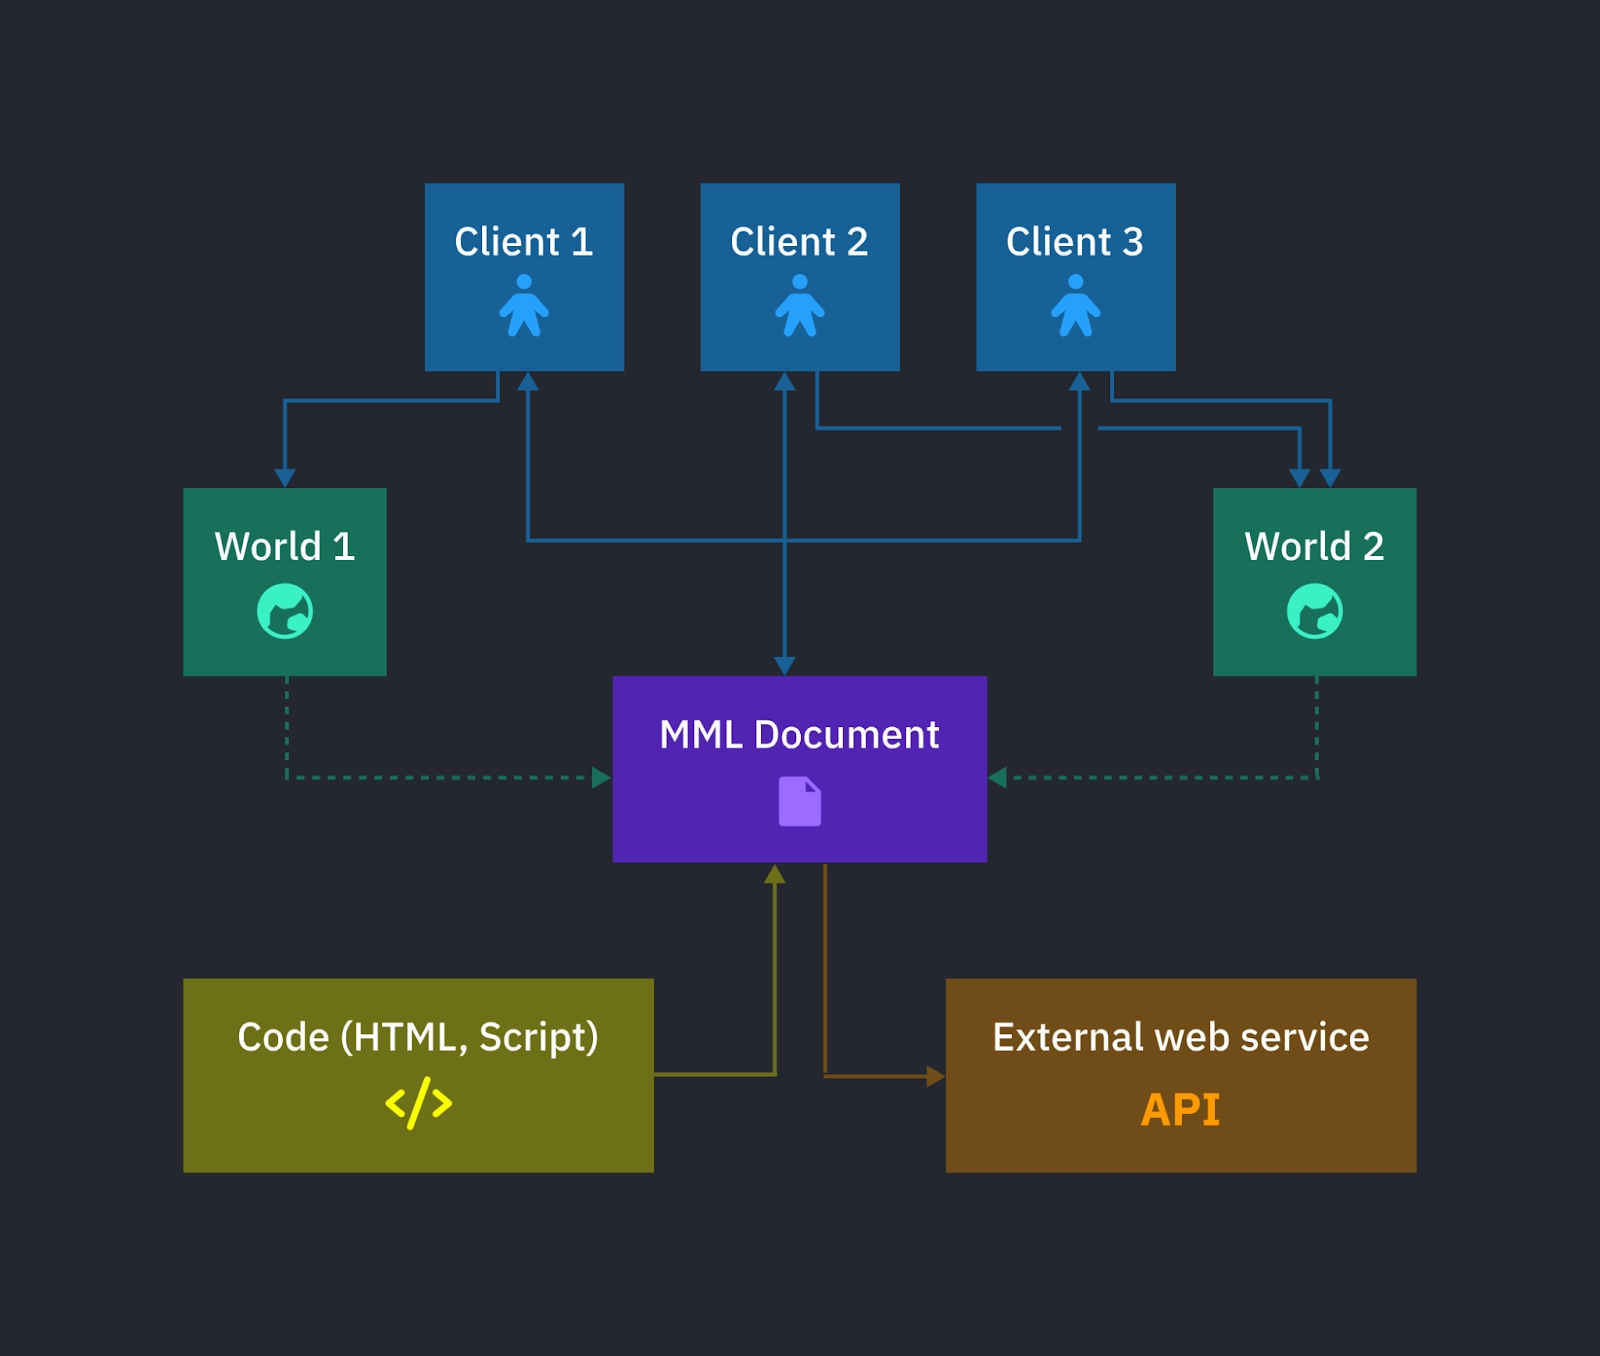
MML is a portability and interaction standard for objects in web and game engines. It uses web technologies as a foundation. This collection of format and architecture is known as Metaverse Markup Language (MML). MML enables the definition of objects and their behaviour using well-known HTML and JavaScript formats and tools.
The architecture of MML allows servers to run interoperable content separate from a game world, enabling the loading of a given live instance of interoperable content into one or more game worlds.
All things on the Somnia network be that a world, and item or an avatar are built using MML. This enables them to be interoperable across all experiences on the network.
Central to MML’s applicability for multi-user virtual world applications is the Networked DOM networking model. This model separates the logic for a document from the “world” server enabling object logic to be portable across various worlds and engines.
The Networked DOM works by using a WebSocket connection between the document and the client, with the document sending DOM updates to the client to update the state the client sees, and the client sending DOM events to the document to interact with it.
The MML editor is the easiest way to build something using MML. You can get started using it .
We are going to create a simple dice that spins when we click it.
We are first going to create a 3d dice model.
Click the code editor window and add the following code:
This code is one of the simpliest primatives in mml. It creates a 3d model of an object. The <m-model> tag tells the interpreter this is a model. The id is used to give the object and id which we can later reference in code to manipulate the object The src parts points to where the 3d model of the object is. This would be on some storage solution The collide tag means that if other objects or avatars touch this object this object will have collisions. You can find all the tags associated with an m-model here
Your editor should now look like this:
You can now do some simple things in the editor. Let's try moving the dice around. To do this click on the dice in the edit window. This should look like this:
You can now move the dice around the scene by left-clicking and dragging the arrows. The green arrow will move up and down, the red arrows left and right, and the blue arrow forward and backward. Let's move the dice so it's above the ground.
You will see the dice move in real-time in the play editor and also the code updating the x, y and z values:
Ok we are now going to add some code to make the dice spin when we click it. First add the following javascript. We have annotated it with comments to explain how it works:
We now need to add the onclick event to the dice. this will call the code we wrote above when we click the dice:
It should look like the window below if you have everything in the right place:
Now if you click the dice in the play window you will see it Spin! Congratz you just made your first dynamic mml object. Now try uploading it using the item builder and using it in the playground!
The item builder allows you to create custom items to be used across the Somnia network. The first place you can use the items is in the Playground.
You can find the item builder here ->
Once you get to that page you can click the item builder button to bring up the tool:
The tool allows you to create custom static objects by uploading a GLB file. A guide on how to use it can be .
Once your item is created you can see it in the . You can also use it in the Playground a guide for which can be found .
<m-group sx="0.4" sy="0.4" y="2">
  <m-video
    z="3"
    y="7"
    width="25"
    rx="0"
    ry="0"
    start-time="0"
    loop="true"
    src="https://public.mml.io/charge.mp4"
  >
    <m-label
      onclick="restart(event.currentTarget.parentNode)"
      content="restart"
      x="10"
      y="-6"
      font-size="100"
      width="4.5"
      alignment="center"
      height="1.5"
      color="#cccccc"
    ></m-label>
    <m-label
      onclick="pause(event.currentTarget.parentNode)"
      content="pause"
      x="-10"
      y="-6"
      font-size="100"
      width="4.5"
      alignment="center"
      height="1.5"
      color="#cccccc"
    ></m-label>
    <m-label
      onclick="unpause(event.currentTarget.parentNode)"
      content="unpause"
      x="-5"
      y="-6"
      font-size="100"
      width="4.5"
      alignment="center"
      height="1.5"
      color="#cccccc"
    ></m-label>
    <m-label
      onclick="resume(event.currentTarget.parentNode)"
      content="resume"
      x="5"
      y="-6"
      font-size="100"
      width="4.5"
      alignment="center"
      height="1.5"
      color="#cccccc"
    ></m-label>
    <m-label
      onclick="toggleEnabled(event.currentTarget.parentNode)"
      content="enable"
      x="0"
      y="-6"
      font-size="100"
      width="4.5"
      alignment="center"
      height="1.5"
      color="#cccccc"
    ></m-label>
    <m-label
      class="attributes-label"
      content="attrs:"
      x="0"
      y="6.5"
      padding="20"
      font-size="50"
      width="25"
      alignment="center"
      height="2"
      color="green"
      font-color="white"
    ></m-label>
  </m-video>
</m-group>
<script>
  function updateAttributesLabel(videoTag) {
    const attributes = [];
    for (const attr of videoTag.getAttributeNames()) {
      const val = videoTag.getAttribute(attr);
      attributes.push(`${attr}="${val}"`);
    }
    const attributesLabel = videoTag.querySelector(".attributes-label");
    if (attributesLabel) {
      attributesLabel.setAttribute("content", `<m-video ${attributes.join(" ")}></m-video>`);
    }
  }

  function restart(videoTag) {
    videoTag.setAttribute("pause-time", document.timeline.currentTime);
    videoTag.setAttribute("start-time", document.timeline.currentTime);
    videoTag.removeAttribute("pause-time");
    updateAttributesLabel(videoTag);
  }

  function toggleEnabled(videoTag) {
    const enabled = videoTag.getAttribute("enabled") !== "false";
    videoTag.setAttribute("enabled", (!enabled).toString());
    updateAttributesLabel(videoTag);
  }

  function pause(videoTag) {
    videoTag.setAttribute("pause-time", document.timeline.currentTime);
    updateAttributesLabel(videoTag);
  }

  function unpause(videoTag) {
    videoTag.removeAttribute("pause-time");
    updateAttributesLabel(videoTag);
  }

  function resume(videoTag) {
    if (!videoTag.hasAttribute("pause-time")) return;
    const startTime = parseFloat(videoTag.getAttribute("start-time")) || 0;
    const pauseTime = parseFloat(videoTag.getAttribute("pause-time")) || 0;
    const playedDuration = pauseTime - startTime;
    const newStartTime = document.timeline.currentTime - playedDuration;
    videoTag.removeAttribute("pause-time");
    videoTag.setAttribute("start-time", newStartTime);
    updateAttributesLabel(videoTag);
  }

  for (const video of document.querySelectorAll("m-video")) {
    updateAttributesLabel(video);
  }
</script><m-model
id="dice"
src="https://public.mml.io/dice.glb"
collide="true">
</m-model><m-model id="dice"
src="https://public.mml.io/dice.glb"
collide="true" y="5.348" x="3.404">
</m-model><script>
let counter = 1;
// Let's make the dice spin
function spinDice() {
// Gets the dice object based it's id
const dice = document.getElementById("dice");
// Sets the dice objects ry value (changes it's rotation). This will spin it by 36 degrees each time we click it
dice.setAttribute("ry", (counter / 10 * 360) % 360);
counter = counter + 1
}
</script><m-model id="dice"
src="https://public.mml.io/dice.glb"
collide="true" y="5.348" x="3.404"
onclick="spinDice()"></m-model>
You can find the item galery by going to the item builder page and clicking on item gallery:
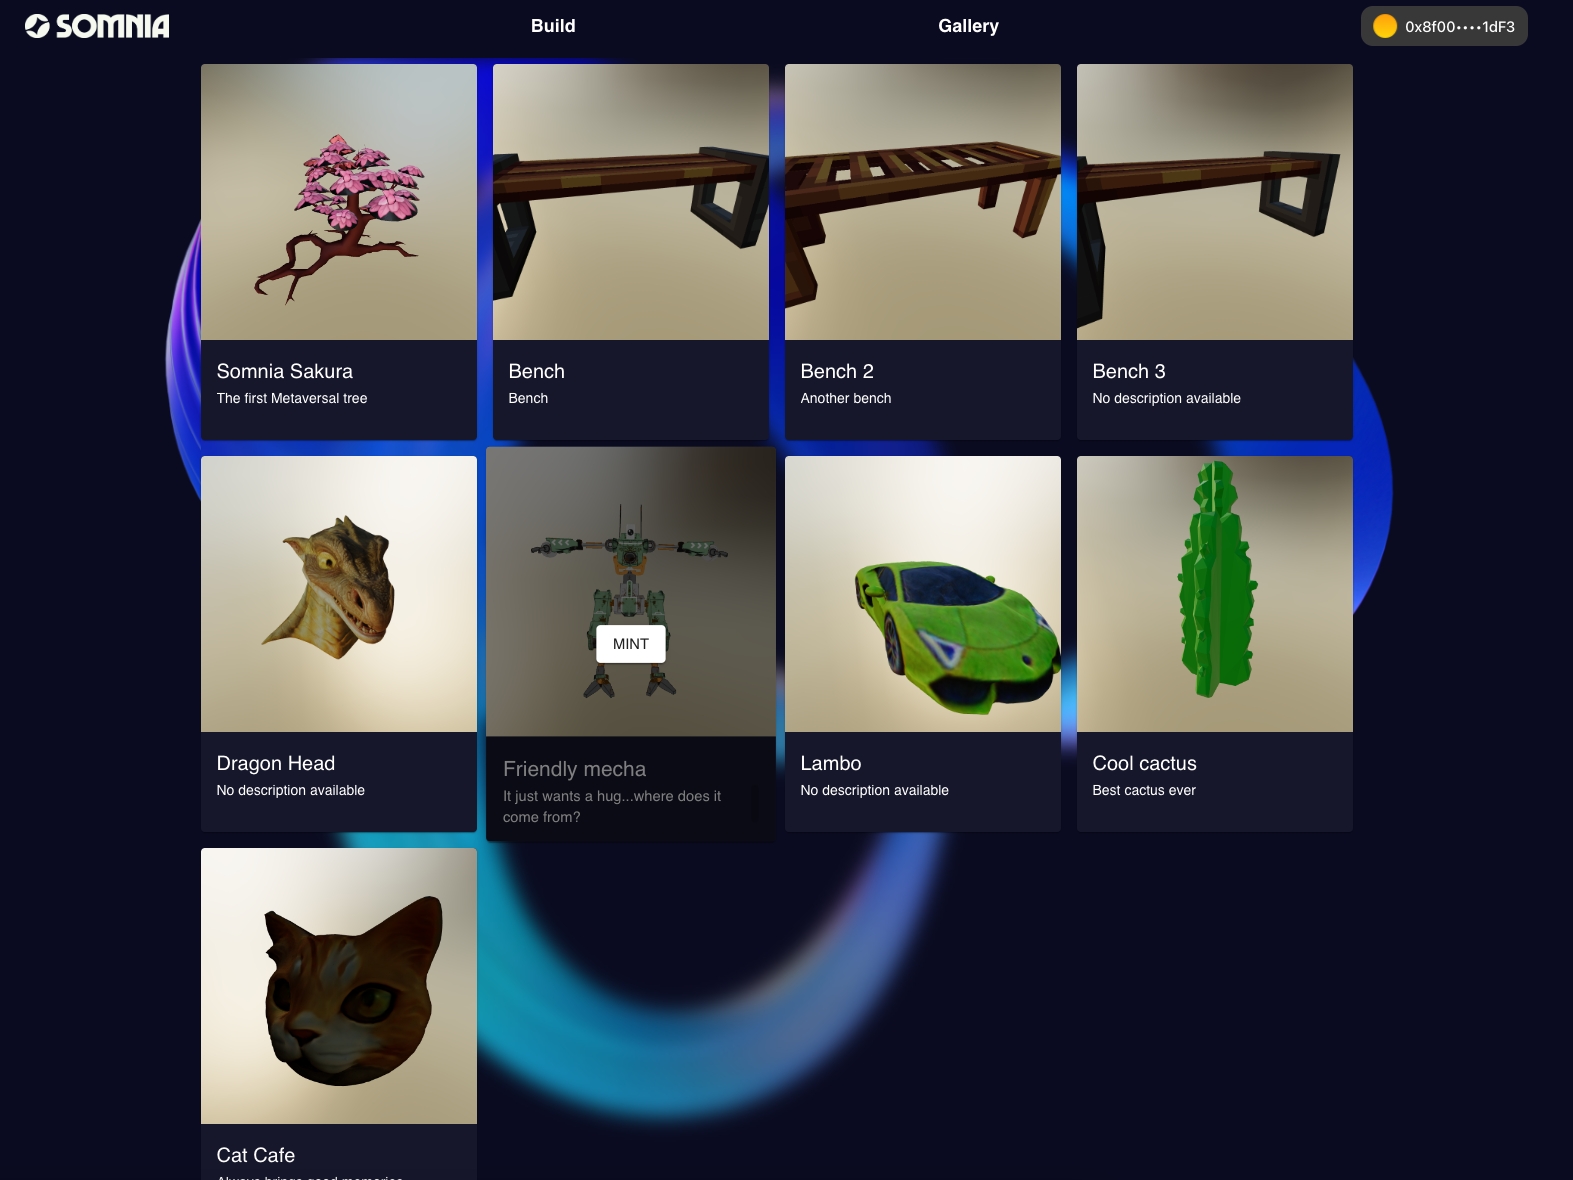
This shows all the items created by users of the Somnia network. If you like any of them, you can click mint. This will create an NFT in your wallet, which you can use in the Playground (see Create your first object for a guide on how to do this).
Somnia: The Future of The Virtual Society, consisting of an L1EVM and a set of omnichain protocols
Virtual Society: A concept of interconnected virtual spaces, including gaming, social media, Web3, and the metaverse.
SOMI: The native utility and governance token of the Somnia blockchain.
SOM0: The initial set of protocols launched by Somnia, enabling interoperability of assets and their commercialization.
SOM1: A protocol enabling composable virtual assets and experiences.
Somniac: Dedicated degens of the Somnia community
OG Somniac: The most dedicated degens and holders of the OG Somniac NFT and Role
Somniac Intern: Twitter intern who loves to support Somnia
Daydreamer: Level 3 - Somniac Trainee
Lucid Dreamer: Level 15 - Seasoned Somniac
Somnia Sleeper: Level 1- N00b Somniac
Crafter: A designer that builds worlds in Somnia's ecosystem
Coder: A developer that contributes to Somnia's ecosystem
Scriber: Content creators that spread the word about Somnia
Somnia Mod: Guardians of the Somnia Town Square
Metaverse Owner: An entity that operates a self-sovereign metaverse on the Somnia Network.
Validator: An entity that provides nodes for computation to the Somnia network.
Token Holder: (Implied definition) Individuals or entities holding SOMI tokens
L1EVM: (Implied definition) Layer 1 Ethereum Virtual Machine
Omnichain protocols: Somnia's approach of making protocols compatible with multiple blockchain networks.
Object Protocol: Part of SOM0, enables the creation and importation of virtual objects compatible with metaverses within the Network.
Attestation Protocol: Part of SOM0, allows network participants to attest to the authenticity of virtual objects.
Marketplace Protocol: Part of SOM0, provides a global liquidity layer for selling objects across the Network.
Experience Engine: Engines that enable the creation of metaverse experiences.
IceDb: Somnia's custom-built database with deterministic performance.
EVM Compilation: Somnia's process of translating EVM bytecode to highly optimized native code.
Data Chains: Independent blockchains operated by each validator in the Somnia network.
Consensus Chain: A separate blockchain that aggregates the heads of all data chains in Somnia.
Streaming Compression: An advanced compression technique used by Somnia to maximize data throughput.
BLS Signature Aggregation: A method used by Somnia to aggregate multiple signatures into a single signature.
Delegated Staking: A process where Token Holders can delegate their tokens to Metaverse Owners or Validators.
Central Limit Order Book (CLOB): A trading system that Somnia aims to implement on-chain.
MML (Metaverse Markup Language): A language used to create objects in the Somnia ecosystem.
Entity-Component-System (ECS): An architectural pattern used in SOM1, similar to game engine architecture.
Dynamic NFTs: NFTs with updatable metadata, enabled by Somnia's protocols.
Metaverse Browser: A user-friendly interface for navigating and participating in the Somnia ecosystem.
Playground: A web-based feature allowing Content Creators to quickly create and test metaverse experiences.
Item builder: A tool for building digital items for Somnia's virtual society
World Builder: A tool for building worlds in Somnia's virtual society
Dream builder: The brand name for the Somnia's collection of world and item-building tools
Canvas Builder: Somnia tool that allows you to bring your NFTs and 2D art into the metaverse
Item: A digital item in Somnia's virtual society
Dream Space: A user-generated world in Somnia's Virtual Society
Somniac Night: Where the OGest Somniacs hang out
Dream Gallery: The place to put all your great art!
MApps: Decentralized metaverse applications
Somniaverse: Monthly gathering hosted by Somnia to discuss everything that we have been up to. Sometimes this happens on X and sometimes it happens in the metaverse.
Uniting Societies: Our event series that takes place both on X and in real life, bringing together our friends and partners from the industry.
Somnia Dream points: Points earned for completing Somnia quests.
Dev Note: Somnia blog category where our developers give us a look behind the scenes
Quest: Somnia blog category where you can find all of the latest info about our quests
Somnia Essential: Somnia blog category where you can find essential tutorials and explanations about the Somnia ecosystem
Education: Somnia blog category that hosts educational content about Web3 and the virtual society
Highlights: Somnia blog category showing insights from the team
News: Somnia blog category where we share all of the recent updates that have been happening with the project
Somnia 101: Somnia blog category that gives simple explanations on every aspect of our ecosystem
Insomnia: Thinking about Somnia so much that you can't sleep
Somorning: GM GM
Somnight: GN GN
NFT: (Implied definition) Non-Fungible Token
Omni-chain: Somnia's approach of making protocols compatible with multiple blockchain networks.


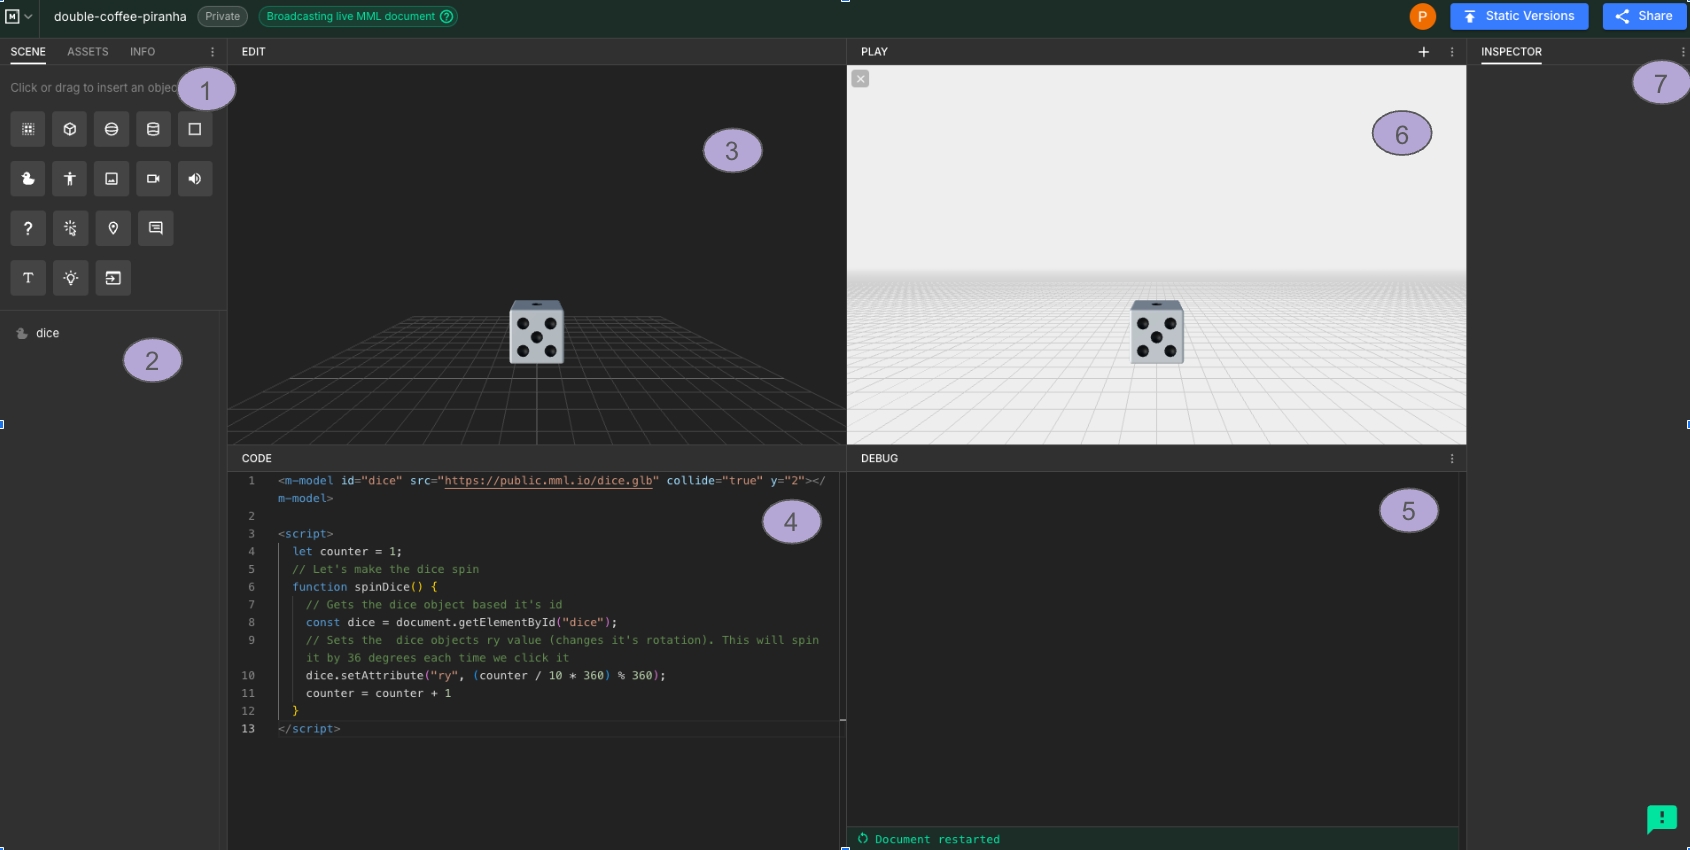
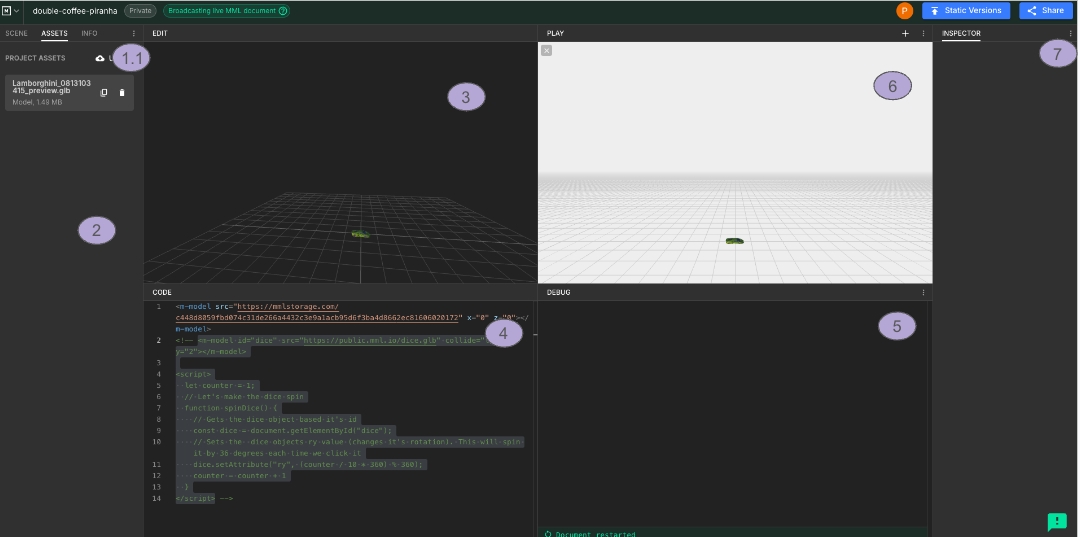
1 - Elements Panel - Allows you to drag and drop MML elements into the scene
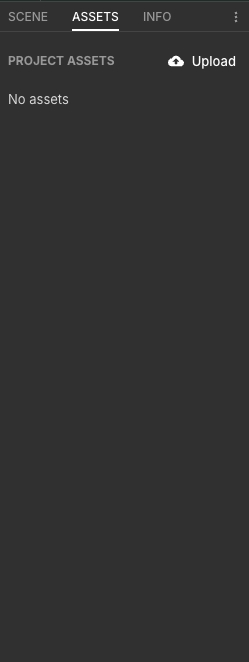
1.1 - Assets Panel - A tab next to the scene panel. This allows you to manage all the assets in you MML scene.
2 - Hierarchy View - A text representation of all the elements in the scene
3 - Editor Window - A window to edit the scene using
4 - Code Window - A window to edit the scene via code and add logic to the scene
5 - Debug Window - A window that displays any debug information from the play scene
6 - Play Window - A live view of your MML scene. This is what would be rendered in experience.
7 - Element Inspector - A visual inspector to edit an MML elements
With these panels, you can easily see all the MML elements you can add to the scene. For example, if we click the cube button, we will add a cube element to the scene.
This is normally a good place to start when making something new
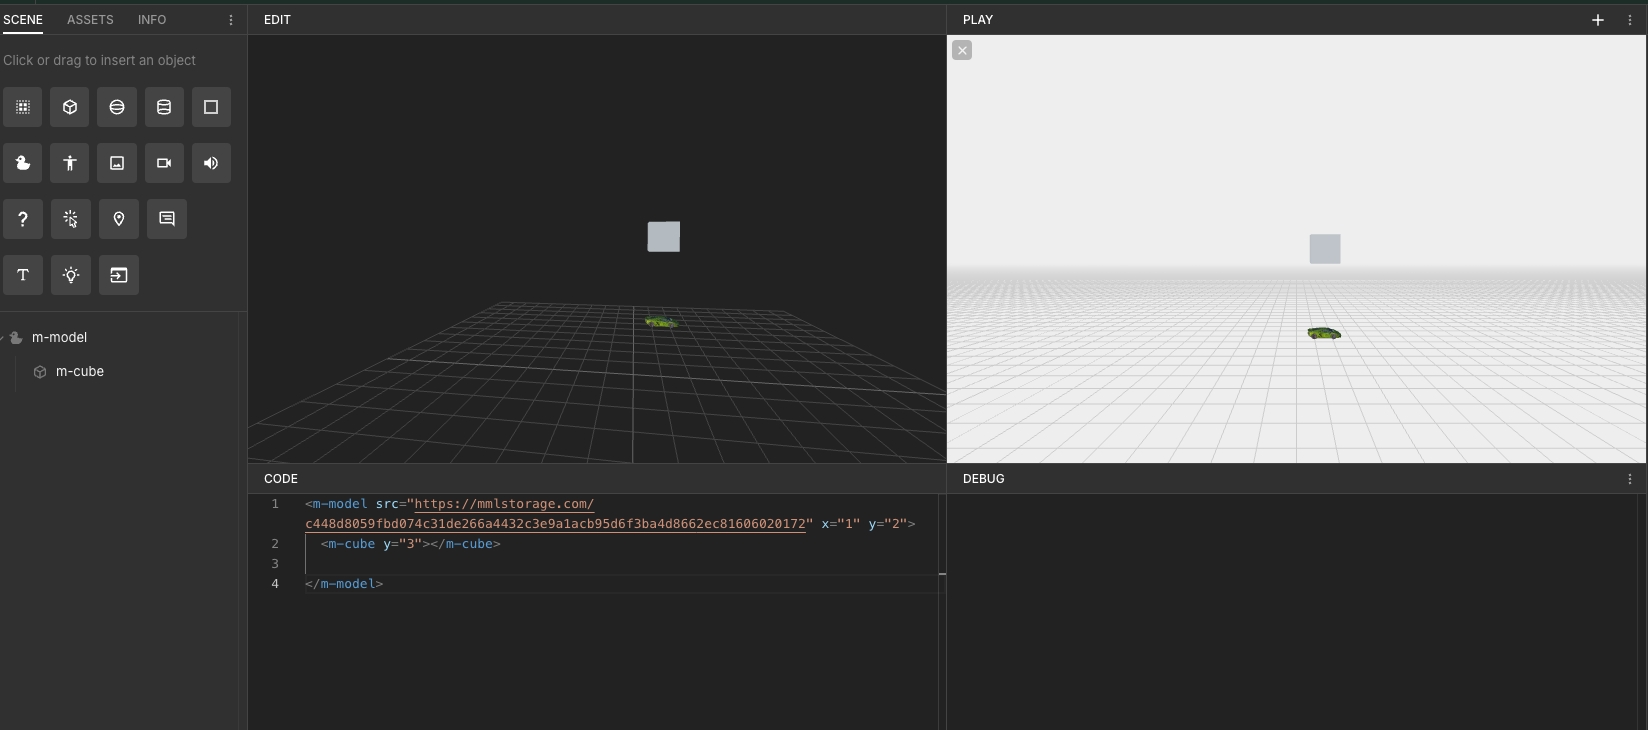
The assets panel shows all the assets associated with your project. You can use this to manage the GLB files you will use for your MML scene. When you have uploaded an object, you can drag it into the scene. It will then be created as an m-model element.
The hierarchy view shows all the elements in your MML scene. You can use this to select objects and create sub hierarchies. When an element is a sub-element of another, it will move in relation to it. This is similar to a game engine such and Unity or Unreal. For example I have added a cube to the scene and dragged it to be a sub item of the model in the scene. Now when I move the model the cube will also move.
This is reflected in the code window, with the cube nested in the m-model element, similar to how you would see it in a HTML webpage.
This concept is useful for creating hierarchies of things that should be associated and moving around the scene together.
The editor window is where you can visualize and edit with your scene. You can select the elements in the scene to edit their properties with the element inspector. You can also move objects around the scene; if you select them, you will see gadgets to move the elements. These work similar to game engines or 3d editor tools.
The code window allows you to edit the scene through code. The language we use is MML which is very similar to HTML using tags and javascript.
Here we have added a small amount of javascript to rotate the cube when we click it. You can learn more about using MML in this guide or by looking at the MML resources or going to the MML website.
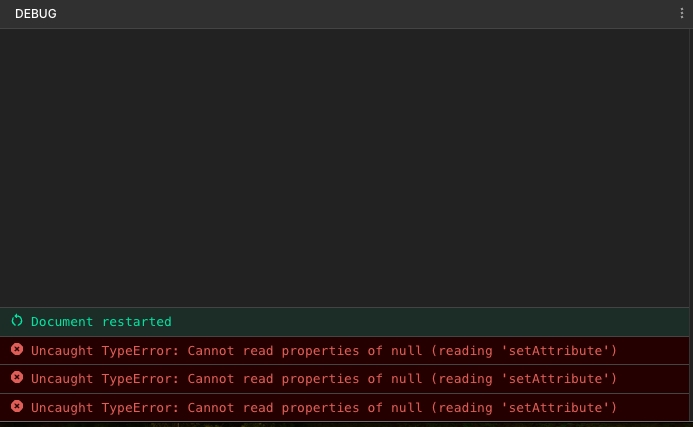
The debug window will displays any errors or console output linked to your scene. This is used for debugging a scene through console prints and errors. You use this as you would a normal web browser console (eg using console.log()).
For example the code above we have added a console.log statement when we click the cube.
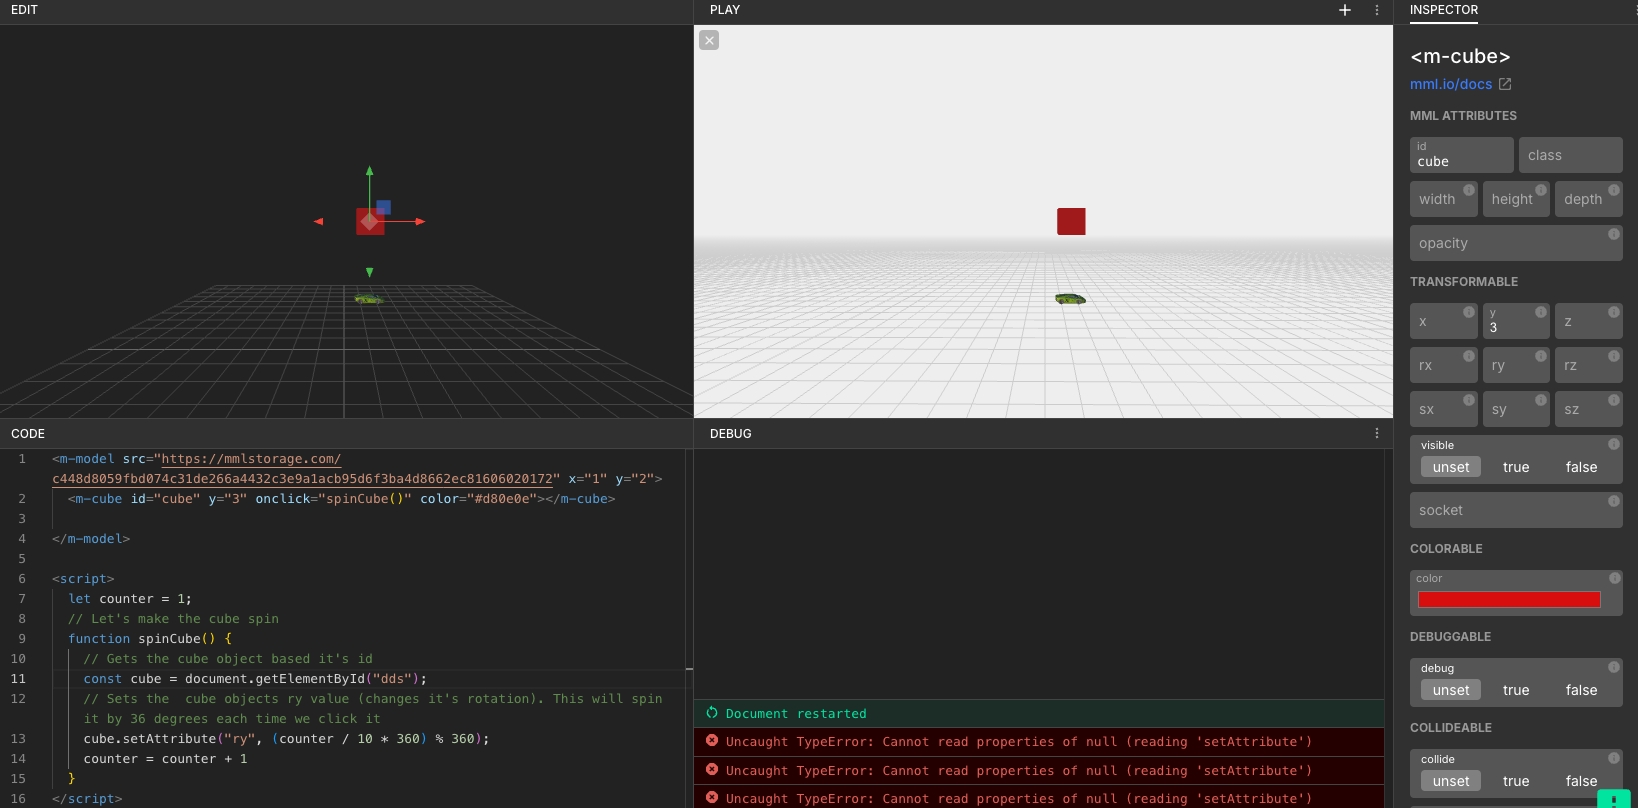
<m-model src="https://mmlstorage.com/c448d8059fbd074c31de266a4432c3e9a1acb95d6f3ba4d8662ec81606020172" x="1" y="2">
<m-cube id="cube" y="3" onclick="spinCube()" color="#d80e0e"></m-cube>
</m-model>
<script>
let counter = 1;
// Let's make the cube spin
function spinCube() {
// Gets the cube object based it's id
console.log("you clicked the cube")
const cube = document.getElementById("cube");
// Sets the cube objects ry value (changes it's rotation). This will spin it by 36 degrees each time we click it
cube.setAttribute("ry", (counter / 10 * 360) % 360);
counter = counter + 1
}
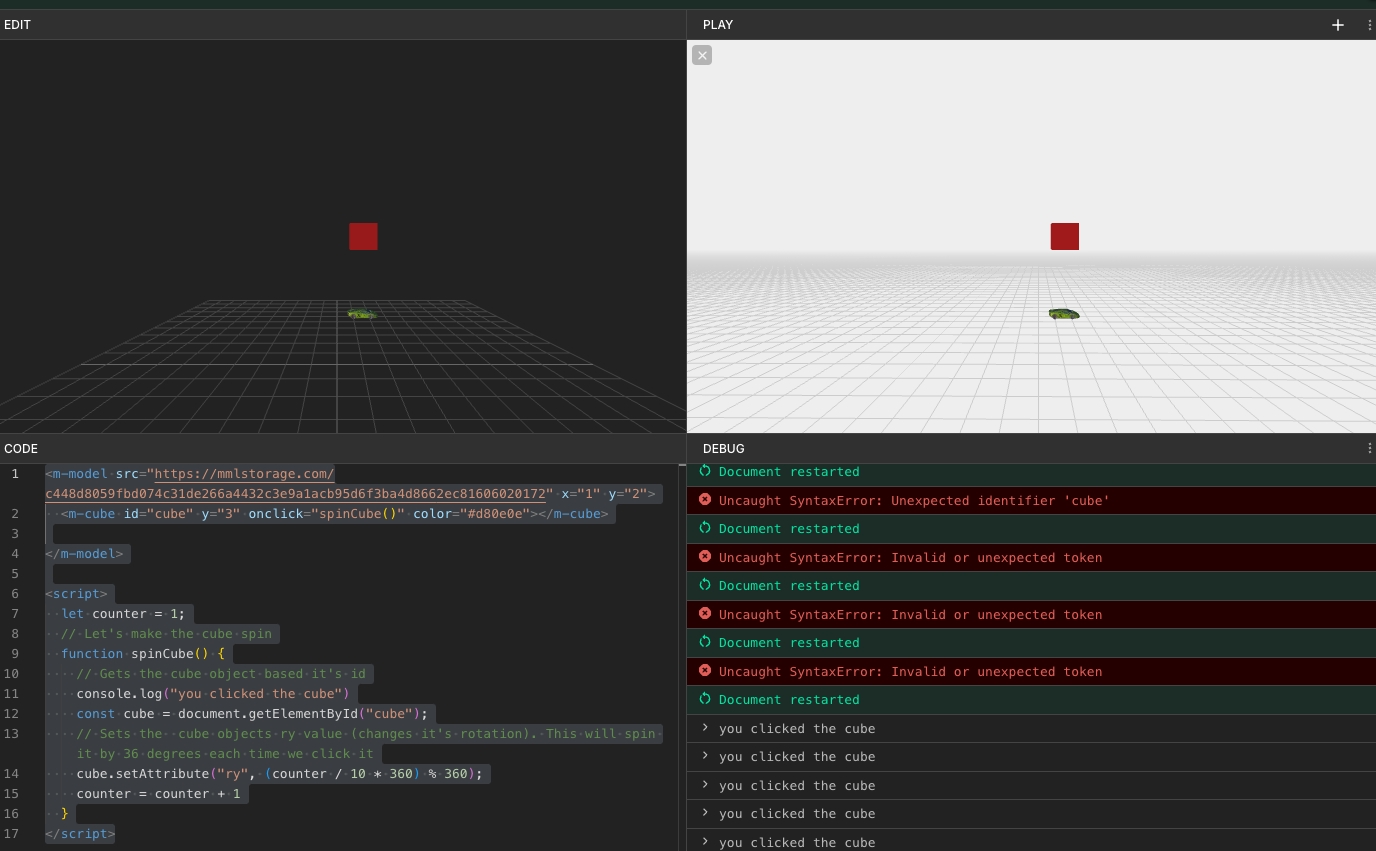
</script>We can then click the cube in the play window. Which will output it to the console:
The play window renders your scene as a client would see it. This means that if it were viewed in a web browser or in an experience, this is what it would look like. You can also test interactions by clicking on elements in this scene. This view has a floating camera, which you can move with WASD and rotate by left-clicking the mouse.
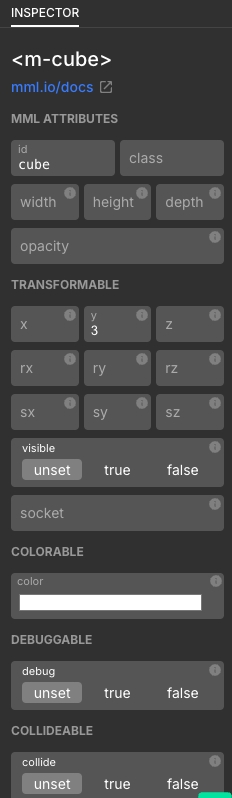
Once you have selected an element in the editor window, you can modify its properties with the inspector. This shows all the properties of the MML elements in a visual way. It's very useful if you don't remember a specific code tag or want to edit the scene in a more visual way.
Here we have edited the color of the cube by clicking the color element and selecting the red color. There are many tags which can be seen in the MML Reference Docs.
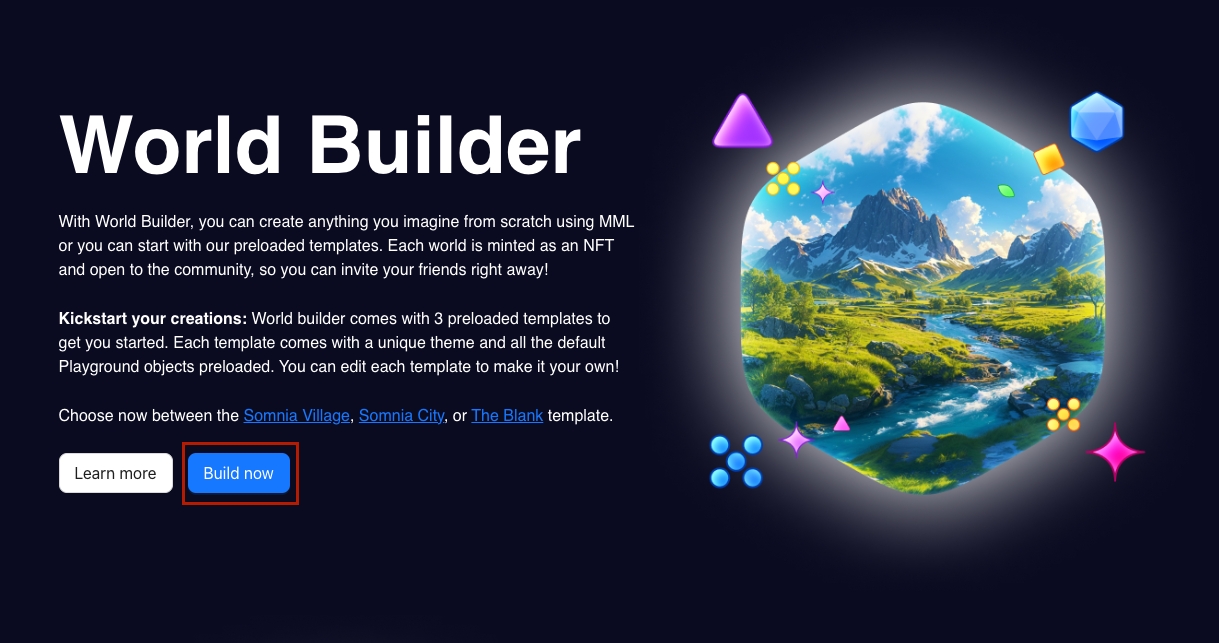
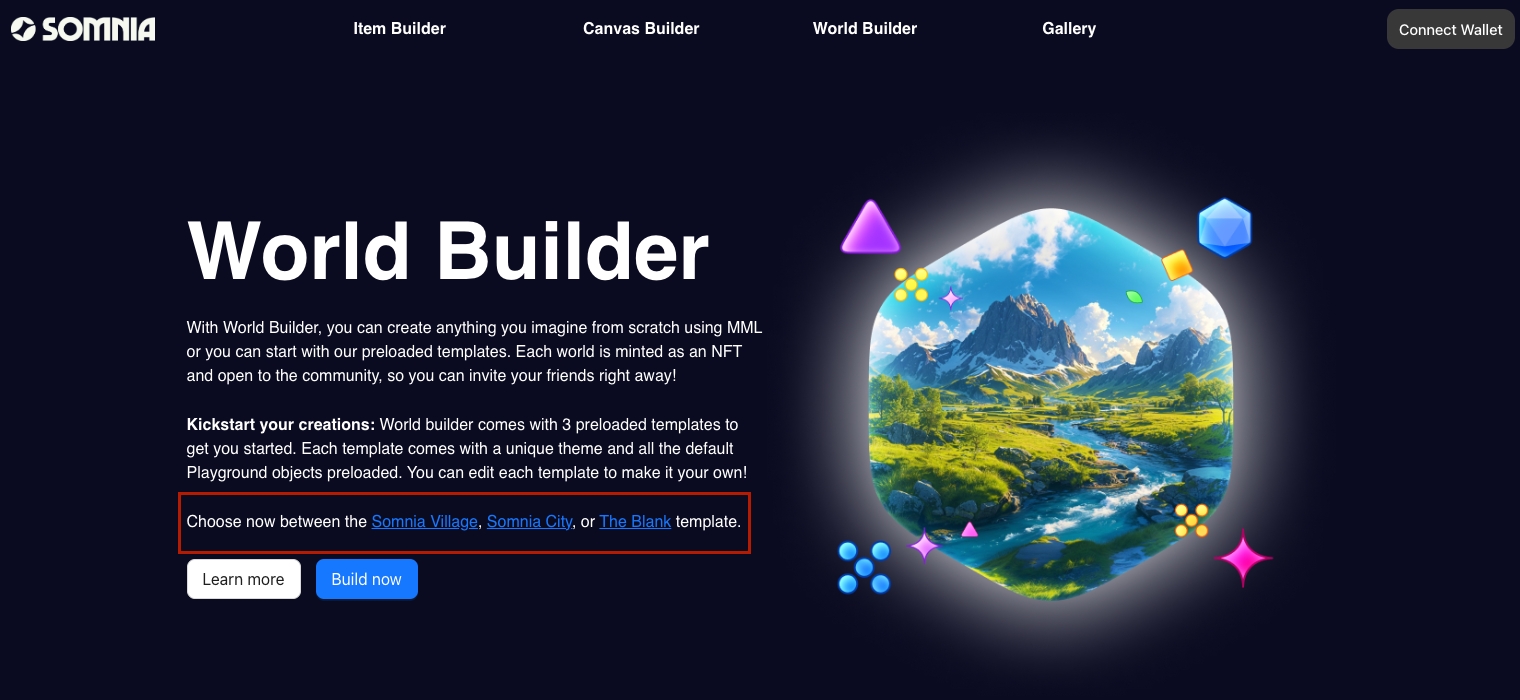
To start, go to the landing page and select one of the three starter projects:
Somnia City - Start from the Somnia City. Customize and create your own cityscape. Somnia Village - Start from the Somnia village. Customize and create your own medieval space. Blank Space - Start from a blank space and build anything you can imagine! In this example we will start from the Somnia city project.
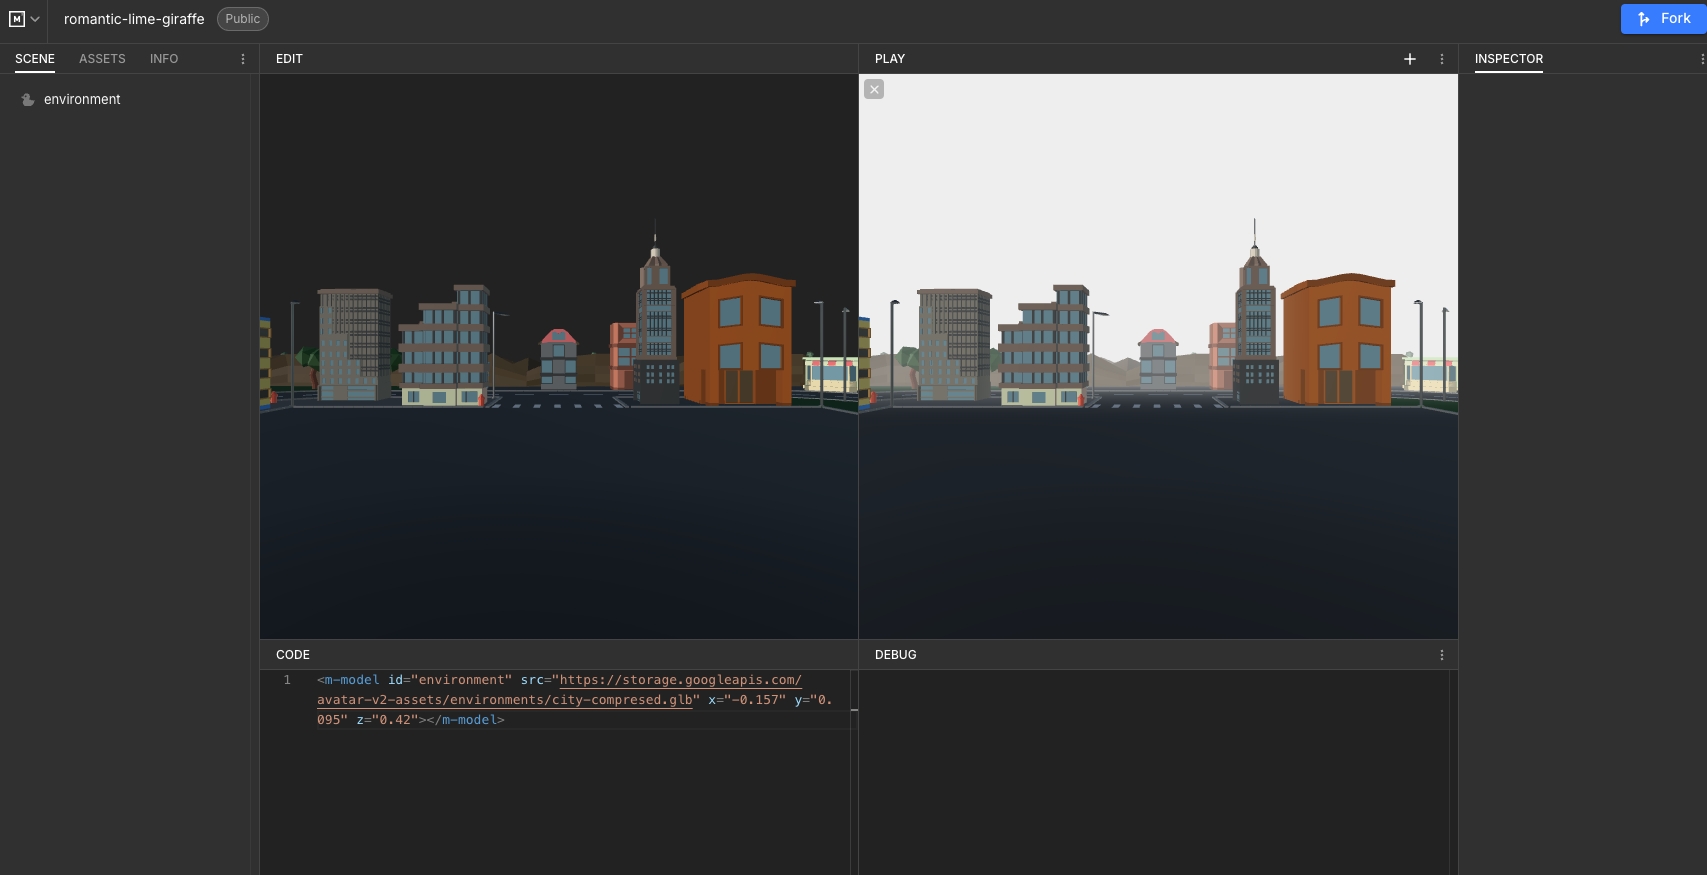
Open the city project in the MML editor and click fork
This will create a version of the City space you can customize. For this tutorial, we are going to place a few preset objects in the space. With the World Builder, you can upload your own assets and add code to create interactive experiences!
Go to the assets tab in the world builder.
Here you will see all the premade assets you can add to the scene. I'm going to add a few palm trees to make the city feel a bit more tropical. To do this click and drag the palmtree.glb into the edit window.
Intially the tree will probably be in a random place. Move it using the location gizmo, which allows you to move it up, down, left, right, forward and back. You click hold and drag to do this.
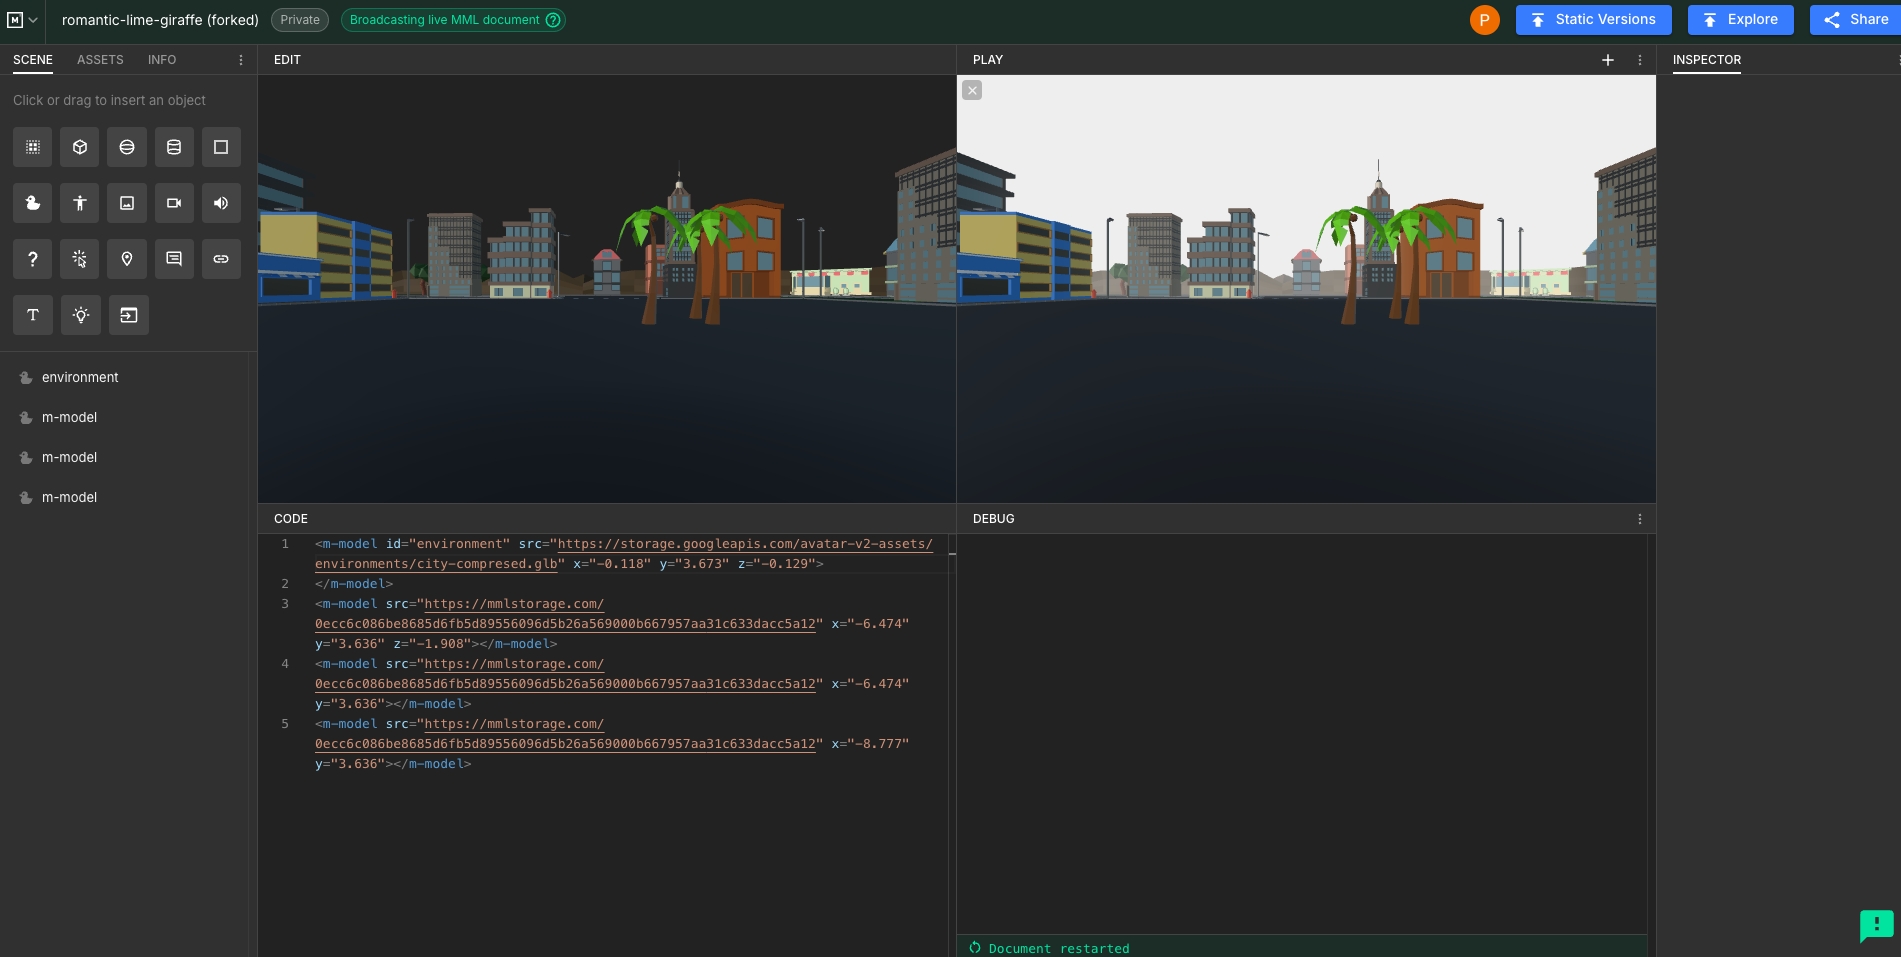
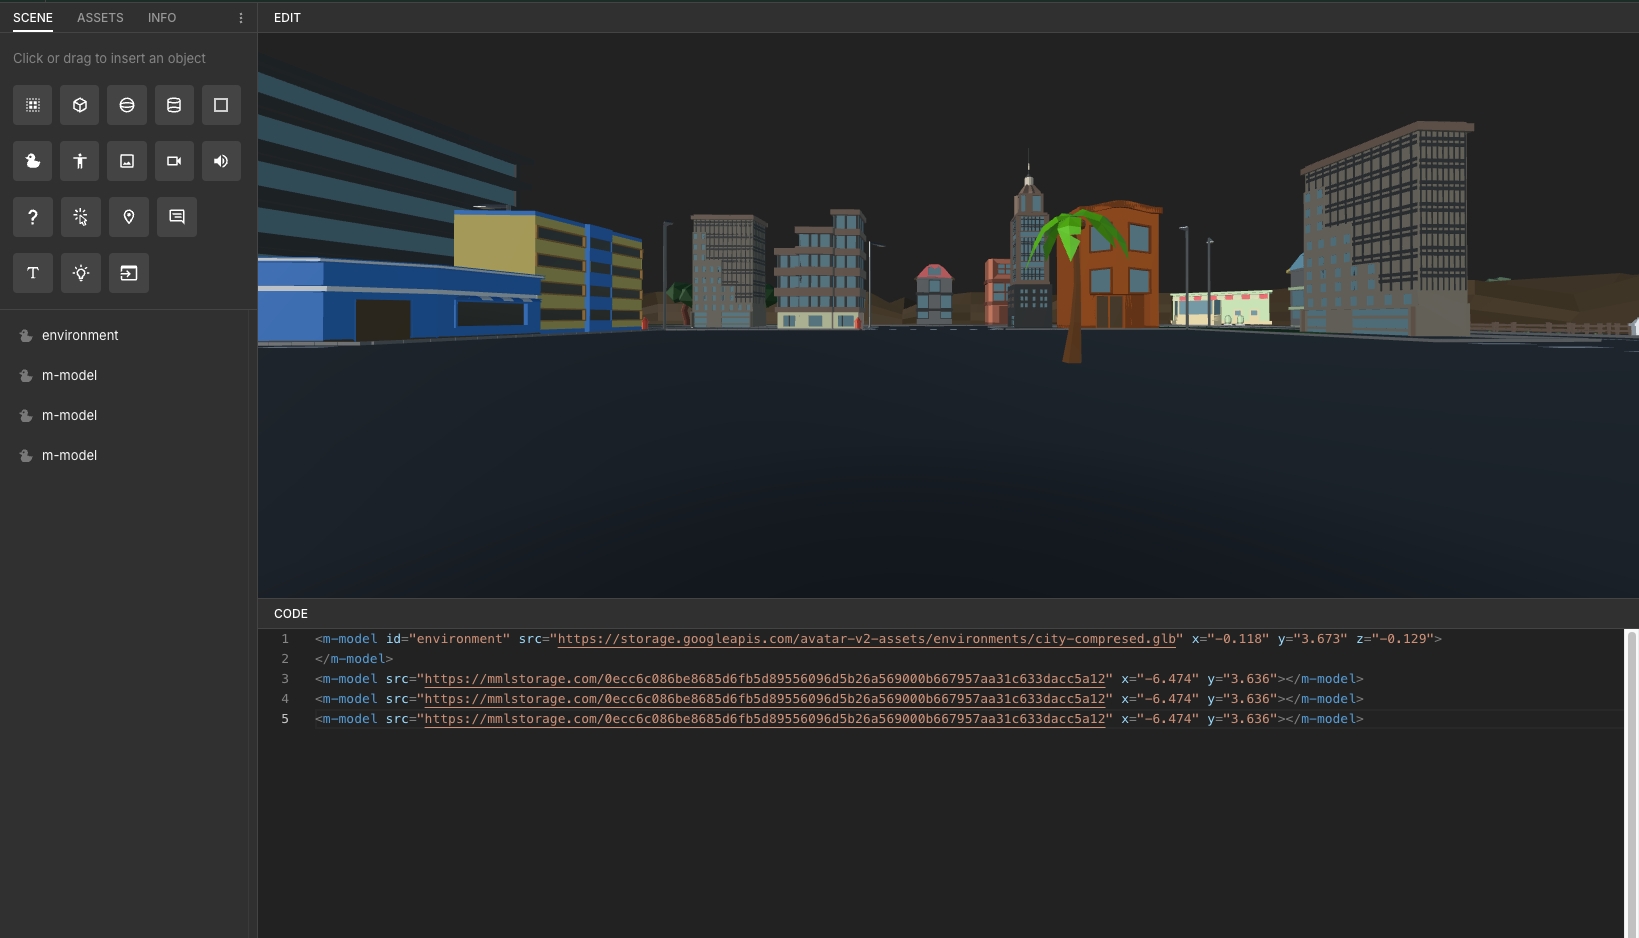
I've now moved the tree into a better position. You will also notice the MML code below has updated to reflect my changes. You can move the tree around by directly updating the code as well. I am now going to go back to the scene view and make a few copies of the tree.
To do this, I will copy and paste the m-model code that references the tree (the second line). This will put three trees in the scene. However, currently, they are all on top of each other!
I will now select the other two trees and move them around to make a little tropical forest.
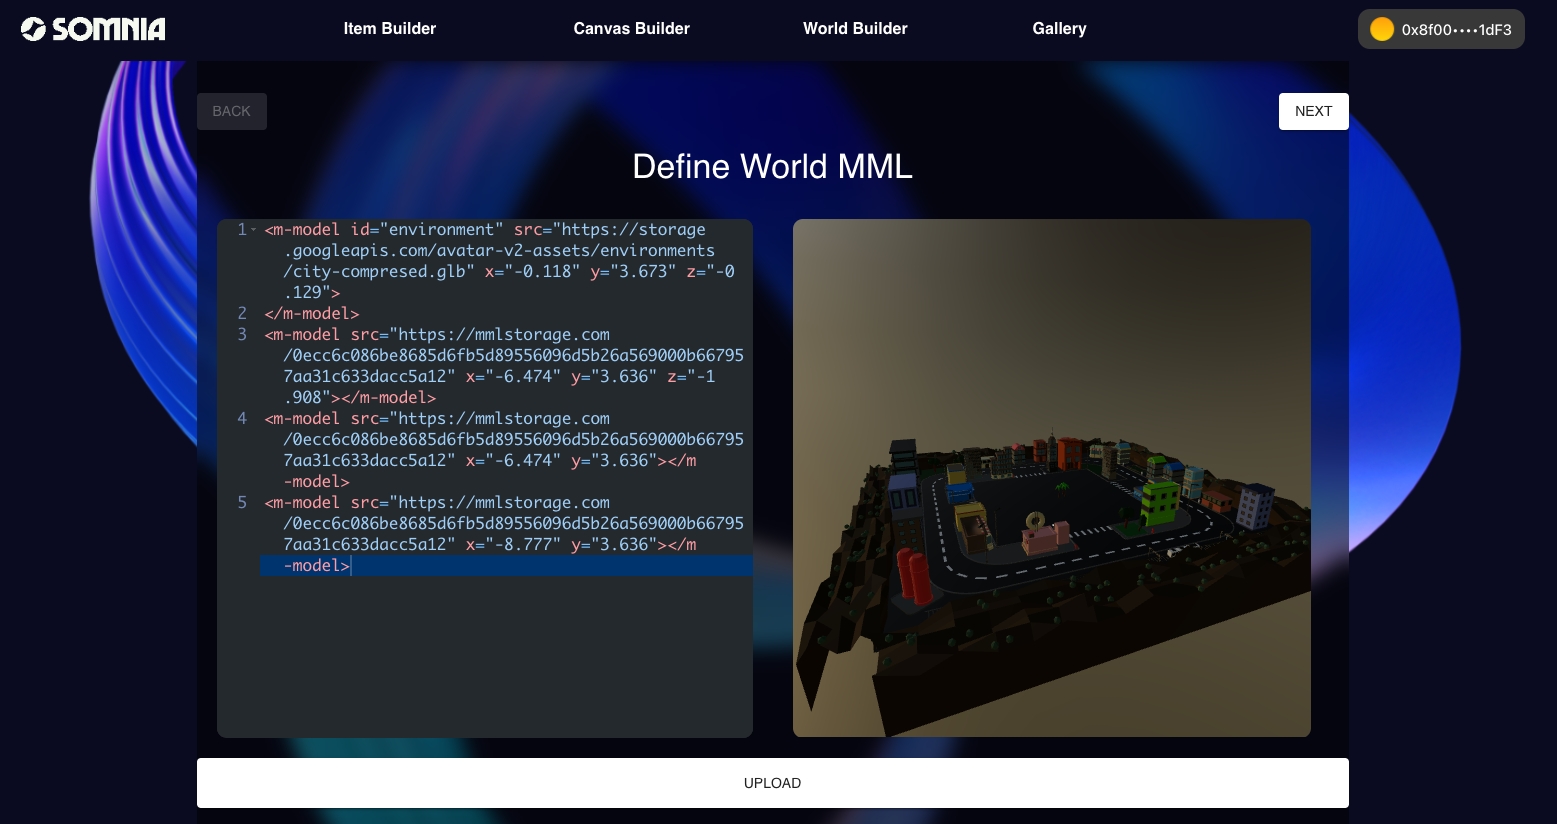
Remember you can move the camera around in the editor window. More detail on this can be found in the mml editor tour. Ok now I've got a cool looking space I'm going to mint it into an NFT and load it into the playground! First copy the mml code of your world. Then go to the world builder app.
Copy the mml code from the editor into the world definition box:
Go through the next step and take a picture of your world:
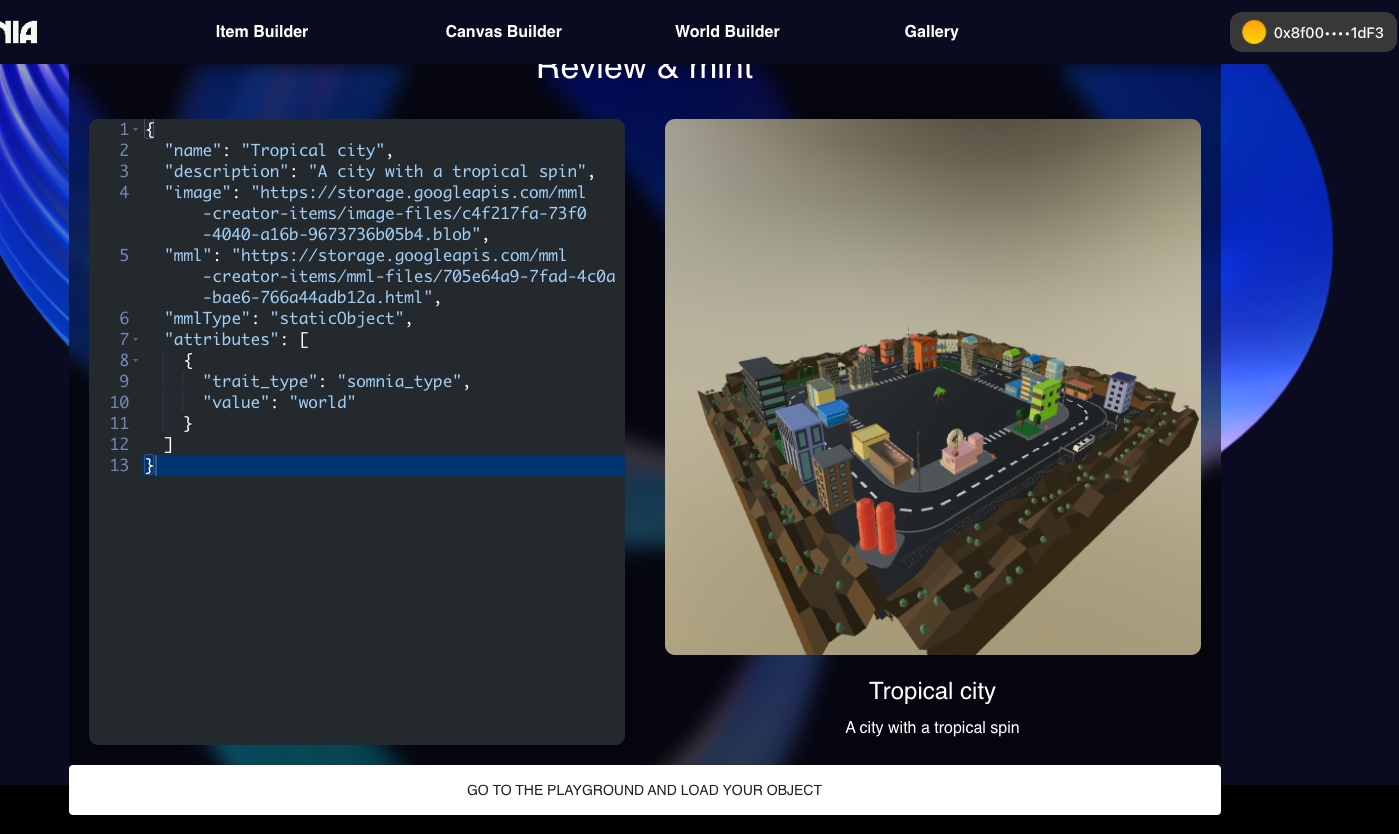
Give your world a name and a description.
Review everything and mint your world. If anything is wrong you can hit back to repeat previous steps.
You will need to confirm the transaction to mint the NFT in your wallet:
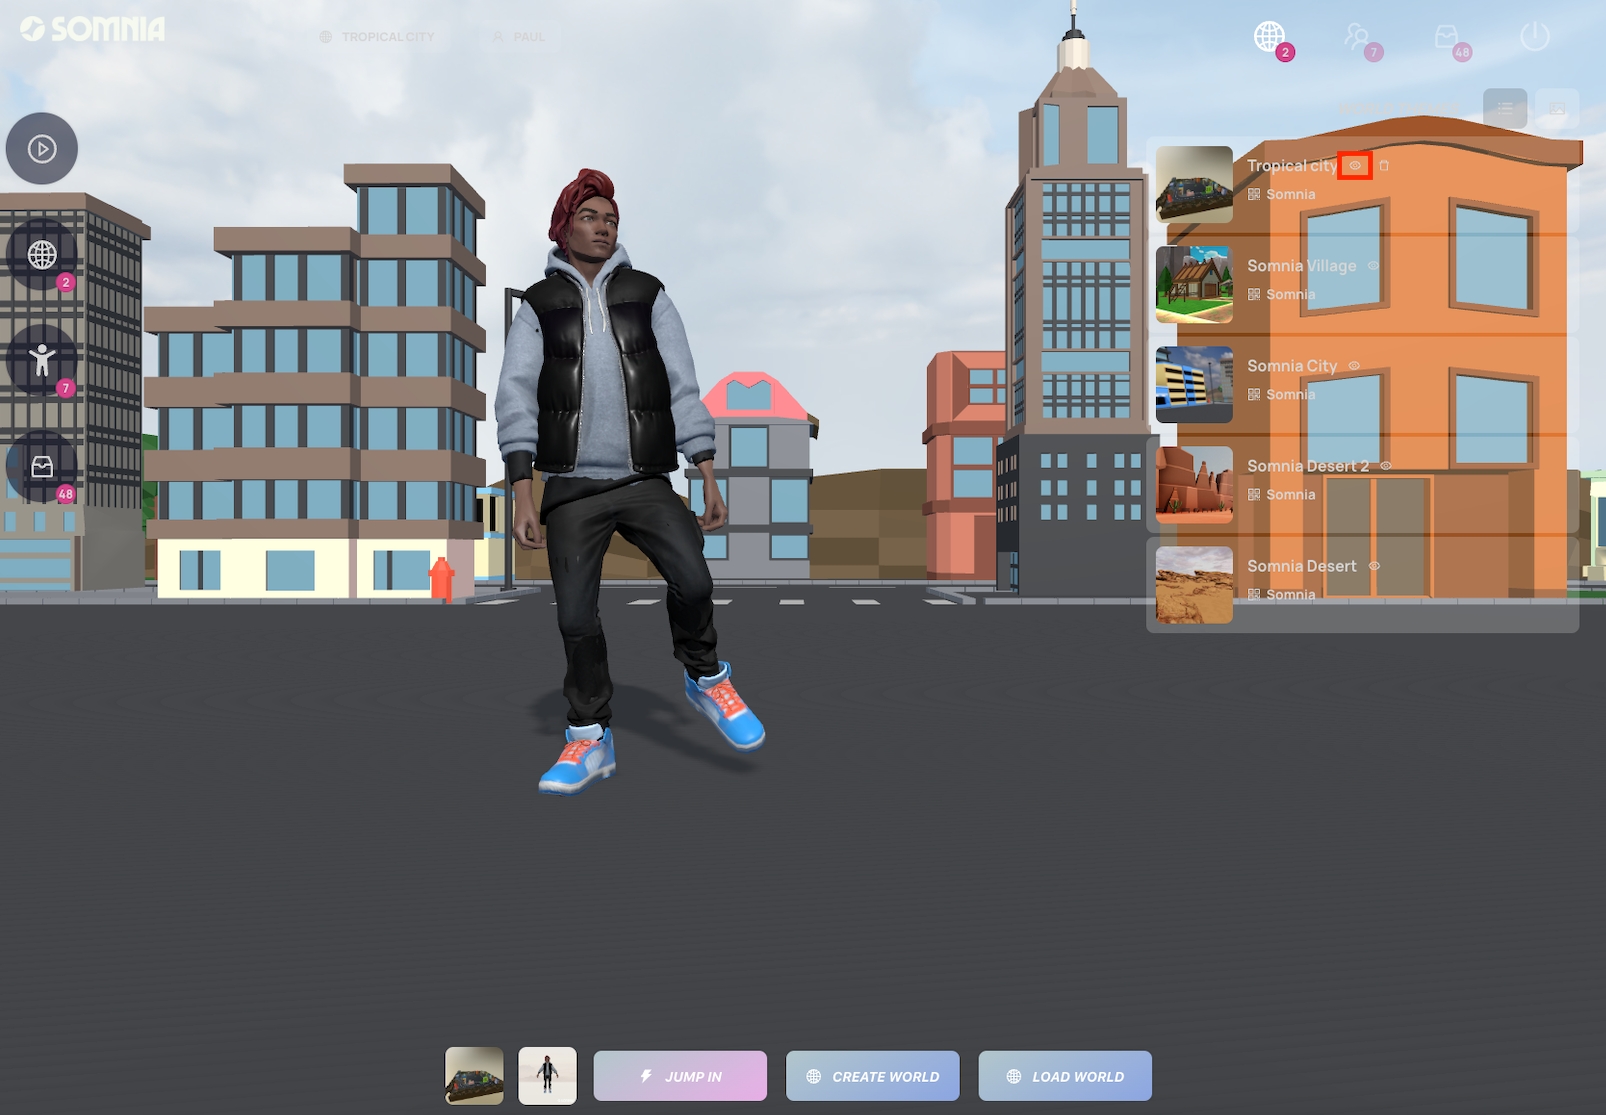
Once minted you can go to the playground and load your world!
Click the button and you will be loaded in the Playground.
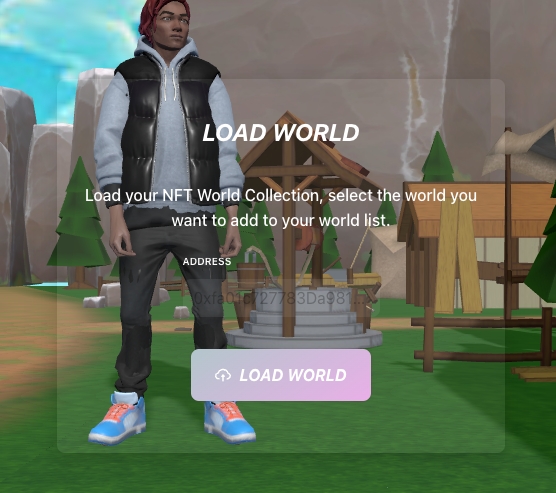
Here click the load world button. You will then be presented with a prompt:
Click the load world button and you will be able to select your custom world from the list!
In this list find your world and click the view world button (the little eye)
Finally click the create world button. This will create a server with your world. You can now click jump in to play or share with the invite url.
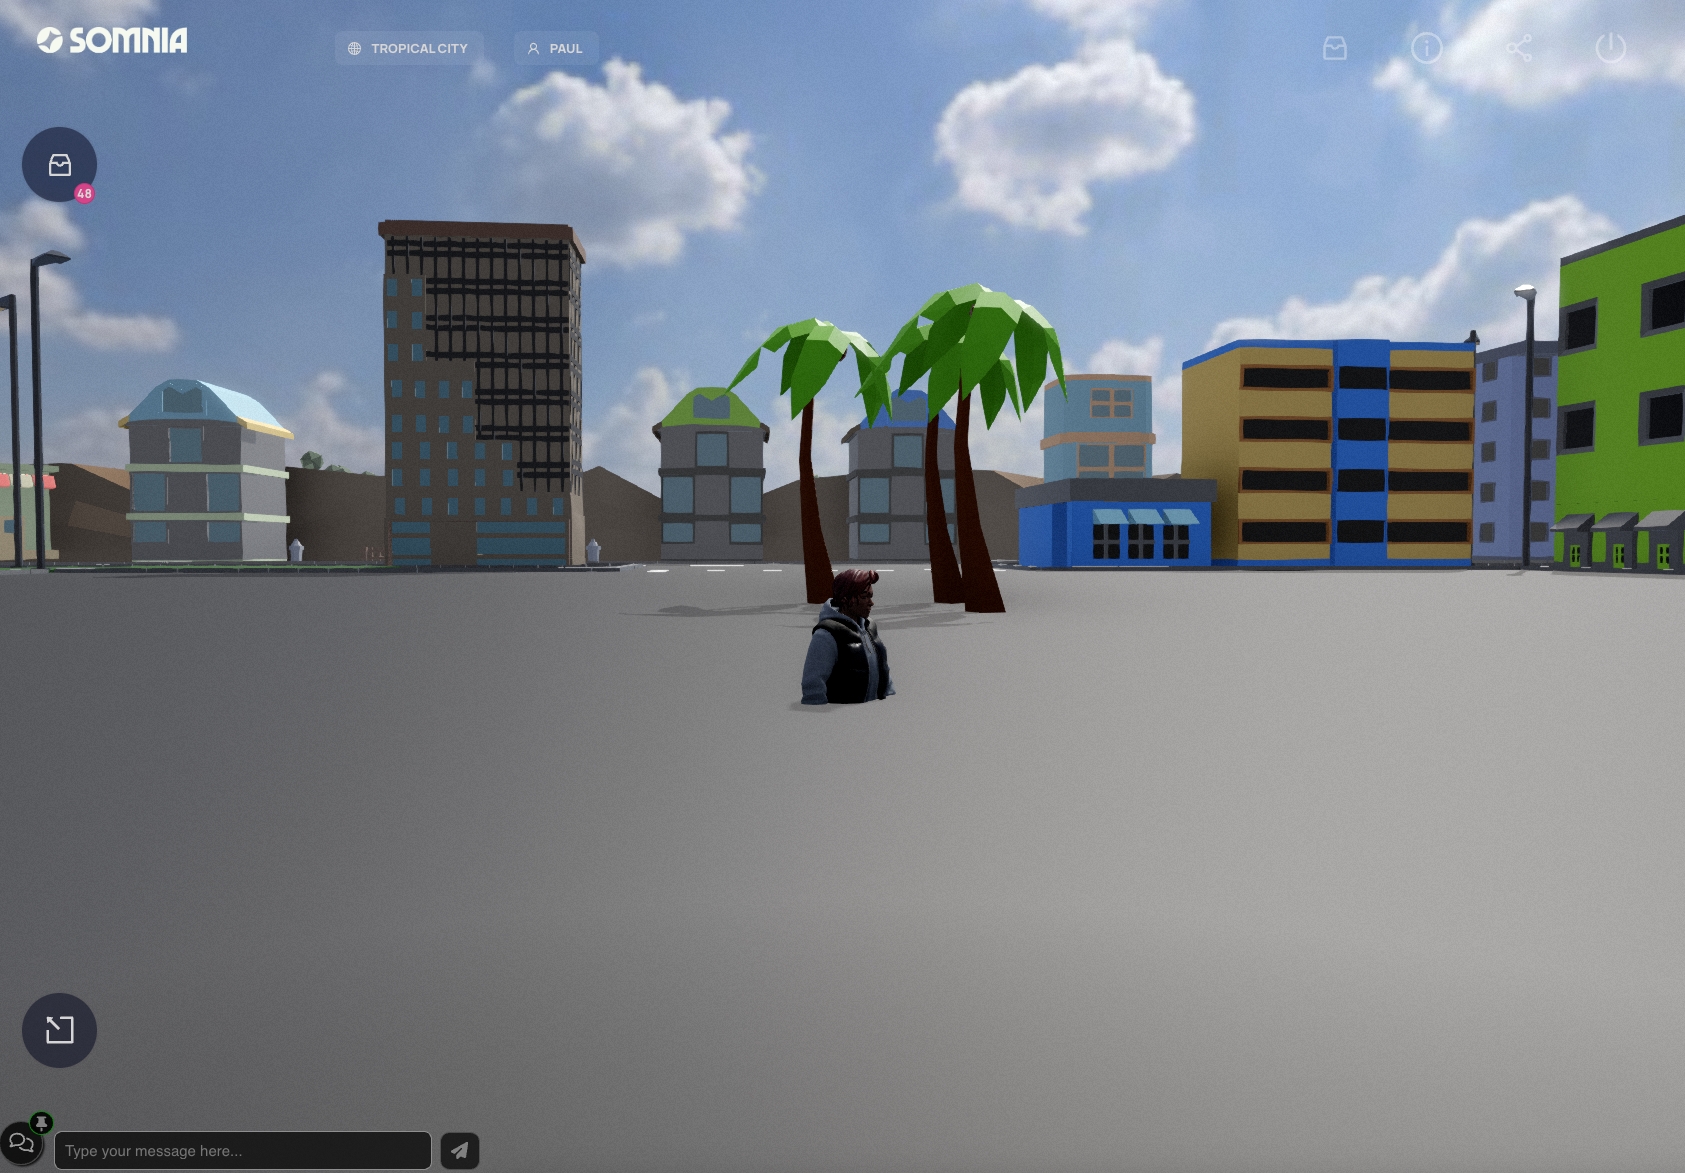
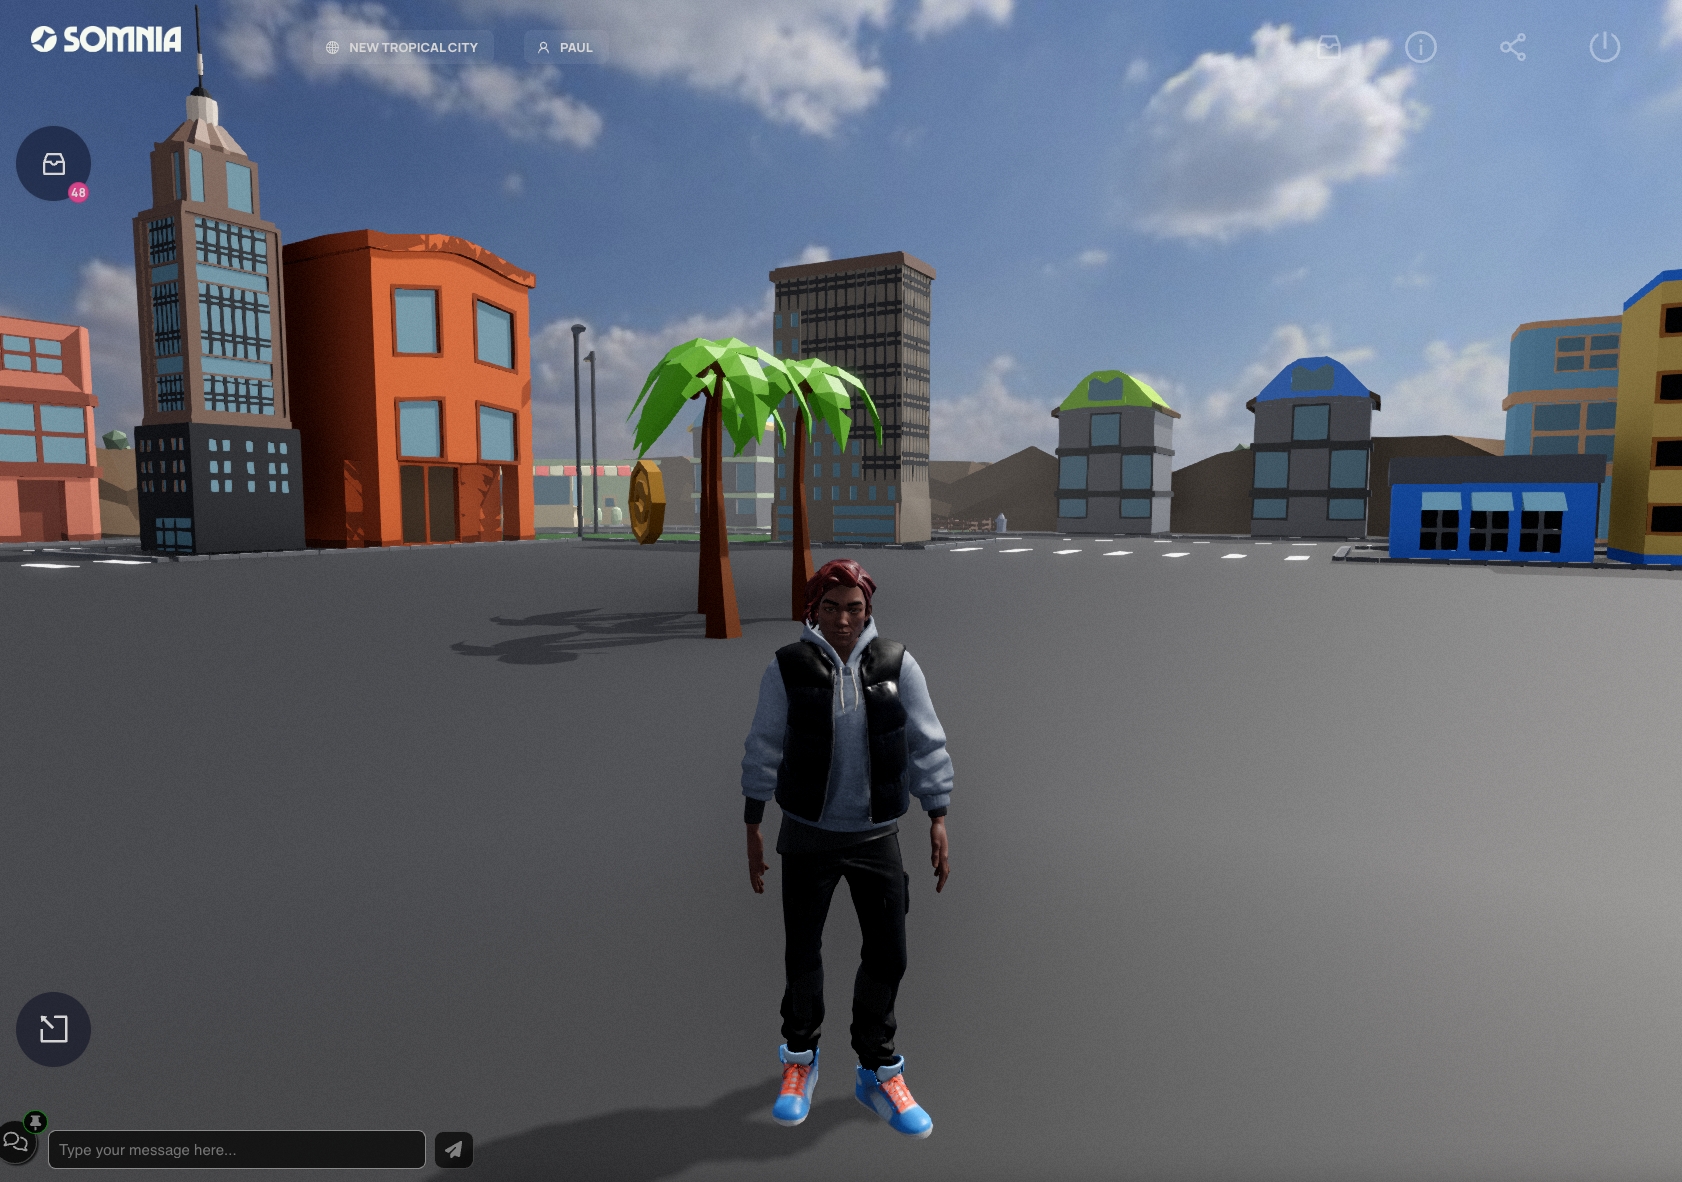
Congratz you are now in your world!
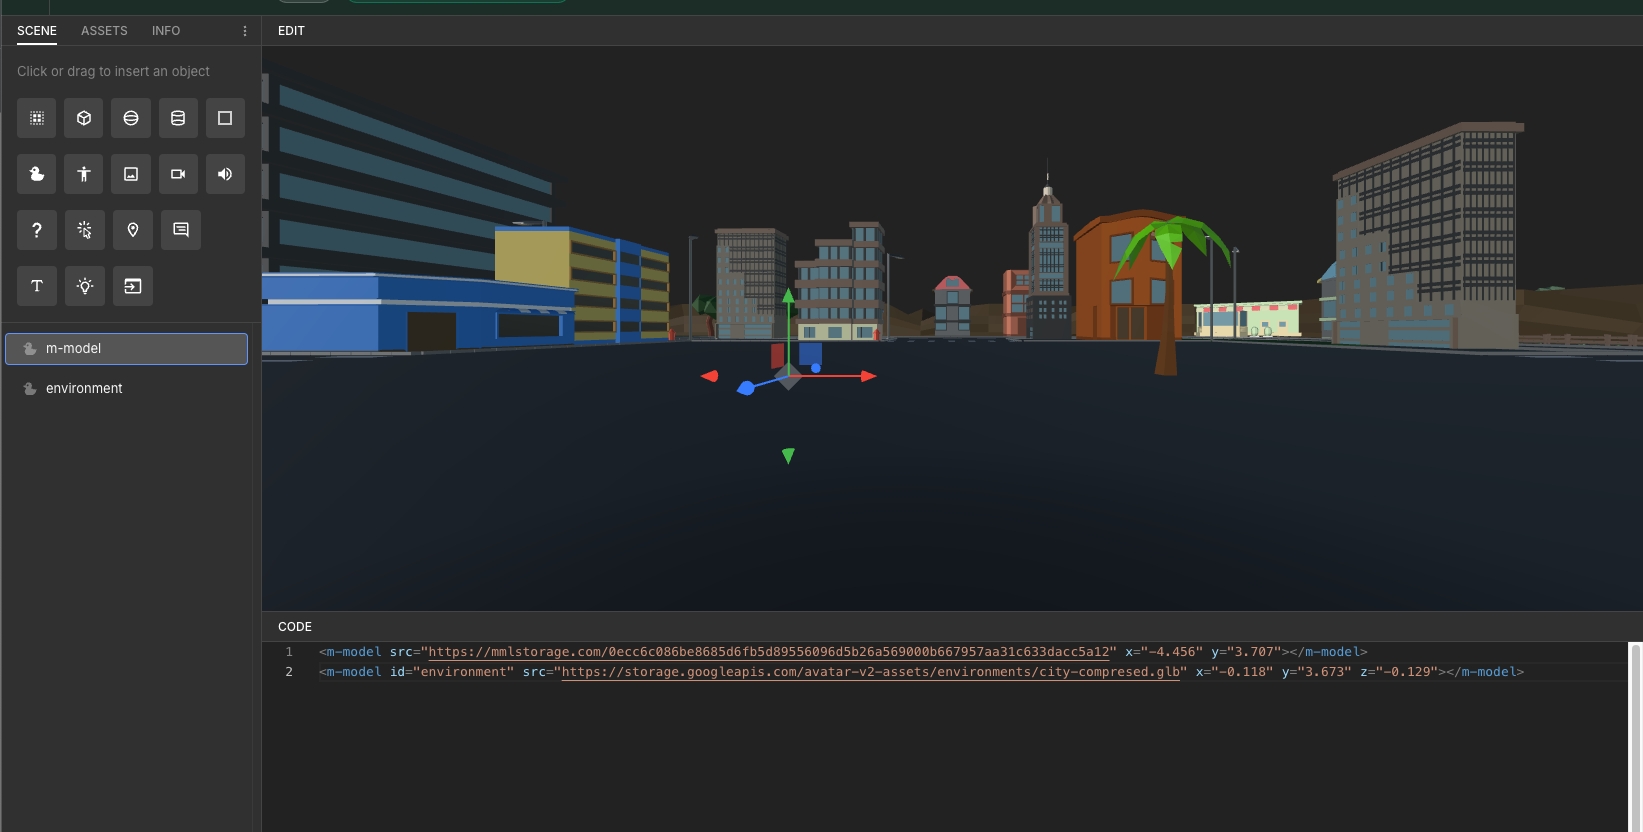
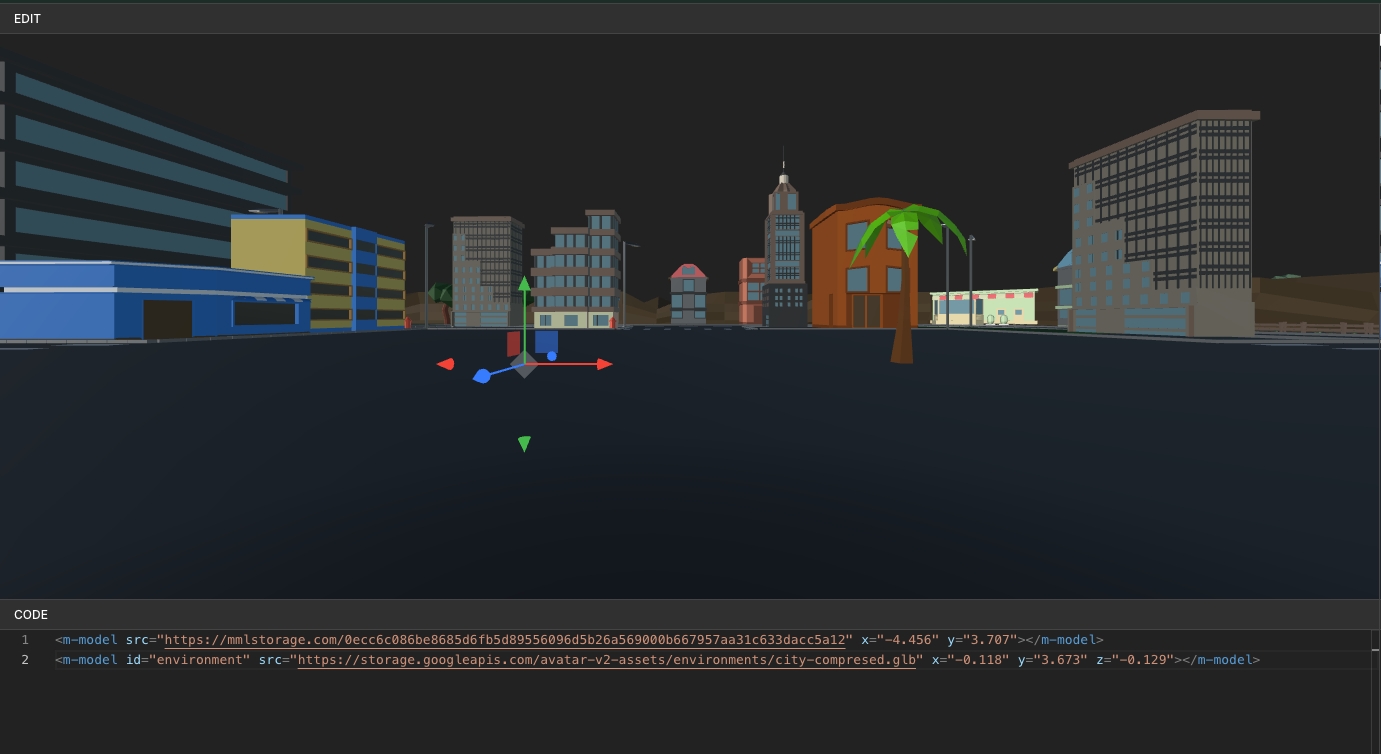
Now you may spawn below the ground of your map. Don't worry this is easy to fix. Go back to your mml project with your world.
Set the y value of all your object to 0. Currently mine look like this:
<m-model id="environment" src="https://storage.googleapis.com/avatar-v2-assets/environments/city-compresed.glb" x
x="-0.118" y="3.673" z="-0.129">
</m-model>
<m-model src="https://mmlstorage.com/0ecc6c086be8685d6fb5d89556096d5b26a569000b667957aa31c633dacc5a12"
x="-6.474" y="3.636" z="-1.908"></m-model>
<m-model src="https://mmlstorage.com/0ecc6c086be8685d6fb5d89556096d5b26a569000b667957aa31c633dacc5a12"
x="-6.474" y="3.636"></m-model>
<m-model src="https://mmlstorage.com/0ecc6c086be8685d6fb5d89556096d5b26a569000b667957aa31c633dacc5a12"
x="-8.777" y="3.636"></m-model>
I will now set all the y value of the objects to 0. This will make my mml look like this:
<m-model id="environment" src="https://storage.googleapis.com/avatar-v2-assets/environments/city-compresed.glb"
x="-0.118" y="0.0" z="-0.129"></m-model>
<m-model src="https://mmlstorage.com/0ecc6c086be8685d6fb5d89556096d5b26a569000b667957aa31c633dacc5a12"
x="-6.474" y="0.0" z="-1.908"></m-model>
<m-model src="https://mmlstorage.com/0ecc6c086be8685d6fb5d89556096d5b26a569000b667957aa31c633dacc5a12"
x="-6.474" y="0.0"></m-model>
<m-model src="https://mmlstorage.com/0ecc6c086be8685d6fb5d89556096d5b26a569000b667957aa31c633dacc5a12"
x="-8.777" y="0.0"></m-model>
You should now see your world slightly down in the scene:
Go and rebuild your world by following the same steps in the minting your world section and playing in your world.
And there you are in your own custom world! Invite your friends, experiment and post stuff in Discord and on Twitter #mysomniaworld
This page has the reference documentation for MML. This can also be found on the mml website https://mml.io/docs/reference
All of the MML Elements with available attributes and examples.
The m-group element can contain other MML tags, allowing all of them to be transformed as single item.
The m-cube element is a primitive 3D cube that can be coloured. It is often used for debugging or initial development purposes.
The m-sphere element is a primitive 3D sphere that can be coloured. It is often used for debugging or initial development purposes.
The m-cylinder element is a primitive 3D cylinder that can be coloured. It is often used for debugging or initial development purposes.
The m-light element is a light that supports various types (e.g. point, spotlight) and can be coloured.
The m-plane element is a primitive 3D plane that can be coloured.
The m-model element is a 3D model. It can be used to load and display various 3D model file formats, such as OBJ, FBX, or GLTF, depending on the rendering engine being used. The model can be positioned, rotated, and scaled within the 3D scene. It also supports animations.
The m-character element is a 3D character. It supports containing other m-model elements, allowing for composing a character from multiple models.
The m-frame element is a 3D frame. It enables composing other MML documents into the document and transforming them as a unit.
The m-audio element is used to play audio in a 3D scene.
The m-image element is used to display an image in a 3D scene.
The m-video element is used to display a video in a 3D scene.
The m-label element is used to display text on a plane in a 3D scene.
The m-position-probe element is used to request the position of a user (either camera or avatar depending upon the experience).
The m-prompt element is used to request a string from the user when the element is clicked in a 3D scene.
The m-interaction element is used to describe an action that a user can take at a point in 3D space.
The m-chat-probe element is used to receive messages from a chat system. Which chat system that is depends on the client implementation.
The m-attr-anim element is used to describe document time-synchronized changes to element attributes.
All of the MML Event types and their properties.
A class that extends Event | Event.
A class that extends Event | Event.
Received when a user clicks on a 3D object.
Received when a user stops colliding with an element.
Received when a user moves the collision point they are colliding at on an element.
Received when a user starts colliding with an element.
Received when a user interacts with an m-interaction.
Received when a user enters the range of an m-position-probe.
Received when a user leaves the range of an m-position-probe after having entered.
Received when a user moves after having entered the range of an m-position-probe.
Received when a user triggers a prompt with a value.
A class that extends Event | Event.
You can go to the mml website to learn more about these comonents ->


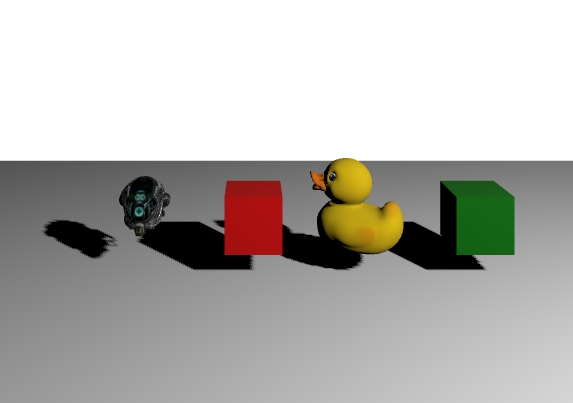
<!-- Battle Damaged Sci-fi Helmet - PBR by theblueturtle_
https://sketchfab.com/models/b81008d513954189a063ff901f7abfe4 -->
<m-model x="-2" collide="true" src="https://public.mml.io/damaged-helmet.glb" z="-2" y="1.2" sx="0.5" sy="0.5" sz="0.5"></m-model>

<m-cube id="clickable-cube" y="1" color="red" collide="true" z="-2"></m-cube>

<m-model x="2" z="-2" id="duck" src="https://public.mml.io/duck.glb"
         y="0.37872010769124587" collide="true">
  <m-attr-anim attr="ry" start="0" end="360" duration="3000"></m-attr-anim>
</m-model>

<m-cube id="color-cube" x="4" y="1" width="1" color="green"
        collide="true" z="-2" castshadow="true"></m-cube>

<script>
  const clickableCube = document.getElementById("clickable-cube");
  clickableCube.addEventListener("click", () => {
    clickableCube.setAttribute("color", `#${Math.floor(Math.random() * 16777215).toString(16)}`);
  });
</script>
Interactive web page -> https://mml.io/examples?example=Basic%20Scene


<m-model id="dice" src="https://public.mml.io/dice.glb" y="1" collide="true" onclick="rollDice()">
  <m-attr-anim id="rx" attr="rx" ping-pong="false" easing="linear" start="0" end="0" loop="false" start-time="0" duration="1"></m-attr-anim>
  <m-attr-anim id="ry" attr="ry" ping-pong="false" easing="linear" start="0" end="0" loop="false" start-time="0" duration="1"></m-attr-anim>
  <m-attr-anim id="rz" attr="rz" ping-pong="false" easing="linear" start="0" end="0" loop="false" start-time="0" duration="1"></m-attr-anim>
  <m-attr-anim id="y" attr="y" ping-pong="false" easing="linear" start="1" end="1" loop="false" start-time="0" duration="1"></m-attr-anim>
</m-model>
<script>
  let rolling = false;
  let rollResult = 1;
  let rollDuration = 750;
  let rollHeight = 3.1;

  function radToDeg(radians) {
    return radians * (180 / Math.PI);
  }

  function animate(attr, easing, targetRotation, duration) {
    rolling = true;
    const mAttrAnim = document.getElementById(attr);
    const newStart = mAttrAnim.getAttribute("end");
    mAttrAnim.setAttribute("easing", easing);
    mAttrAnim.setAttribute("start", newStart);
    mAttrAnim.setAttribute("end", targetRotation);
    mAttrAnim.setAttribute("loop", "false");
    mAttrAnim.setAttribute("duration", duration);
    mAttrAnim.setAttribute("start-time", document.timeline.currentTime);
    setTimeout(() => {
      rolling = false;
    }, duration + 10);
  }

  function rollDice() {
    if (rolling) return;
    const rollMap = {
      1: {
        rx: 0,
        ry: 0,
        rz: 0
      },
      2: {
        rx: 0,
        ry: 0,
        rz: radToDeg(-Math.PI / 2)
      },
      3: {
        rx: radToDeg(-Math.PI / 2),
        ry: 0,
        rz: 0
      },
      4: {
        rx: radToDeg(Math.PI / 2),
        ry: 0,
        rz: 0
      },
      5: {
        rx: 0,
        ry: 0,
        rz: radToDeg(Math.PI / 2)
      },
      6: {
        rx: radToDeg(Math.PI),
        ry: 0,
        rz: 0
      },
    };
    const diceElement = document.getElementById("dice");

    let newRoll = Math.floor(Math.random() * 6) + 1;
    while (newRoll === rollResult) {
      newRoll = Math.floor(Math.random() * 6) + 1;
    }
    rollResult = newRoll;

    const targetRotation = rollMap[rollResult];
    const startRotation = {
      rx: parseFloat(diceElement.getAttribute("rx")),
      ry: parseFloat(diceElement.getAttribute("ry")),
      rz: parseFloat(diceElement.getAttribute("rz")),
    };

    animate("rx", "easeOutCubic", targetRotation.rx, rollDuration);
    animate("ry", "easeOutCubic", targetRotation.ry, rollDuration);
    animate("rz", "easeOutCubic", targetRotation.rz, rollDuration);
    animate("y", "easeOutQuint", rollHeight, rollDuration * 0.35);
    setTimeout(() => {
      animate("y", "easeOutBounce", 1, rollDuration * 0.65);
    }, rollDuration * 0.35);
  }
</script>
Interactive web page -> https://mml.io/examples?example=Dice

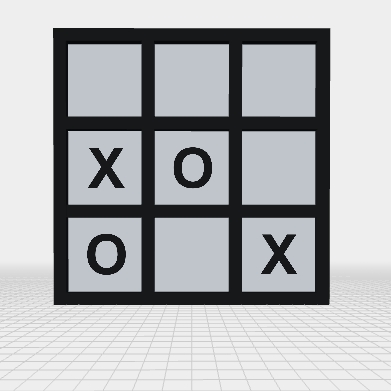
<m-group id="board" z="-20" y="0">
  <m-label id="winner" width="22" y="-5" height="5" content="" font-size="200" alignment="center"></m-label>

  <!--  horizontal lines -->
  <m-cube id="line-horizontal-1" width="22" z="1" y="21.5" color="black"></m-cube>
  <m-cube id="line-horizontal-2" width="22" z="1" y="14.5" color="black"></m-cube>
  <m-cube id="line-horizontal-3" width="22" z="1" y="7.5" color="black"></m-cube>
  <m-cube id="line-horizontal-4" width="22" z="1" y="0.5" color="black"></m-cube>

  <!--  vertical lines -->
  <m-cube id="line-vertical-1" height="22" z="1" x="-10.5" y="11" color="black"></m-cube>
  <m-cube id="line-vertical-2" height="22" z="1" x="-3.5" y="11" color="black"></m-cube>
  <m-cube id="line-vertical-3" height="22" z="1" x="3.5" y="11" color="black"></m-cube>
  <m-cube id="line-vertical-4" height="22" z="1" x="10.5" y="11" color="black"></m-cube>

  <!--  interactive cubes -->
  <!--  first row -->
  <m-label id="cell-1" width="6" height="6" x="-7" y="18" z="1" font-size="450" color="#ffffff" alignment="center"></m-label>
  <m-label id="cell-2" width="6" height="6" x="0" y="18" z="1" font-size="450" color="#ffffff" alignment="center"></m-label>
  <m-label id="cell-3" width="6" height="6" x="7" y="18" z="1" font-size="450" color="#ffffff" alignment="center"></m-label>

  <!--  second row -->
  <m-label id="cell-4" width="6" height="6" x="-7" y="11" z="1" font-size="450" color="#ffffff" alignment="center"></m-label>
  <m-label id="cell-5" width="6" height="6" x="0" y="11" z="1" font-size="450" color="#ffffff" alignment="center"></m-label>
  <m-label id="cell-6" width="6" height="6" x="7" y="11" z="1" font-size="450" color="#ffffff" alignment="center"></m-label>

  <!--  third row -->
  <m-label id="cell-7" width="6" height="6" x="-7" y="4" z="1" font-size="450" color="#ffffff" alignment="center"></m-label>
  <m-label id="cell-8" width="6" height="6" x="0" y="4" z="1" font-size="450" color="#ffffff" alignment="center"></m-label>
  <m-label id="cell-9" width="6" height="6" x="7" y="4" z="1" font-size="450" color="#ffffff" alignment="center"></m-label>
</m-group>

<script>
  let isGameOver = false;
  // Create tic-tac-toe board status
  let board = [
    ["", "", ""],
    ["", "", ""],
    ["", "", ""],
  ];

  const label = document.querySelector("#winner");

  // Track current player
  let currentPlayer = "X";

  const setMove = (selectedCell) => {
    selectedCell.setAttribute("content", currentPlayer);
  }

  // Function to update board status
  function updateBoard(x, y, player) {
    board[y][x] = player;
  }

  // Function to check for a win
  function checkForWin() {
    const winConditions = [
      [
        [0, 0],
        [1, 0],
        [2, 0]
      ], // rows
      [
        [0, 1],
        [1, 1],
        [2, 1]
      ],
      [
        [0, 2],
        [1, 2],
        [2, 2]
      ],
      [
        [0, 0],
        [0, 1],
        [0, 2]
      ], // columns
      [
        [1, 0],
        [1, 1],
        [1, 2]
      ],
      [
        [2, 0],
        [2, 1],
        [2, 2]
      ],
      [
        [0, 0],
        [1, 1],
        [2, 2]
      ], // diagonals
      [
        [0, 2],
        [1, 1],
        [2, 0]
      ],
    ];

    return winConditions.some(condition =>
      condition.every(([x, y]) => board[y][x] === currentPlayer)
    );
  }

  function resetBoard() {
    isGameOver = false;
    board = [
      ["", "", ""],
      ["", "", ""],
      ["", "", ""],
    ];
    const boardNode = document.getElementById("board");
    const labels = boardNode.querySelectorAll("m-label");
    labels.forEach((child) => {
      child.setAttribute("content", "");
    });
  }

  // Add click event listeners to cubes
  for (let y = 0; y < 3; y++) {
    for (let x = 0; x < 3; x++) {
      const cell = document.getElementById(`cell-${y * 3 + x + 1}`);
      cell.addEventListener("click", () => {
        if (isGameOver) return;

        if (board[y][x] === "") {
          // Update board status
          updateBoard(x, y, currentPlayer);
          setMove(cell)

          // Visualize move
          cell.textContent = currentPlayer;

          // Check for win
          if (checkForWin()) {
            isGameOver = true;
            label.setAttribute("content", `${currentPlayer} wins!
Click to restart!`);
            label.addEventListener("click", () => {
              resetBoard();
            });
            return;
          }

          // Check for tie
          if (board.every(row => row.every(cell => cell !== ""))) {
            isGameOver = true;
            label.setAttribute("content", "It's a tie!\nClick to restart!");
            label.addEventListener("click", () => {
              resetBoard();
            });
            return;
          }

          // Switch players
          currentPlayer = currentPlayer === "X" ? "O" : "X";

        }
      });
    }
  }
</script>
<m-light type="point" x="10" y="10" z="10"></m-light>
MML Project -> https://mmleditor.com/projects/solar-purple-rodent-rJro1o


<m-label id="latitude" content="latitude" y="4.5" font-size="50" width="5.5" alignment="center" height="1" color="#dddddd"></m-label>
<m-label id="longitude" content="longitude" y="3.5" font-size="50" width="5.5" alignment="center" height="1" color="#dddddd"></m-label>
<m-label id="windspeed" content="wind speed" x="0" y="2.5" font-size="60" width="11" alignment="center" height="1" color="#dddddd"></m-label>
<m-label id="temperature" content="temperature" x="0" y="1.5" font-size="60" width="11" alignment="center" height="1" color="#dddddd"></m-label>
<m-label id="weather" content="weather" x="0" y="0.5" font-size="60" width="11" alignment="center" height="1" color="#ddddff"></m-label>
<script>
const latLabel = document.getElementById("latitude");
const longLabel = document.getElementById("longitude");
const windSpeedLabel = document.getElementById("windspeed");
const temperatureLabel = document.getElementById("temperature");
const weatherLabel = document.getElementById("weather");
const weatherCode = {
0: "Clear sky",
1: "Mainly clear",
2: "Partly cloudy",
3: "Overcast",
45: "Fog",
48: "Depositing rime fog",
51: "Light drizzle",
53: "Moderate drizzle",
55: "Dense drizzle",
56: "Light freezing drizzle",
57: "Dense freezing drizzle",
61: "Light rain",
63: "Moderate rain",
65: "Heavy rain",
66: "Light freezing rain",
67: "Heavy freezing rain",
71: "Light snow fall",
73: "Moderate snow fall",
75: "Heavy snow fall",
77: "Snow grains",
80: "Light rain showers",
81: "Moderate rain showers",
82: "Violent rain showers",
85: "Light snow showers",
86: "Heavy snow showers",
95: "Thunderstorm",
96: "Thunderstorm",
97: "Thunderstorm",
98: "Thunderstorm",
99: "Thunderstorm",
};
async function fetchAPIData() {
const latitude = 51.5;
const longitude = 0.11;
const res = await fetch(
`https://api.open-meteo.com/v1/forecast?latitude=${latitude}&longitude=${longitude}¤t_weather=true&hourly=temperature_2m,relativehumidity_2m,windspeed_10m`,
);
const json = await res.json();
latLabel.setAttribute("content", `Latitude: ${latitude}°N`);
longLabel.setAttribute("content", `Longitude: ${longitude}°W`);
const floatTemp = parseFloat(json["current_weather"].temperature);
const color = floatTemp > 15 ? (floatTemp > 25 ? "#ffcccc" : "#ccffcc") : "#ccccff";
const temperature = `${floatTemp}°C`;
temperatureLabel.setAttribute("content", `Temp: ${temperature}`);
temperatureLabel.setAttribute("color", color);
const windSpeed = `${json["current_weather"].windspeed} km/h`;
windSpeedLabel.setAttribute("content", `Wind: ${windSpeed}`);
const weather = parseInt(json["current_weather"].weathercode);
weatherLabel.setAttribute("content", weatherCode[weather]);
}
fetchAPIData();
setInterval(() => {
fetchAPIData();
}, 5 * 60 * 1000);
</script>